Faculty: What's New Archives
| Site: | Southern Oregon University |
| Course: | Southern Oregon University |
| Book: | Faculty: What's New Archives |
| Printed by: | |
| Date: | Saturday, June 13, 2026, 3:23 AM |
Description
This book contains information about changes to Moodle.
Table of contents
- What's new next chapter
- What's New in 4.1 Preview & Link
- What's New in 3.11
- What's New in 3.10
- What's new in 3.8
- What's New in 3.6
- What's New in 3.5
- Welcome to 3.5!
- Enhanced Navigation: Course Elements
- Enhanced Navigation: "More..." Class Listing
- Banners in the Dashboard
- Add a Custom Image
- Recording in Atto
- Record a Comment
- File Type Selector
- Participant View Changes
- Add a User
- Tagged Quiz Questions
- Add Tags to Questions
- Add Tagged Questions to a Quiz
- Group Choice
- Basics Guide to 3.3!
- Cool New Features in 3.3
- What's New in 3.2!
- Our New Look!
- Changes in Gradebook View
- Course Evaluation Links
- Course Format Option
- Assignments: Due Date Overrides
- Assignments: Required File Types
- Advanced Grading: Checklists
- Forums: "Discussion" Locking
- Choice: Select for Student
- Bonus Tip: Assignment Downloads
- VeriCite Update
- What's New in 3.1!
- Overview
- New: Recycle Bin!
- New: Assignment Grading Interface
- New: VeriCite Plagiarism Checker
- New: Pin a Forum Post
- New: Tag Course Concepts
- New: Edit Section Names
- New: Competencies
- New: Grade Recalculation Message
- Download Folder Option
- Intro to 3.0
- New! Checklist Tool
- Update! Attendance Setup
- Edit Sections
- Display File Info
- Set Up Gradebook
- Filter Users by Group
- Duplicate Rubric Criterion
- Create New Question Types
- Welcome to 2.9!
- Drag & Drop Images
- Section Deletion
- Grade to Pass
- Quiz Layout
- Group Settings
- Attendance Settings, Part 1
- Attendance Settings, Part 2
- Choice Option Preview
- Introducing the "Dashboard"
- Welcome to Moodle 2.8!
- Quiz Enhancements
- Grade Book Overhaul
- NEW: File Attachments for Assignment Links
- NEW: Zoom Web Conferencing
- Multi-Choice Polls
- Hidden Sections
- Forum Display
- Enrollment Changes
What's new next chapter
Add new chapter when updating.
What's New in 4.1 Preview & Link
Moodle is getting a new look just in time for the holidays! We're upgrading from version 3.11 to 4.1.
This upgrade is going to change our interface significantly, but after the first click, things will generally work just as we are used to. In addition to this video, you can read about the upcoming changes and request a user account in our test site if you'd like to get a jump start on getting familiar with the new version.
You don't need to do anything to prepare—all of your content will migrate with the upgrade. Let me know if you have questions at wilsonh@sou.edu.
What's New in 3.11
 Up, Up and Away!
Moodle 3.11 features just a few changes to how Moodle looks, but doesn't represent a major change in how we do our work online.
Read on to learn more!
Due Dates & Completion Tracking
In version 3.11, any due date set for an item can be displayed on the course page under the activity title. This setting is not currently activated by default. See Display Options: Due Dates for
how to show due dates on your course page.
The checkboxes used to track completion of course activities have been moved to the left side of the page. By hovering over a checkbox, you
can see what the requirement is to have the box checked off. In the student view, items that can be manually checked off by students ("Mark as done") are represented by a solid gray checkbox.
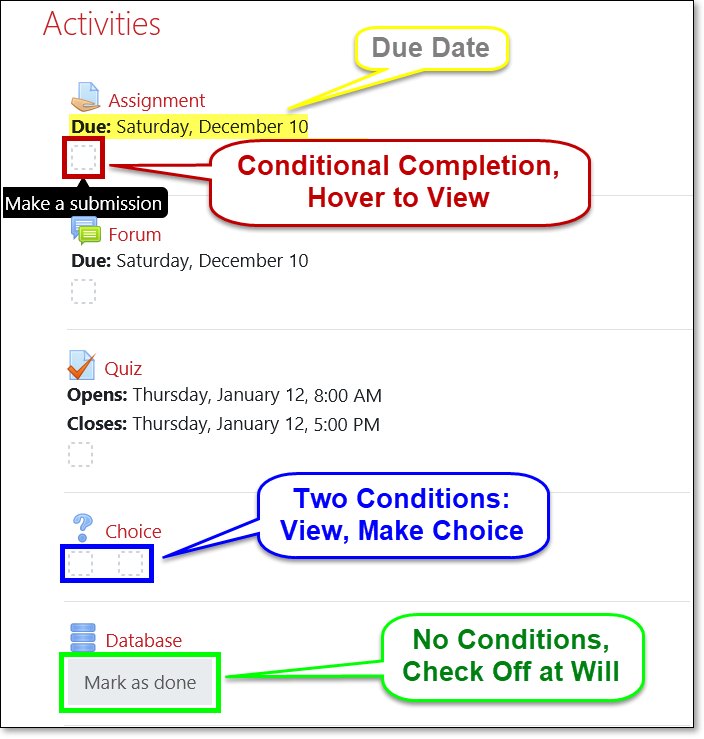
As shown in this image, some items may show multiple conditions that must be met in order to be shown as completed. If you want to simplify the display, turn off the "View" condition when you create an item. (See the guide to completion tracking linked above for more information.)
TIP: Update completion settings for multiple items at once or set default conditions for new activities in your course by following this guide for creating bulk completion settings.
NOTE: The campus course template has been updated to include common settings for completion tracking. In future terms, any new items you add will include those default settings when you create them.
Student Views
Here's how completion tracking and due dates look to students:
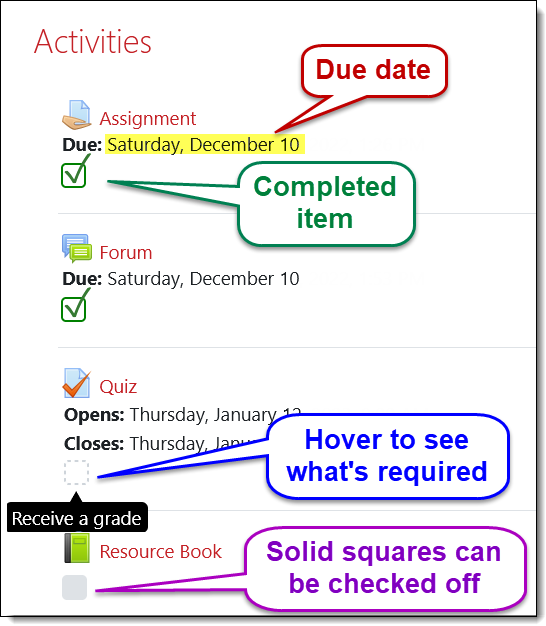
Due dates and completion settings are also displayed within the activity when it is opened; if an item is set for manual completion, learners can check the box from within the activity.
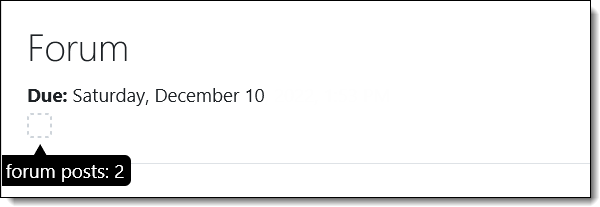
Here's what a forum with a due date looks like when you open it and hover over the completion checkbox:
Display Options: Completion
Having completion settings shown on the main course page is the default preference, but you can turn them off there if you wish. Note that if this option is turned off on the main course page, completion tracking icons will still be shown when learners open an activity.
To turn off the display, click on the course admin gear in the upper right corner and select Edit settings. Scroll down to change the Show activity completion conditions to No in the Completion tracking section.
(Note: Please do not disable completion tracking completely from your course as many students rely on it to help them keep track of what they have done and still need to do.) NOTE: The "Mark as done" boxes
will continue to be displayed even if you change this setting to No—because there aren't any conditions attached to them. (Remember, this is all Moodle's idea, not ours!)
![]()
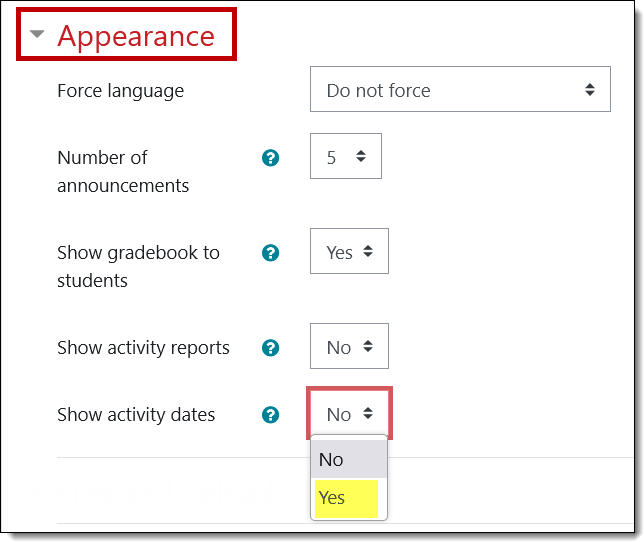
Display Options: Due Dates
To display due dates on your course page, open the course admin gear and select Edit settings. Open the Appearance options area and select Yes in the Show activity dates field. (This will be
activated for future terms within the course template.)
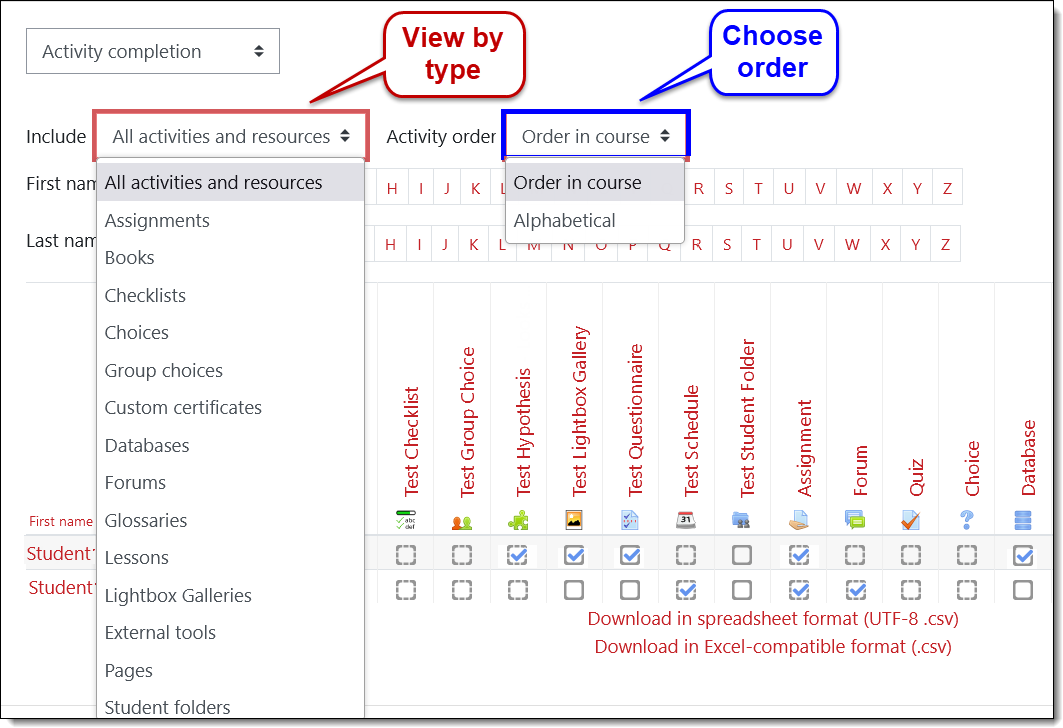
Activity Completion Report Refinements
One of the most helpful aspects of specifying student actions to indicate completion — requiring them to submit an assignment or make a forum post, for instance — is the ability to see reports that show the extent to which your learners are engaging with course activities and resources. In 3.11, these reports have been enhanced by the ability to filter the data by type of activity and to change the order that items are shown.
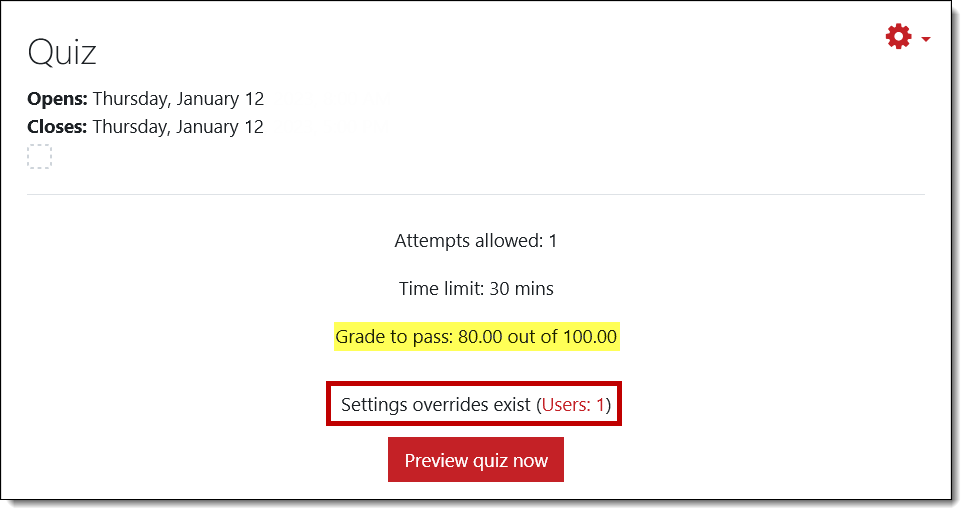
Quiz Enhancements
One of the Grade options for quizzes is setting a minimum grade to pass. In 3.11, a passing score is displayed in the quiz description area when you open the activity. If you have set an override for a student or group of students to allow them more time on the quiz, that information will also be shown (and linked) on the quiz page.
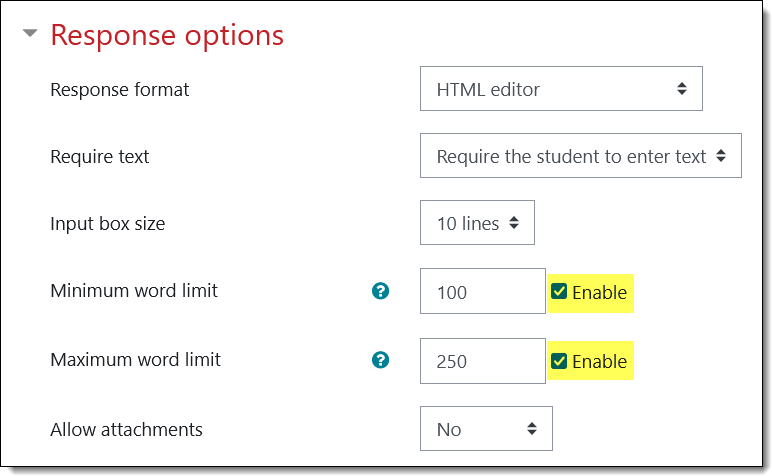
Essay Question Limits
In 3.11, you can set minimum and/or maximum word counts for essay questions in quizzes. Quiz takers are warned if their responses are too brief or too long, based on the word counts you specify. If you enable a word count requirement, be sure to inform
students clearly in the question text so they will know that they need to check the length of their response.
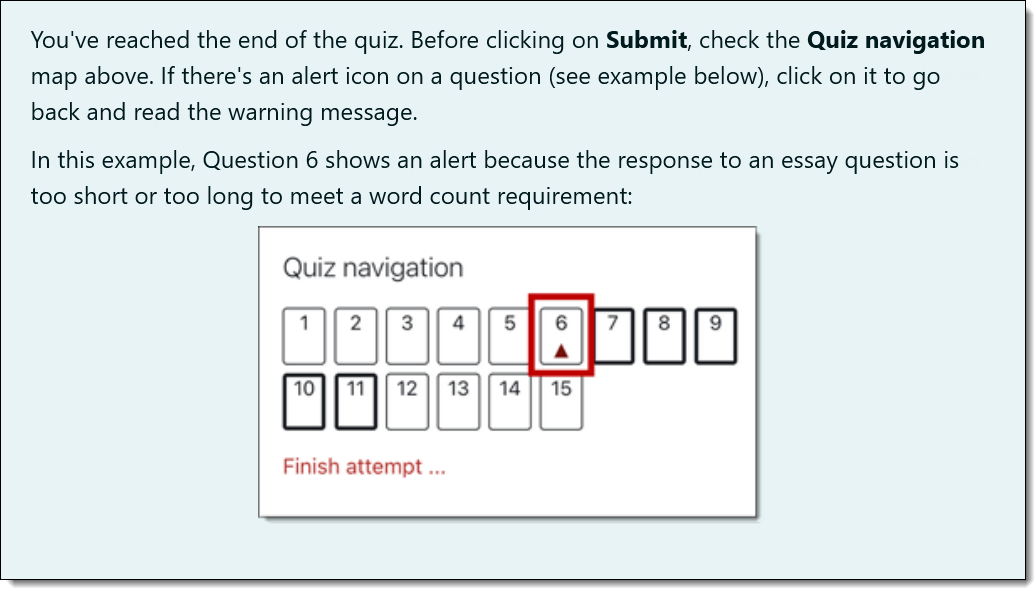
We're going to get technical here... read on if this interests you—skip to the next page if it doesn't. 😉
Rather than displaying a word count or immediately warning students that they are over or under the required word count, Moodle posts an alert only after a student leaves the page with the essay question and goes on to another page. As a result, if the last page of questions has one or more essay questions on it and students submit after responding to the last question—without going to another page—they won't be alerted if they haven't met the word count requirement.
Here's a way to help your students be aware of and look for alerts. Import this question into your course and add it on a separate page at the end of your quiz:
To import this question:
- Save this file to your computer.
- In your course, click on the admin gear in the upper right corner and select More... from the bottom of the menu.
- In the Question bank section, click on Import.
- Select Moodle xml format for the file type.
- Open the Category options and select the category where you want to store the question.
- Drag and drop the file you just saved into the file picker and click on Import.
- Add the question at the end of your quiz and insert a page break before it.
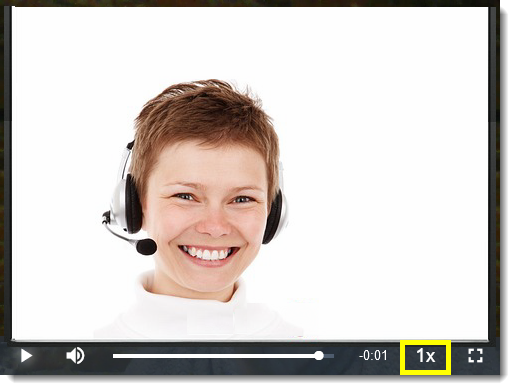
Audio/Video Playback
Audio and video clips recorded in Moodle textboxes can now be adjusted for playback speed to meet user preferences.
What's New in 3.10
 The upgrade to 3.10 includes changes to the editing interface, but not a lot of new features.
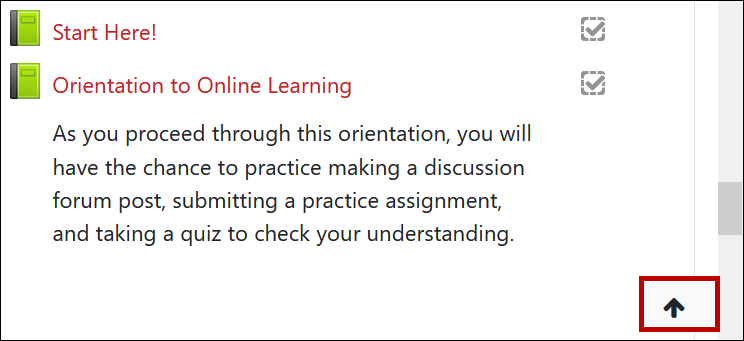
Go to Top
Finally, an answer to the Dread Moodle Death Scroll! Quickly return to the top of any page by clicking on the arrow in the lower right corner. Bliss!
Menu Changes
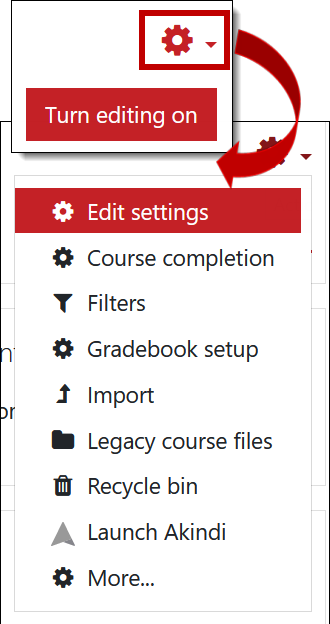 Our "Turn editing on" button has a new look! Now that its use has been incorporated in standard Moodle, you'll no longer find that function in the admin gear's drop-down menu.
New Options Palette
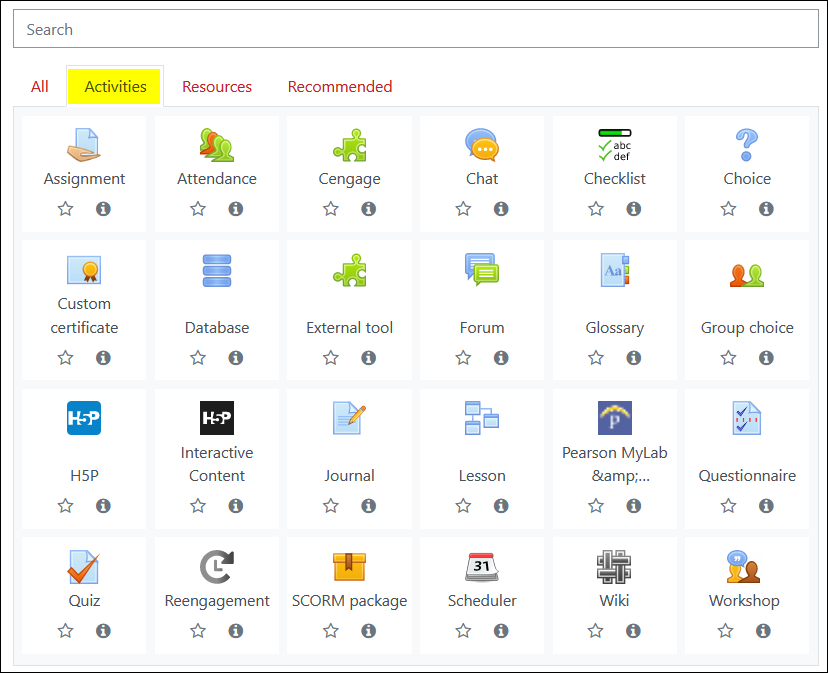
Adding an activity or resource is a lot more colorful in 3.10! Choose from the desired tab: All, Activities, Resources, or Recommended.
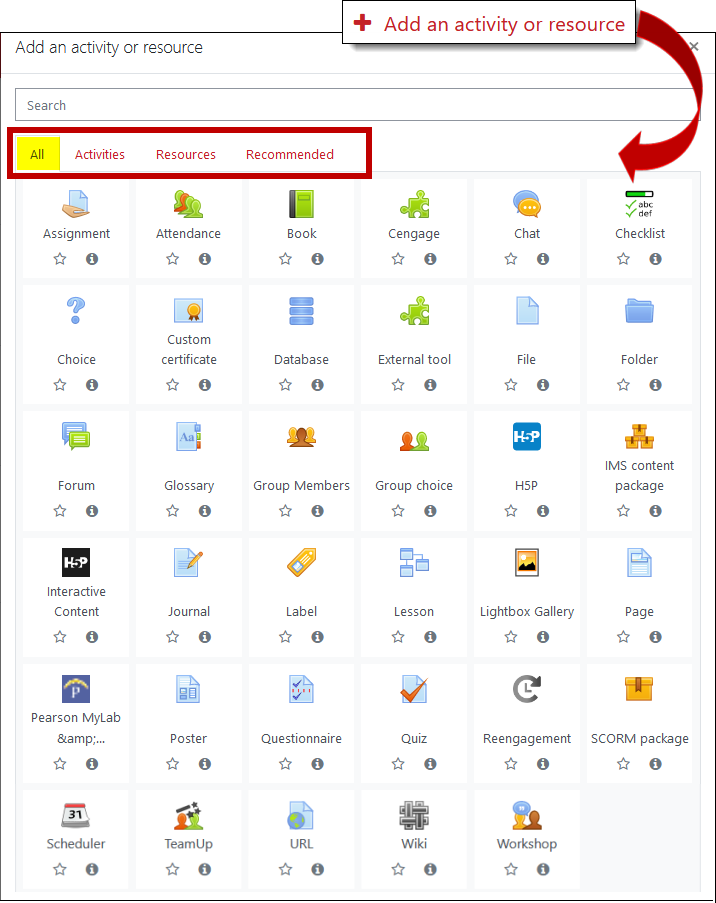
Activities Palette
Click on the Activities tab to display a set of icons for tools to engage learners.
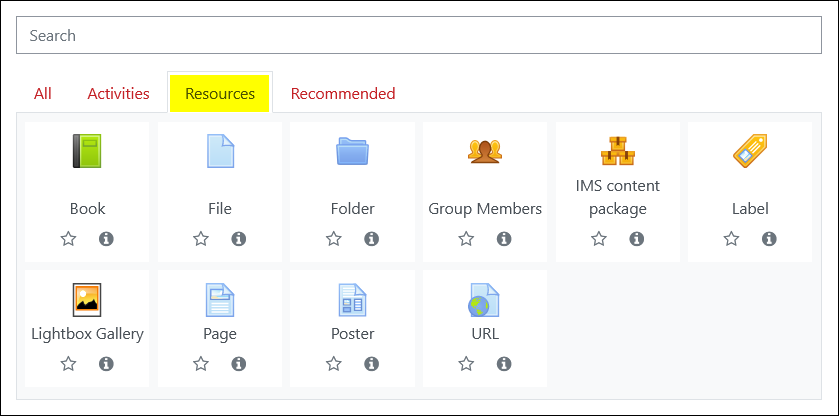
Resources Palette
Looking to add a resource? Choose the Resources tab to quickly access the element you'd like to add to your course.
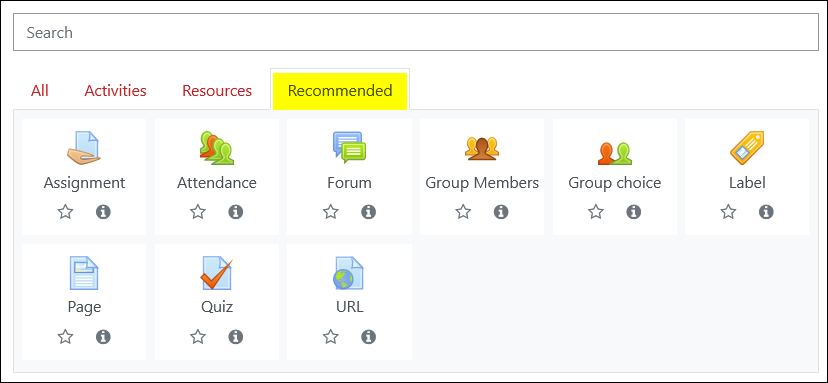
Recommended Palette
Have you ever wondered what you might be missing in Moodle? Check out the activities and resources on the Recommended tab to see what we think everyone needs in their Moodle repertoire.
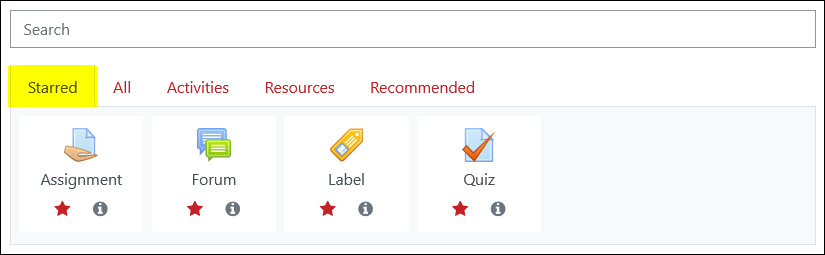
Starred Favorites Palette
And we've saved the best for last!
Select any activity or resource to generate a new Starred tab with your very own favorite assortment of Moodle content and tools.
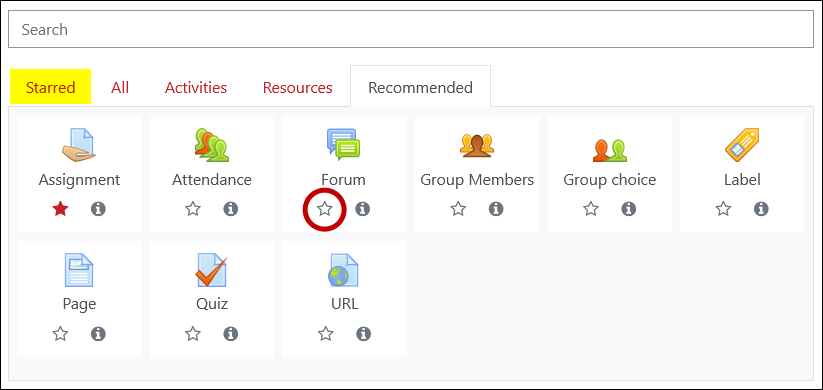
And voilà! Your personalized menu for building your course.
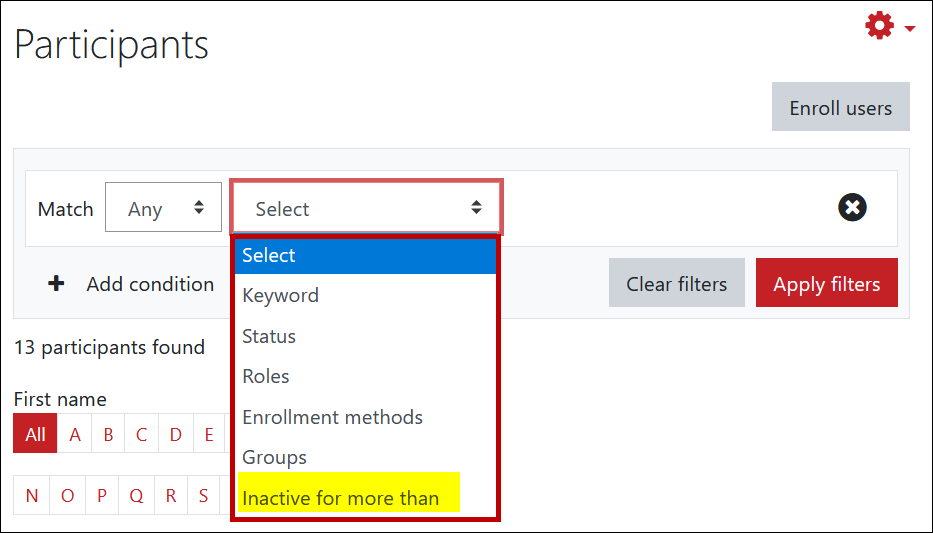
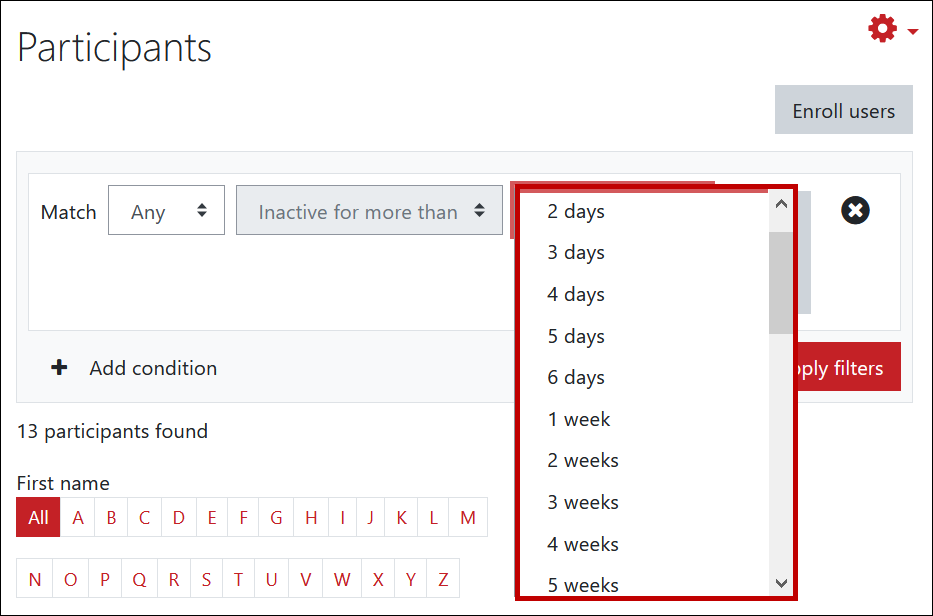
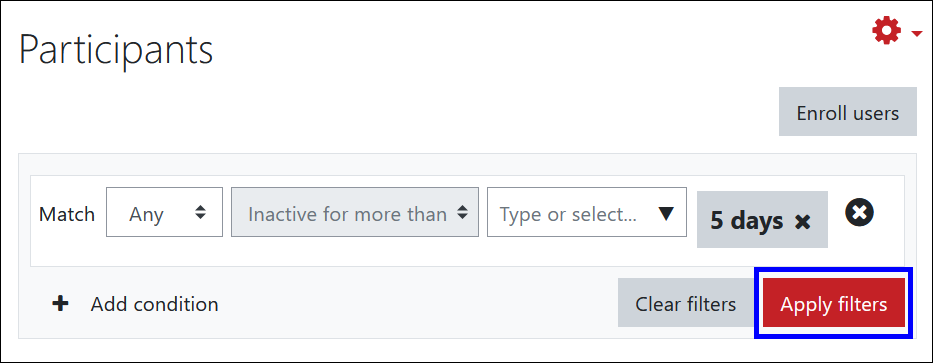
Filter Participants List
Find specific sets of learners more quickly by using filters to select them. This example illustrates how you might pull a list of students who have not accessed your course for five days.
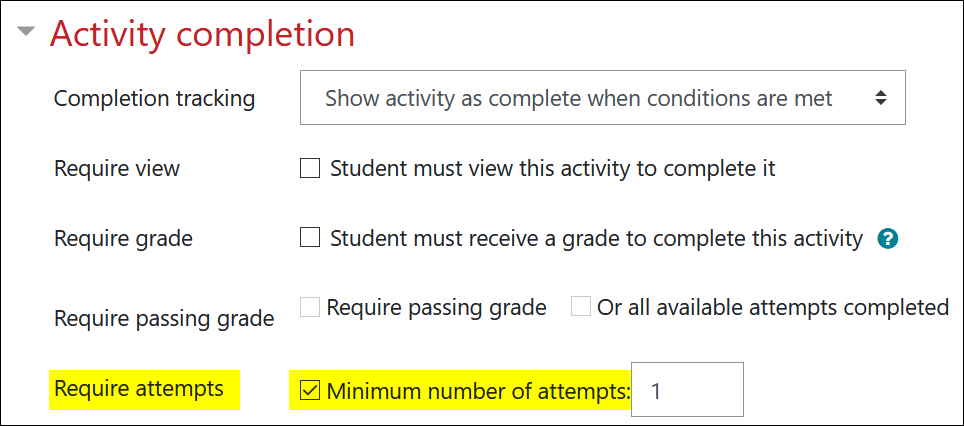
Quiz Completion Option
Activity completion requirements for quizzes can now include requiring a minimum number of attempts in order for the quiz to be marked as completed.
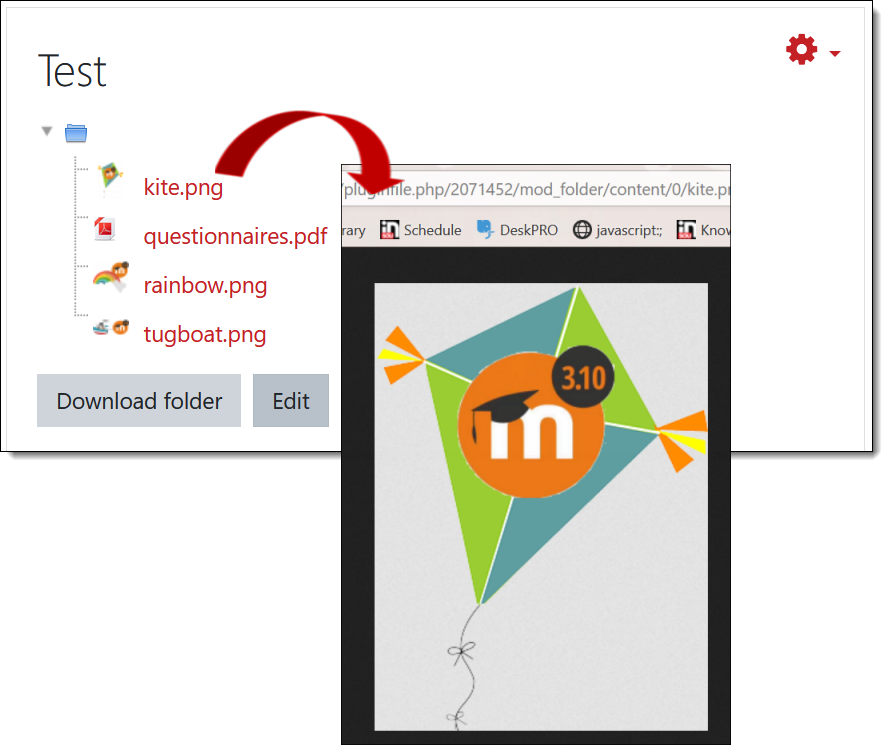
Folder Enhancement
The Folder resource is an excellent way to share files with our learners. It's now possible to display files in the browser instead of forcing users to download them for viewing.

When force download has been disabled, a student selecting a file will see it open in their browser without having to download it first.
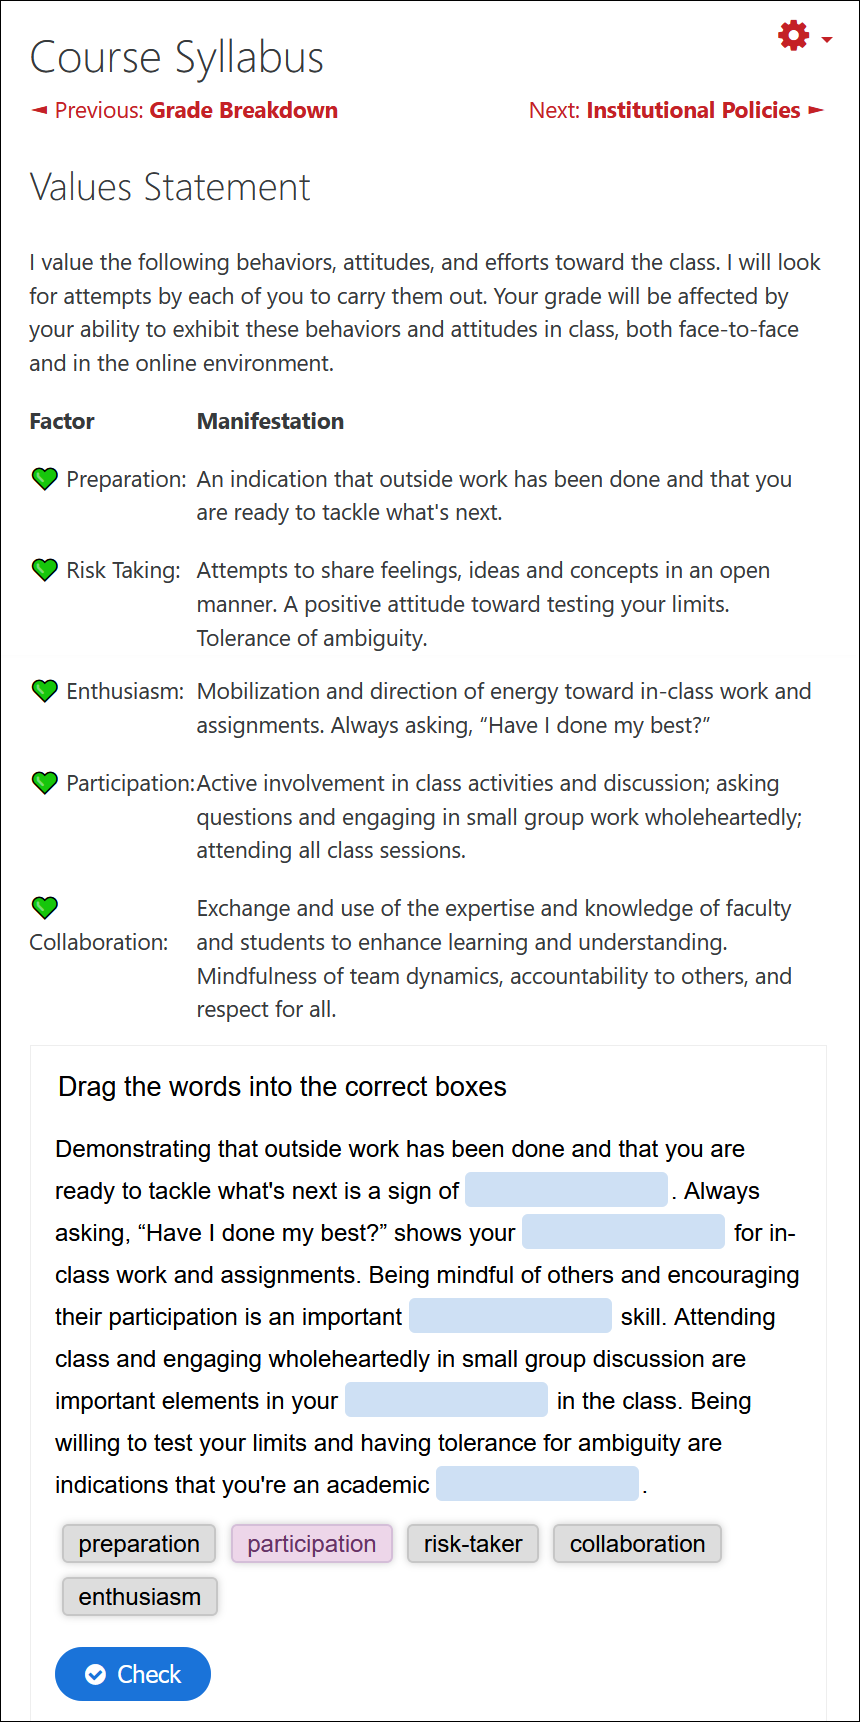
Enhanced h5p Integration
Interested in creating interactive activities like flashcards, timelines, images with hot spots, or interactive video? Moodle's integration of h5p makes it possible to create activities within your course for your learners to experience. (See the example below, a drag and drop mini-quiz embedded in a book resource that contains the course syllabus.)
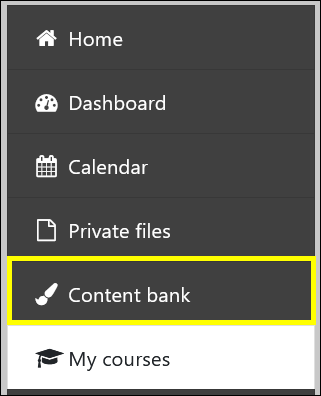 Greater integration means that your hp5 activities reside in a "content bank" for easy access in any of your courses. You'll find a link for the Content bank in the left navigation panel as shown here. Selecting h5p from the Add an activity or resource menu
will also take you to the Content bank.
Greater integration means that your hp5 activities reside in a "content bank" for easy access in any of your courses. You'll find a link for the Content bank in the left navigation panel as shown here. Selecting h5p from the Add an activity or resource menu
will also take you to the Content bank.
Private Files Cleanup
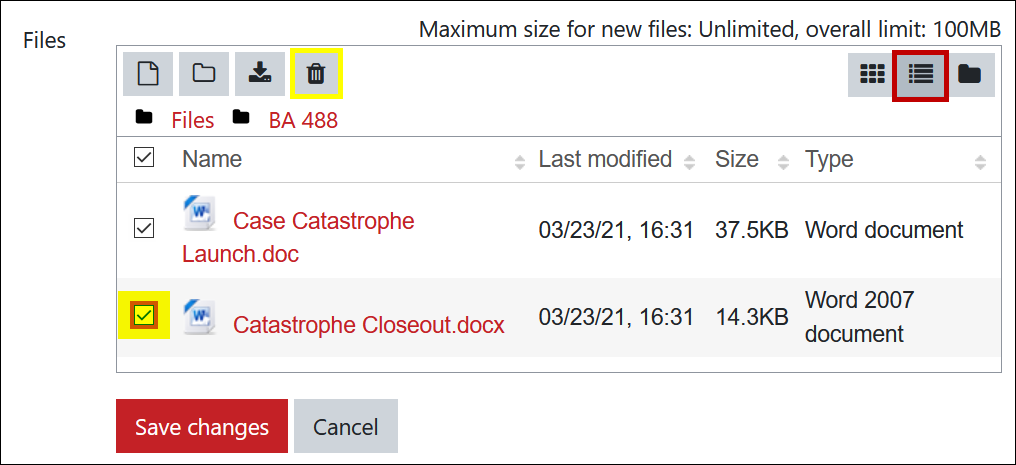
All users have 100MB of private storage in Moodle by way of Private files. Until now, we could only delete one file at a time. The latest upgrade means that we can select multiple files for deletion at one time. (It's the little things that count!)
To delete a batch of files, open your private files by clicking on Manage private files... in the Private files block. Select the file details view from the options in the upper right corner, then choose the files you wish to delete. Click on the
trash can icon to delete.
What's new in 3.8
 We upgraded to version 3.8 on March 26, 2020.
What was new in 3.8 was all forums, all the time. Read about the changes.
Help Message for Open Forums
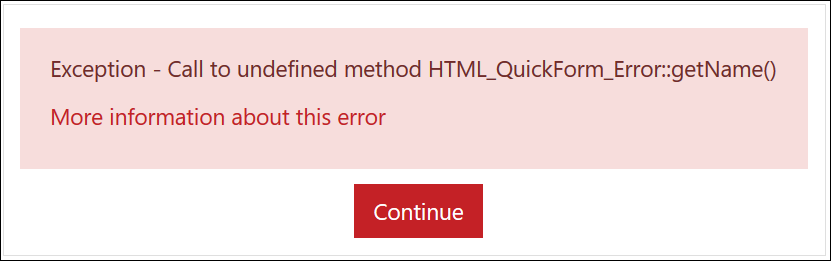 Faculty — getting a strange error message when you try to update an Open forum? See important information inside this page.
 Our recent upgrade to Moodle 3.8 included major improvements to the Forum activity in terms of how forums are displayed and graded. The changes are so significant that we will be phasing out the Open forums (formerly
known as Moodlerooms forums) that we have used since we adopted Moodle in 2011. Read about the changes and review FAQs.
Our recent upgrade to Moodle 3.8 included major improvements to the Forum activity in terms of how forums are displayed and graded. The changes are so significant that we will be phasing out the Open forums (formerly
known as Moodlerooms forums) that we have used since we adopted Moodle in 2011. Read about the changes and review FAQs.
Currently, it is only possible to create a Forum. Existing Open forums will still support discussions, but they cannot be edited. We recommend adopting the new forums so that you can take full advantage of the options
they provide. Changing over will take just a few minutes and we think you'll be very pleased at how much easier assessing your learners' work will be.
Here's one way to go about it:
- Open an existing Open forum.
- Copy the content of the Description textbox (Ctrl+C works great for this).
- Take note of the forum type (Standard general, Single simple, etc.).
- Return to your main course page and use the Add an activity or resource link to add a Forum activity to the section where the Open forum presently resides. (See instructions for creating a forum.)
- Enter a Name for the Forum, then paste the content you just copied into the Description textbox (Ctrl+V).
- Select the appropriate Forum type.
- Set a Due date and Cut-off date, if you wish, by enabling the fields.
- Decide how you wish to grade the forum, using Whole forum grading or Ratings, then set the grade options as desired. (If you are not sure how many points were possible for the Open forum, check the Setup page in your gradebook.)
- Set any other options as needed, then Save and display to check your handiwork.
- If it's good to go, delete the original Open forum. One down!
TIP #1: Try displaying your course in two different tabs (or windows) in your browser. You can have an Open forum showing on one tab and a newly created Forum in the other, and you can copy and paste between the two
with less waiting for pages to load.
TIP #2: We've drafted these Tips for Forums that offer both pedagogical and operational recommendations for managing forum discussions. Let us know if you find them useful!
What's New in 3.6
 We're upgrading to version 3.6 on July 17.
This upgrade features minor tweaks to the user interface, so we can just enjoy the improvements and not worry about learning a lot of new functions and processes. Read on to learn about all of the changes in the new dashboard — you're going to love them!
Dashboard Overhaul
With the release of Moodle 3.6, the dashboard has been completely overhauled to allow more functionality and personalization when managing your course menu. By customizing your dashboard display, you can sort, manage, and prioritize courses and assignments—star courses that you access frequently and hide those you don't need at the moment.
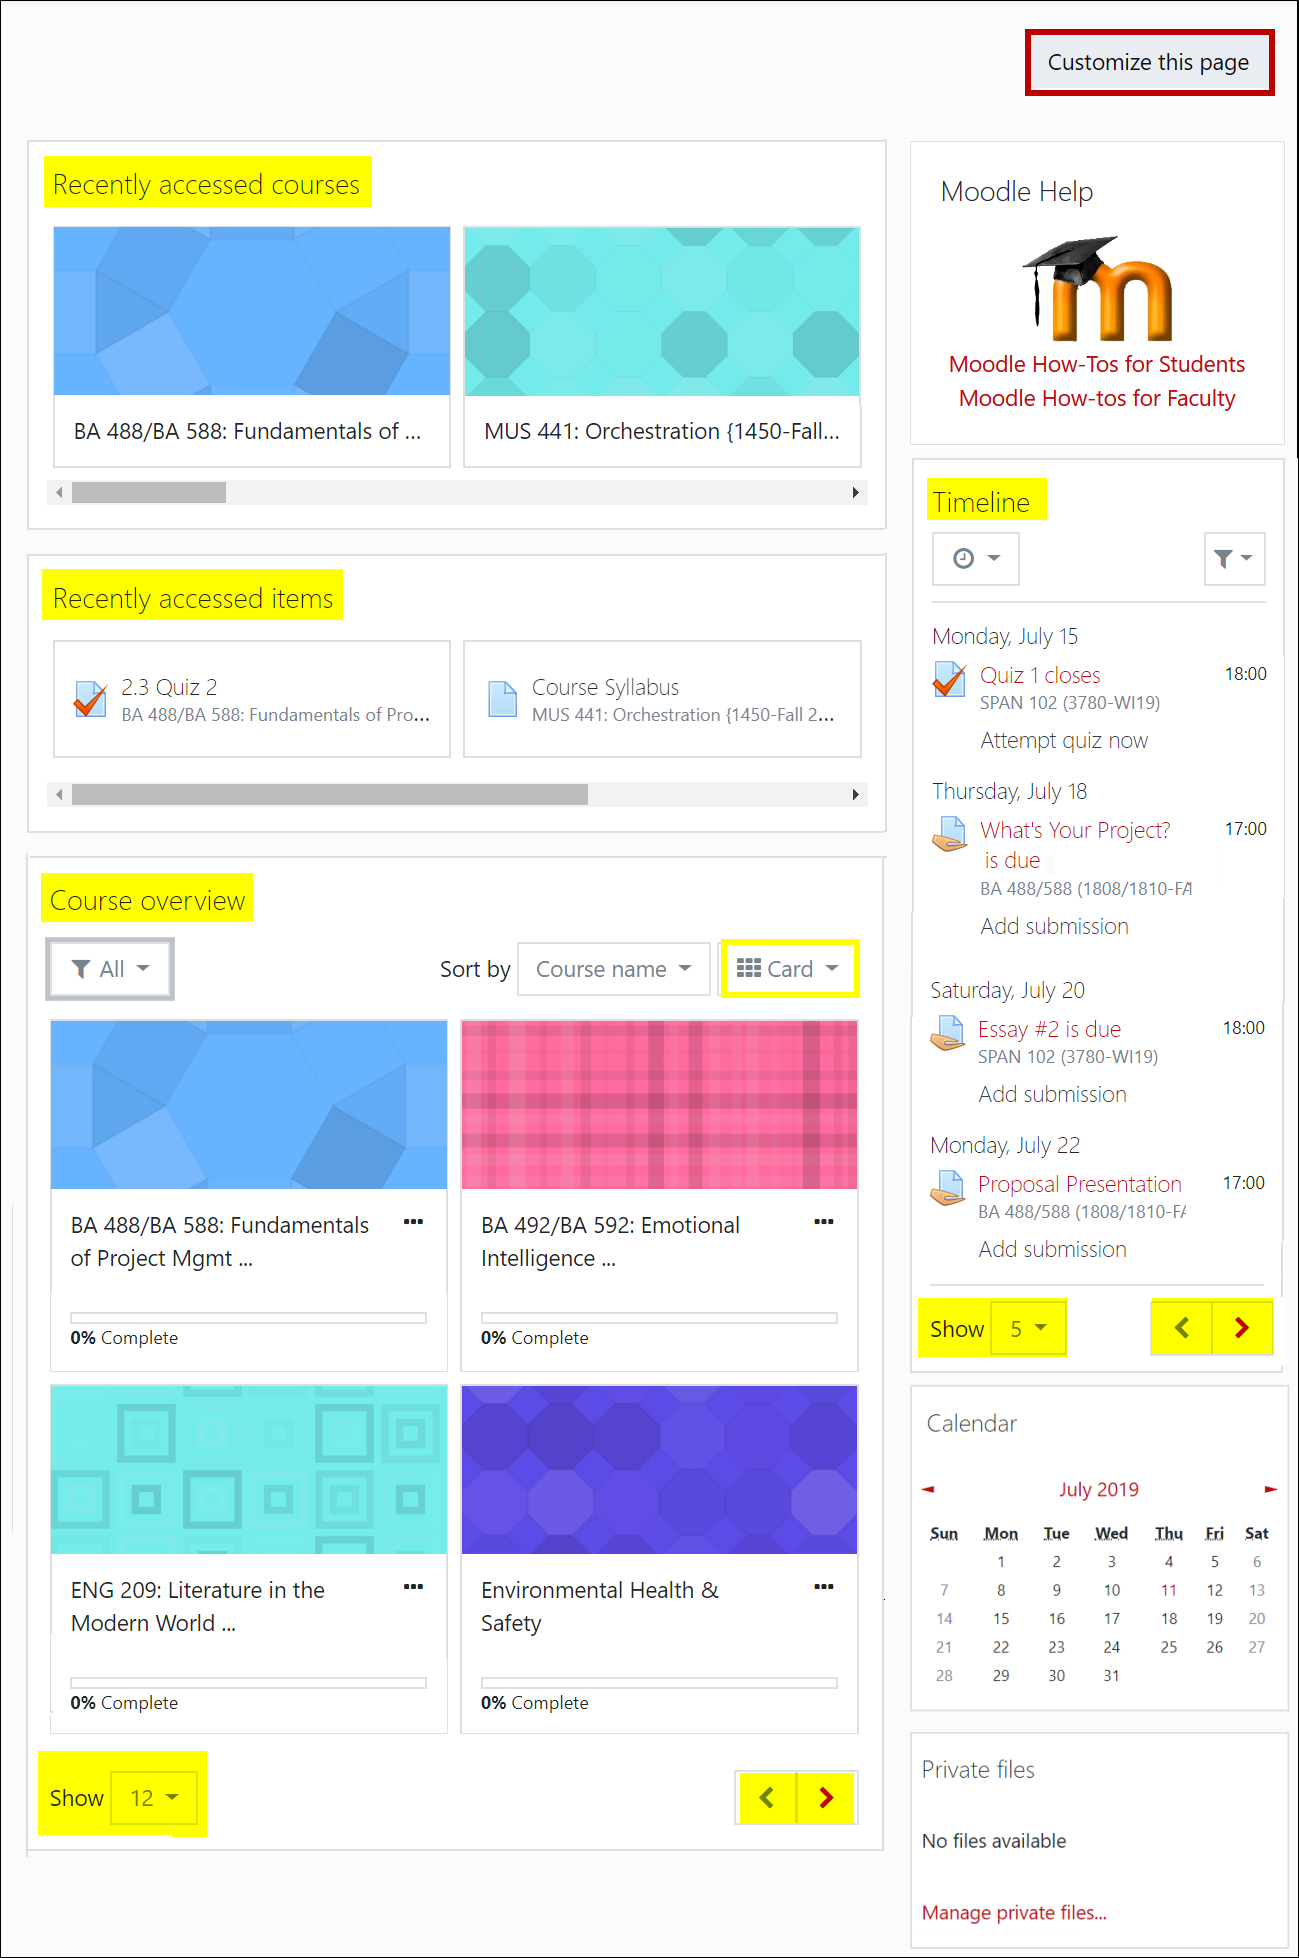
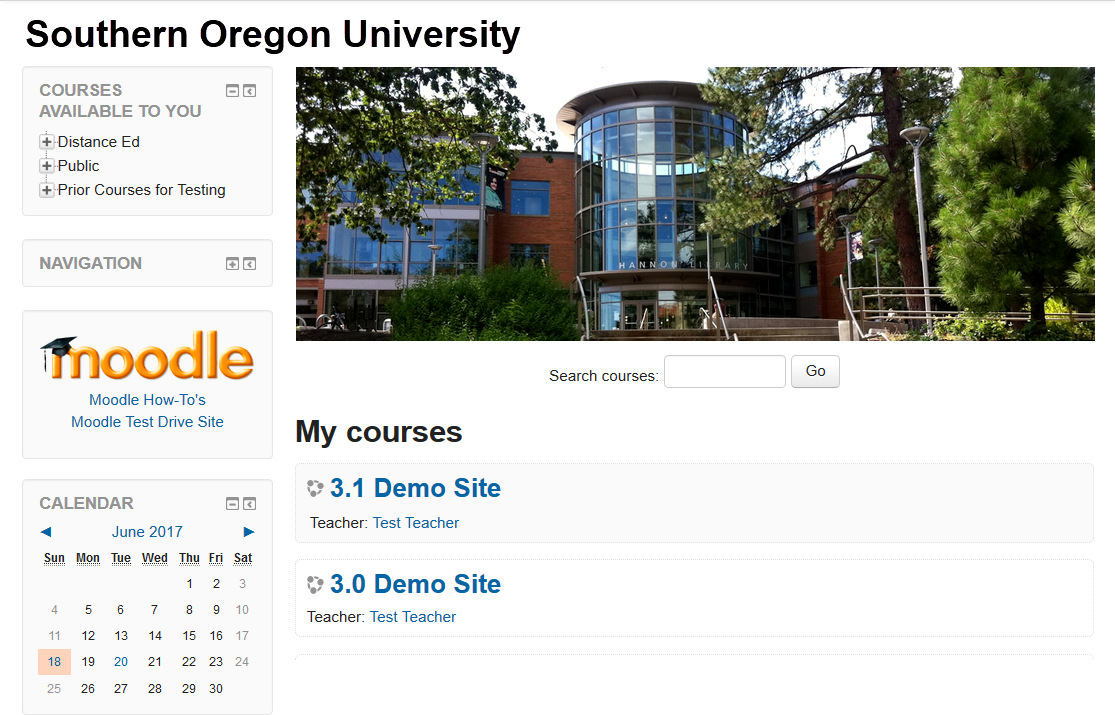
By default, your dashboard will display the courses you have most recently visited followed by the course items you have most recently accessed. Below you'll find all of the courses in which you are enrolled.
Two things of special note about the Recently accessed courses and Recently accessed items block:
- Courses will only appear in the Recently accessed courses block if they are available to students. You can quickly access courses for future terms by filtering or starring them in the Courses overview block (read on to learn how).
- Mac users will not see the horizontal scroll bar shown here, but you will be able to slide through the courses and items displayed.
As illustrated here in the Courses overview block, not only can you see your courses (shown here in "Card" view), but you (and your students) can also see a timeline for upcoming assignments in new blocks. Best of all, you can rearrange the blocks to suit yourself!
Course Views
Each block features controls to allow you to filter, sort and display courses to meet your needs:

Star or Hide a Course
Click on the three dots adjacent to the course name to star or hide a course:
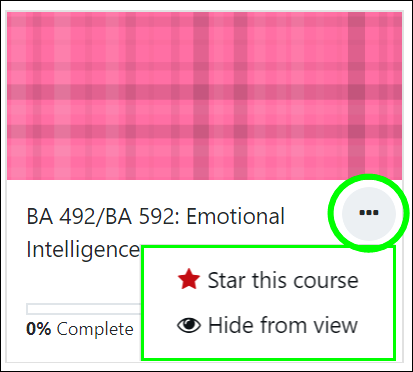
Once you have starred the course, use the filter icon to display just your starred favorites (or to show courses that you have hidden):
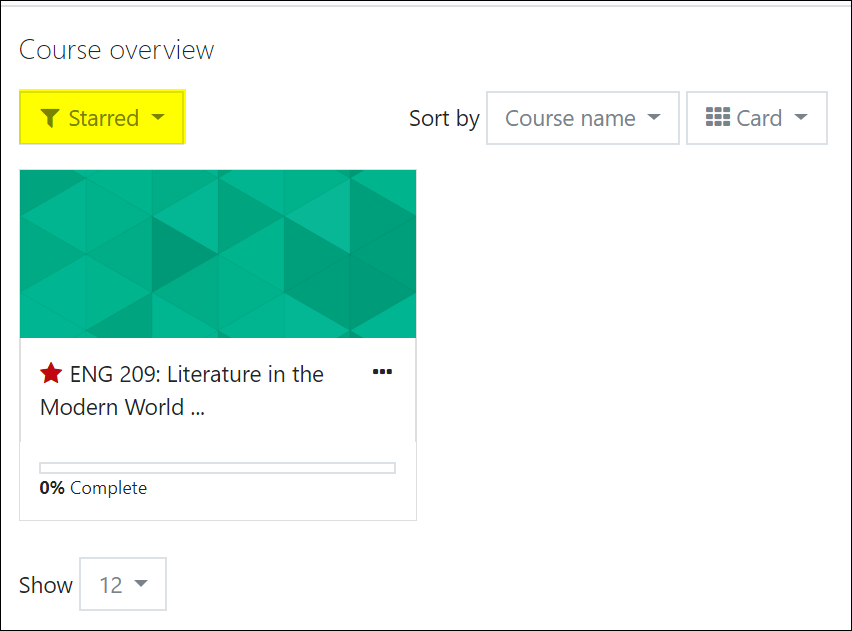
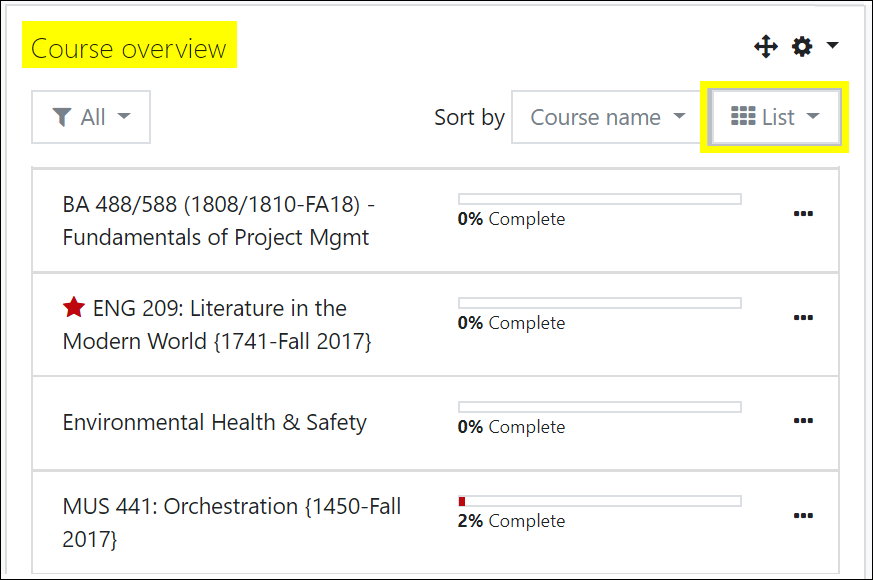
Adjust Your View
So far, we've shown you the "Card" view of your course list. You can also choose "List" view:
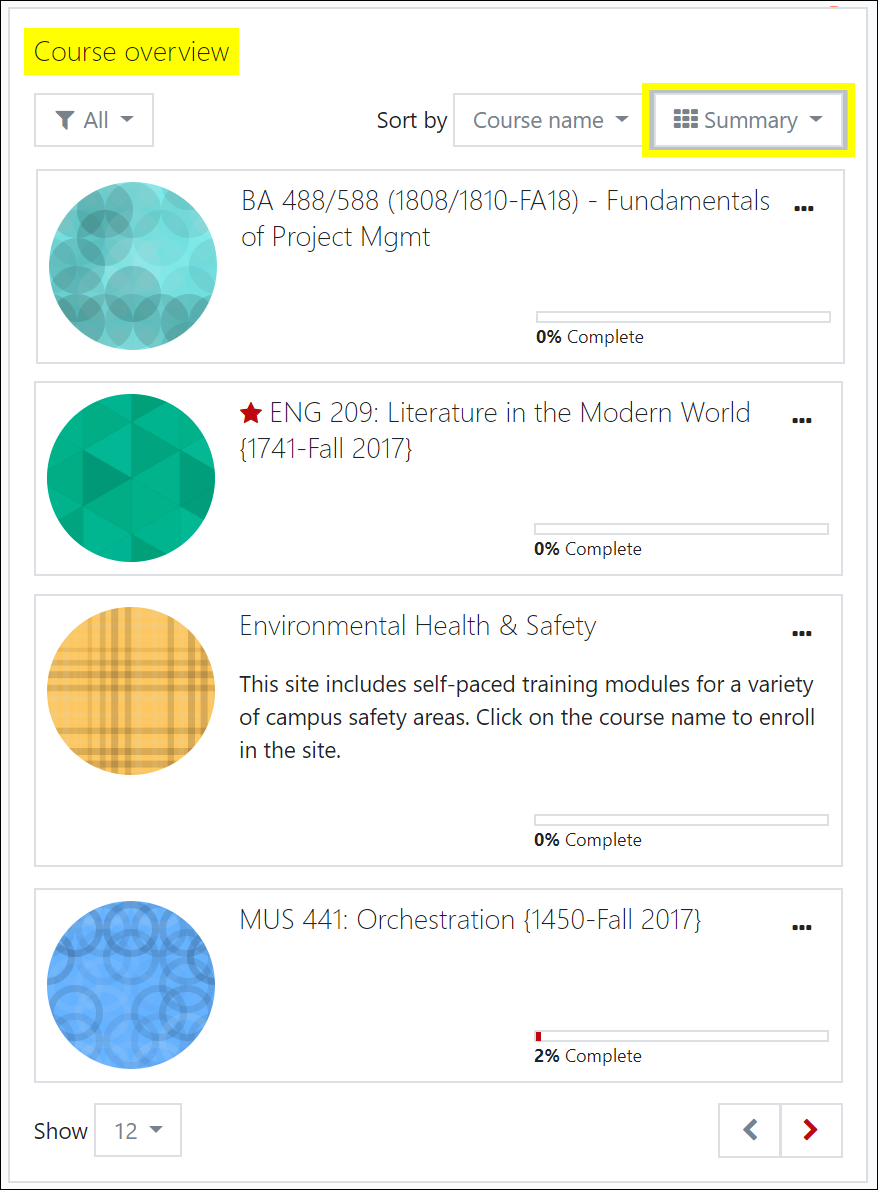
Or "Summary" view:
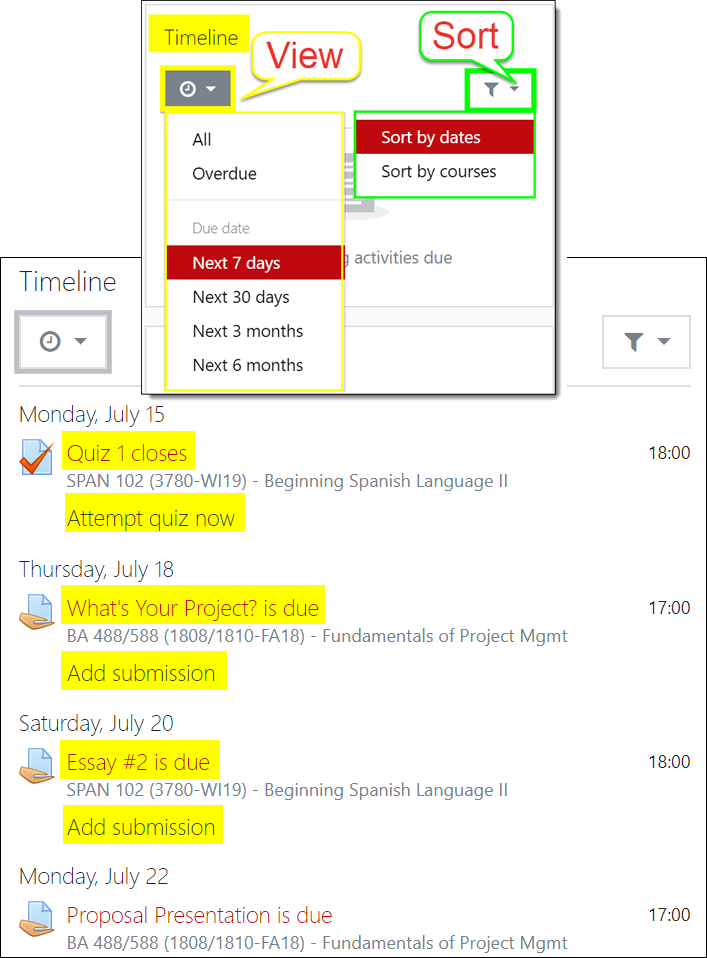
Use the Timeline
The Timeline block allows you to filter assignments by due date and to sort them by course or by date. Note that each activity is linked for easy access.
Customize Your Dashboard
To rearrange the blocks on your dashboard page, click on the Customize this page button in the upper right corner. With customizing activated, you'll see controls in the upper right corner of the block:
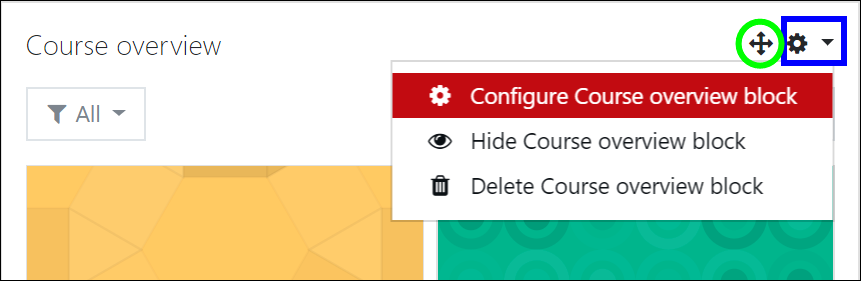
If you want to keep the block in the same area, but move it to a different location, use the Move icon circled here in green. To move it to the side panel, click on the Actions menu icon highlighted in blue and select Configure .... block.
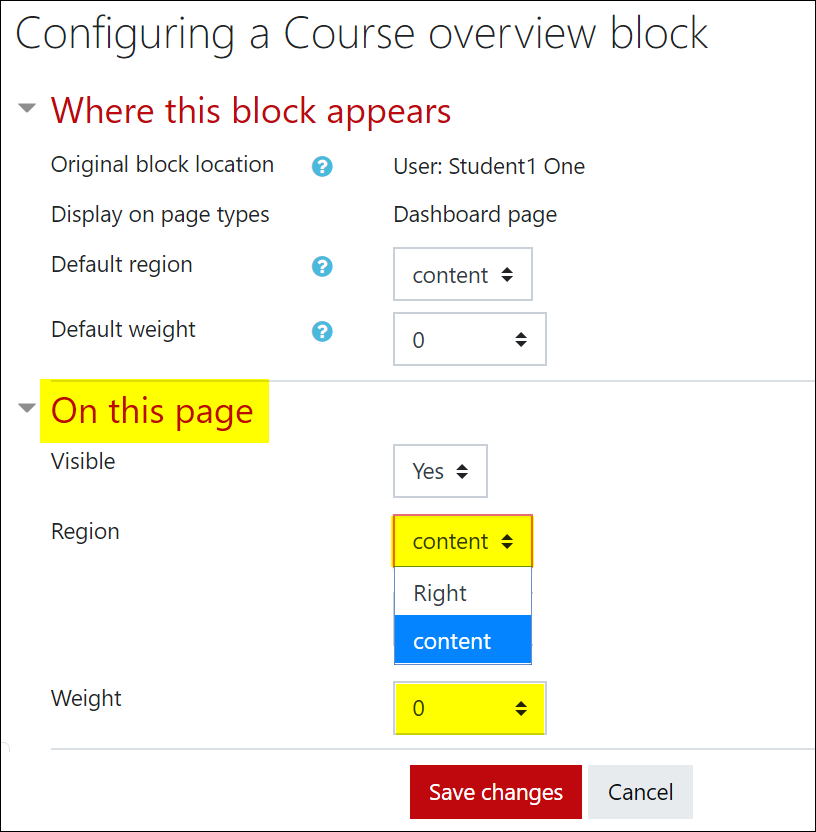
In the block configuration window, use the pull-down menu in the On this page area to change the current location (what Moodle calls "region") — "content" denotes the central portion of your page, while "Right" indicates the right column. You can use the Weight field to indicate where on the page you'd like the block to appear or use the move icon to drag and drop it after you save your changes.
Click on Stop customizing this page when you're done rearranging blocks; click Reset page to default to start over.

Learn More: Videos
Moodle HQ has released these helpful overviews of the new dashboard features.
New: Record Feedback
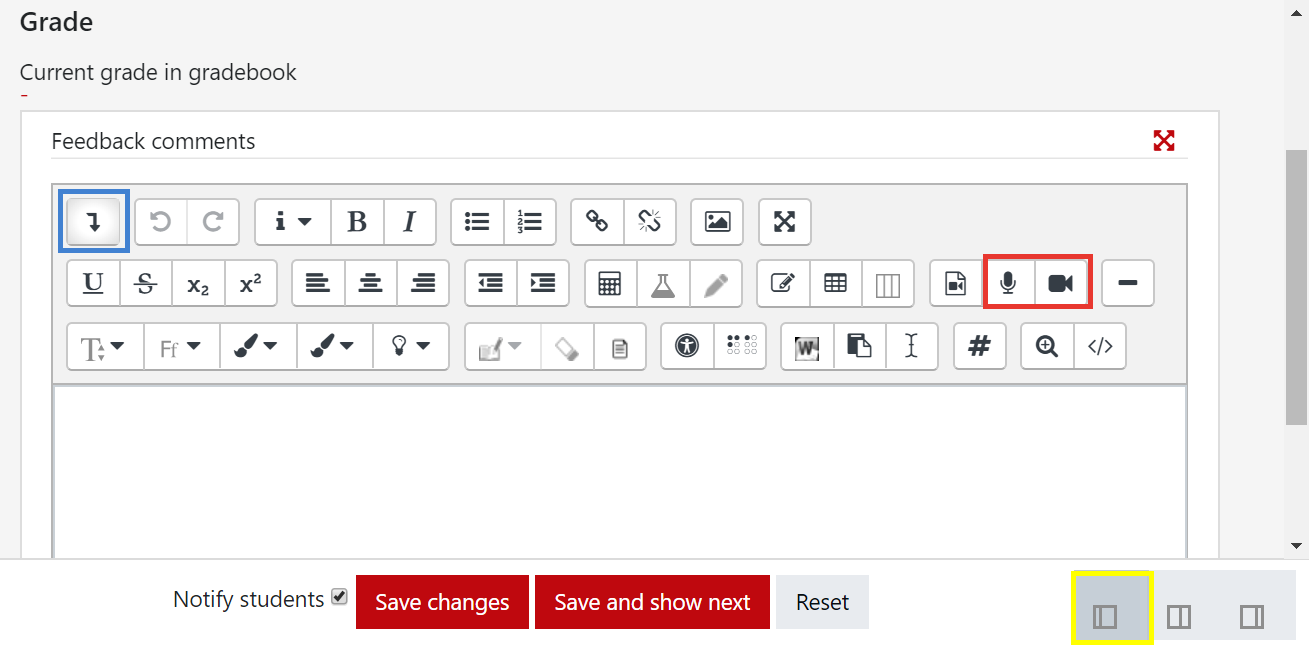
Have you ever wanted to record audio feedback for your students? In version 3.5, recording video and/or audio responses in forums and online text assignment boxes was enabled for those using the Atto editor. With the 3.6 edition, we can now provide up to two minutes of audio/visual feedback in assignment feedback textboxes. These instructions describe how to record audio or video feedback.
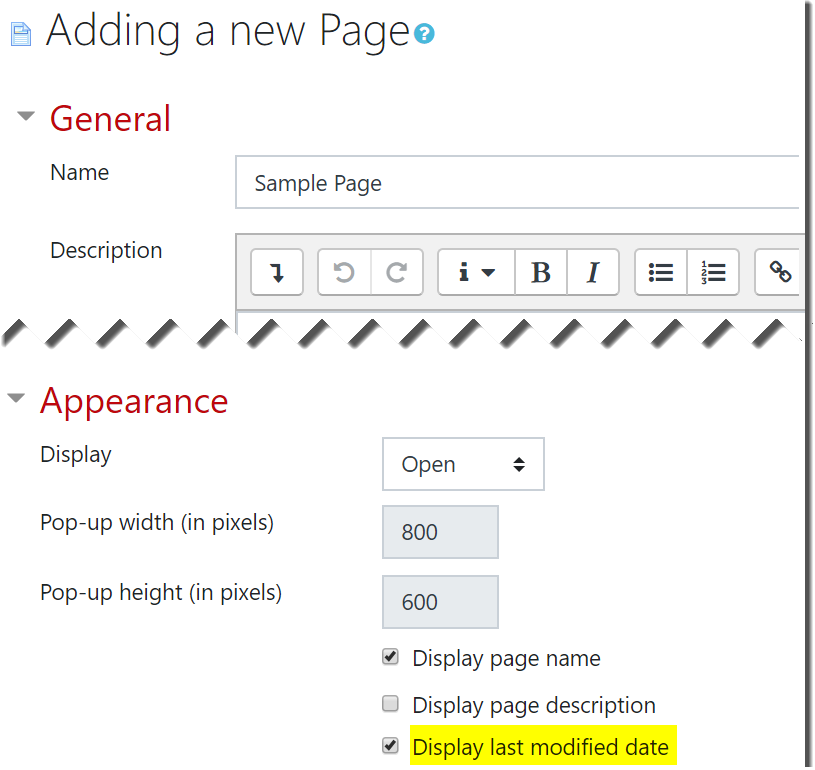
New: Page Editing Option
Ever wish that you could remove the date stamp after editing a page? Now we can! Simply de-select the Display last modified date option to render your pages timeless.
New: Copy Indicator
Few innovations have been as enthusiastically greeted as Moodle's "duplicate" feature for copying activities and resources. With 3.6, we have the additional advantage of having new copies appear with (copy) in the title, making it that bit simpler to tell what's what on our course page. Here's an example:

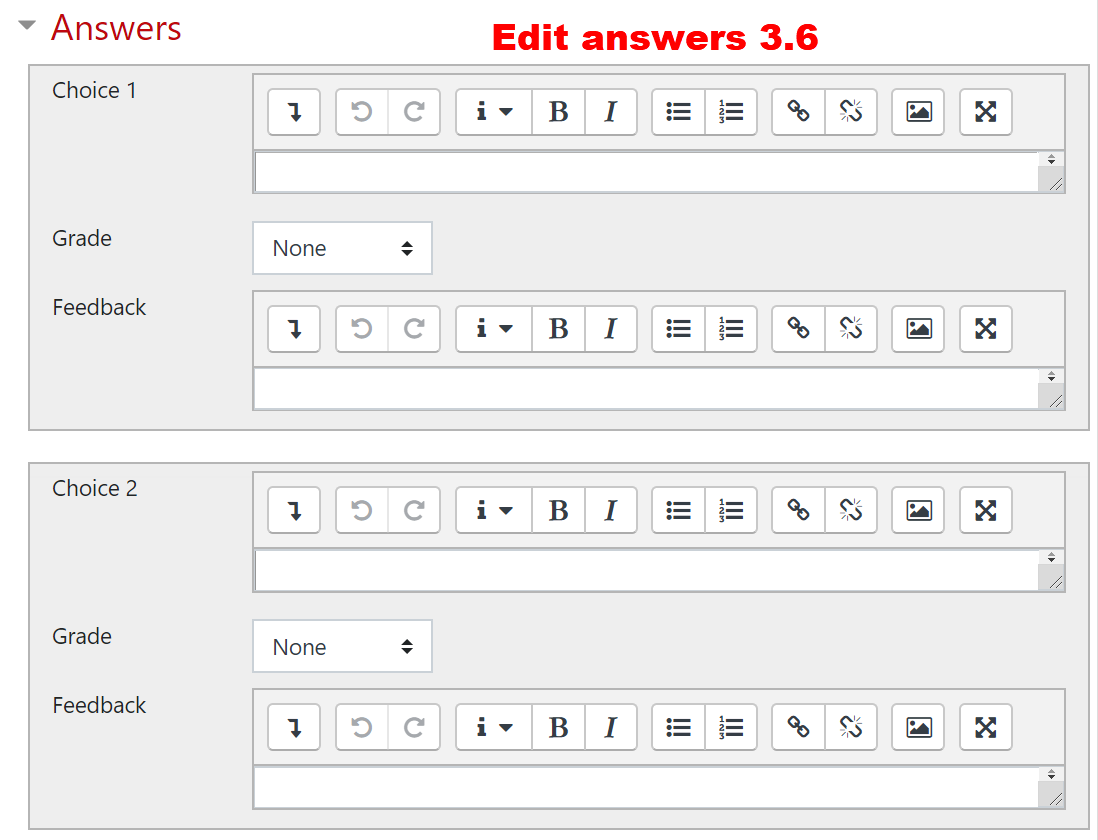
New: Clearer Question Creation
If you have manually created a multiple choice question recently, you may have noticed how similar the answer choice and feedback fields are on the page. (Has anyone else entered an answer choice in the feedback field as many times as we have here in Moodle Central?)
Some kind Moodle developer has stepped in to help us out with improved formatting. Now it's much easier to see where you are:
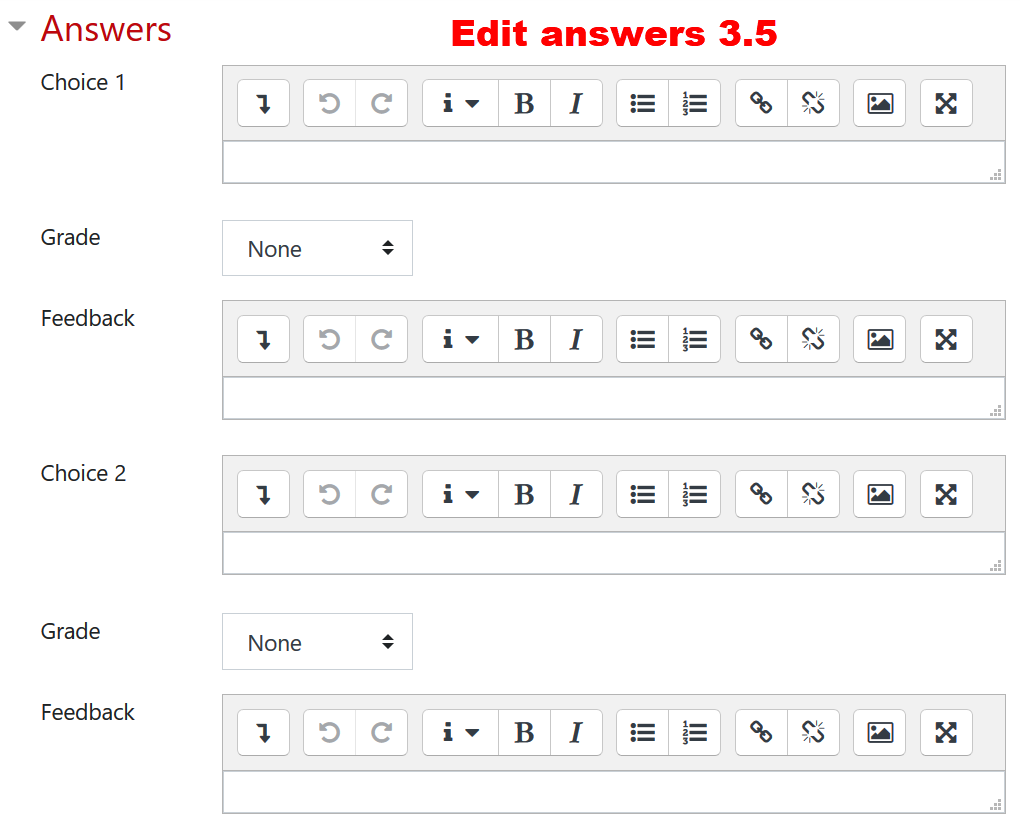
Here's what we've been working with in 3.5, just as a reminder:
Updated: New Quickmail Interface
After minor tweaks to Quickmail over many upgrades, version 3.6 brought some surprises! For instance, we can now have a message sent at a specific time.
When you open the Compose Course Message link, you'll find yourself in a new universe. Fortunately, you can revert to the former recipient selection display if you wish by updating the configuration settings shown here. (Note that if you do change your configuration, once you save your preferences, you'll need to go back to your dashboard to access your course—silly Moodle!)
Here's how things work (see below for a written explanation):
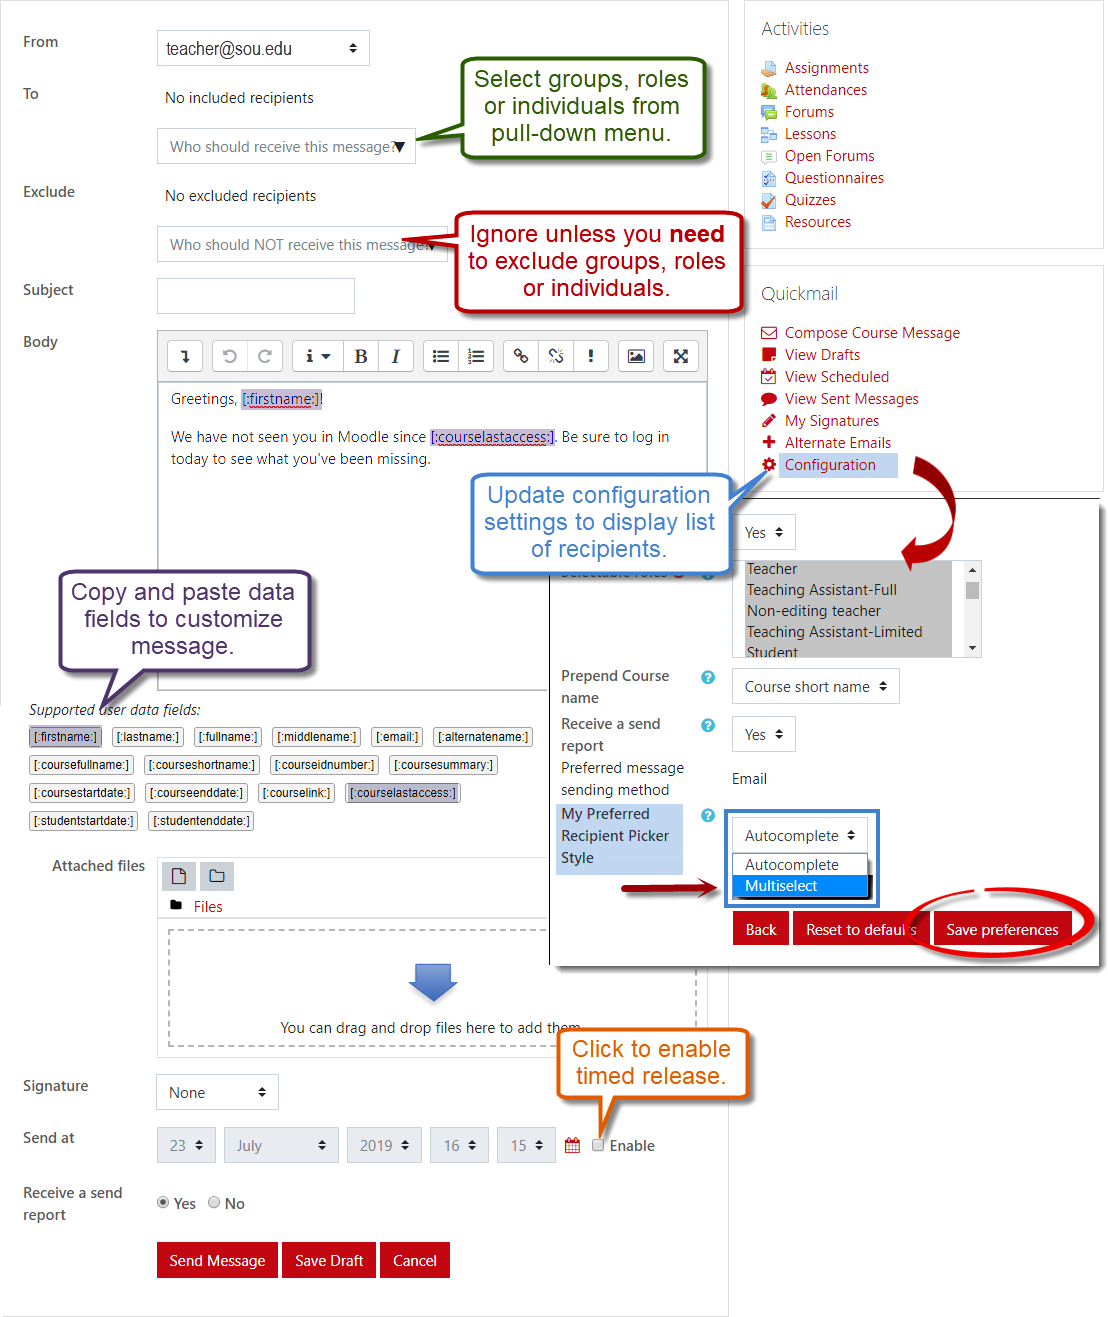
Use the pull-down menu in the To field to select groups, roles or individuals as recipients. You can ignore the Exclude option unless you have an actual need to exclude specific groups, roles or individuals.
Below the message textbox, you'll find a batch of data fields. If you copy a data field and paste it into your message, Moodle will autofill that specific data into the message. In this example, the student's first name will be dropped into the message along with the date s/he last accessed the course.
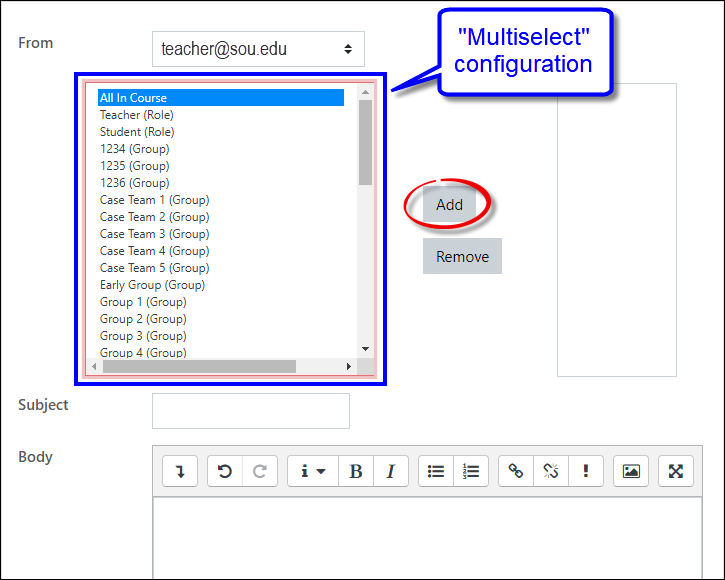
If you select Configuration from the Quickmail block, you can choose "Multiselect" as your preferred recipient selection style and return to the "classic" selection mode to which we have grown accustomed. (Students do not have this ability at this time.)
What's New in 3.5
 We skipped right over 3.4 and upgraded to Moodle 3.5 on September 5.
While there are not any significant changes in functionality going from version 3.3 to 3.5, there are some nuances and enhancements that we think you'll appreciate.
Let's take a look!
Welcome to 3.5!
We skipped right over 3.4 and upgraded to Moodle 3.5 on September 5.
While there are not any significant changes in functionality going from version 3.3 to 3.5, there are some nuances and enhancements that we think you'll appreciate.
Let's take a look!
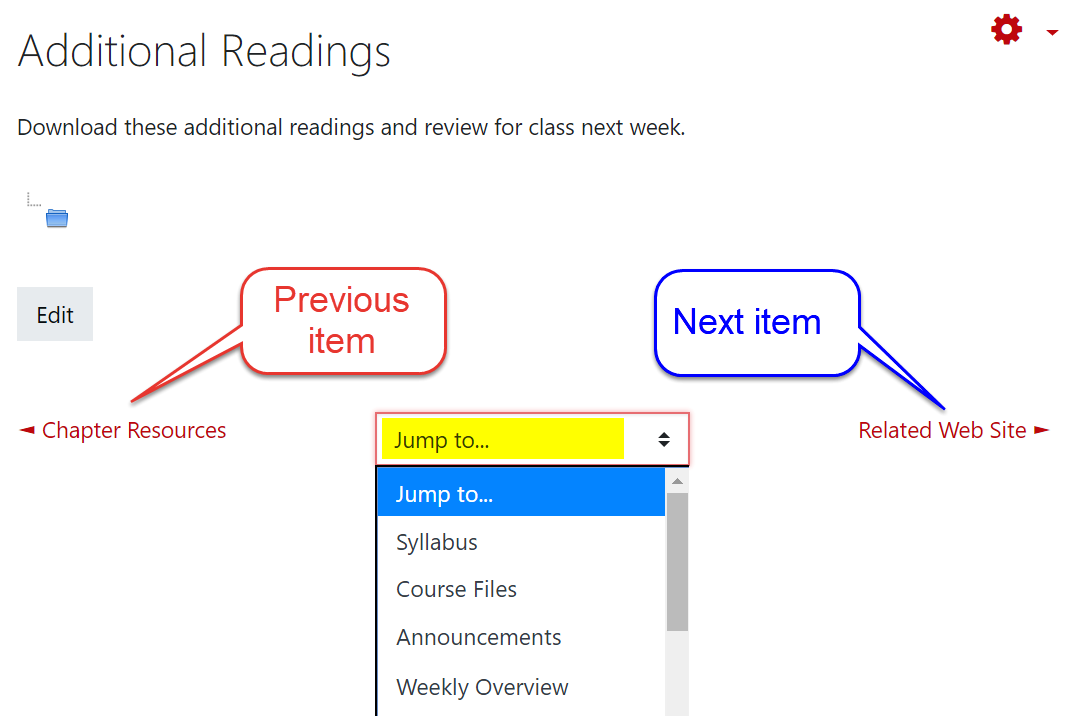
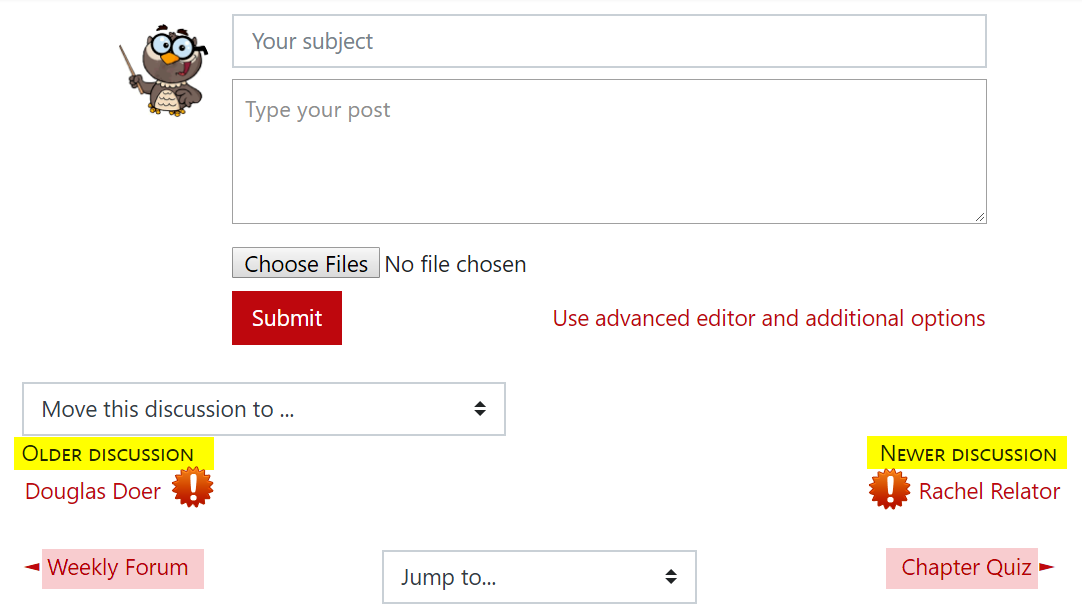
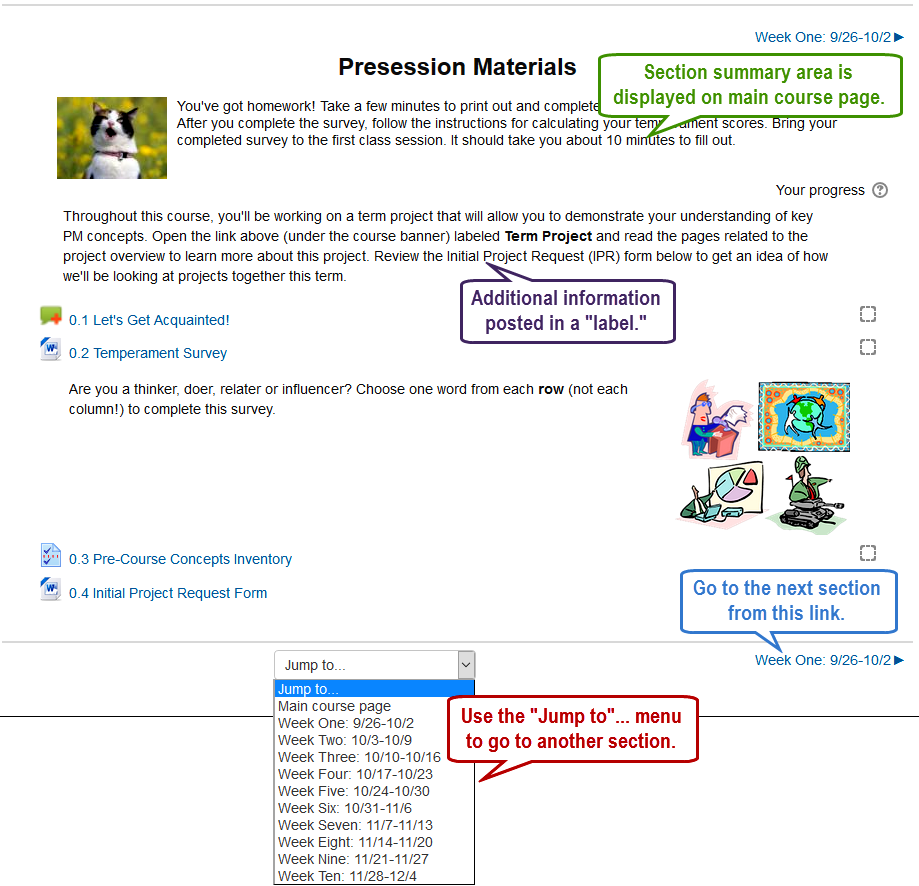
Enhanced Navigation: Course Elements
New "Previous" and "Next" links and a "jump to" menu make it faster and more intuitive to move from one item in your course to another. In our experience, you'll want to slow down a bit when reading forum posts to be sure you're selecting the next forum post and not the next course element! See example below.
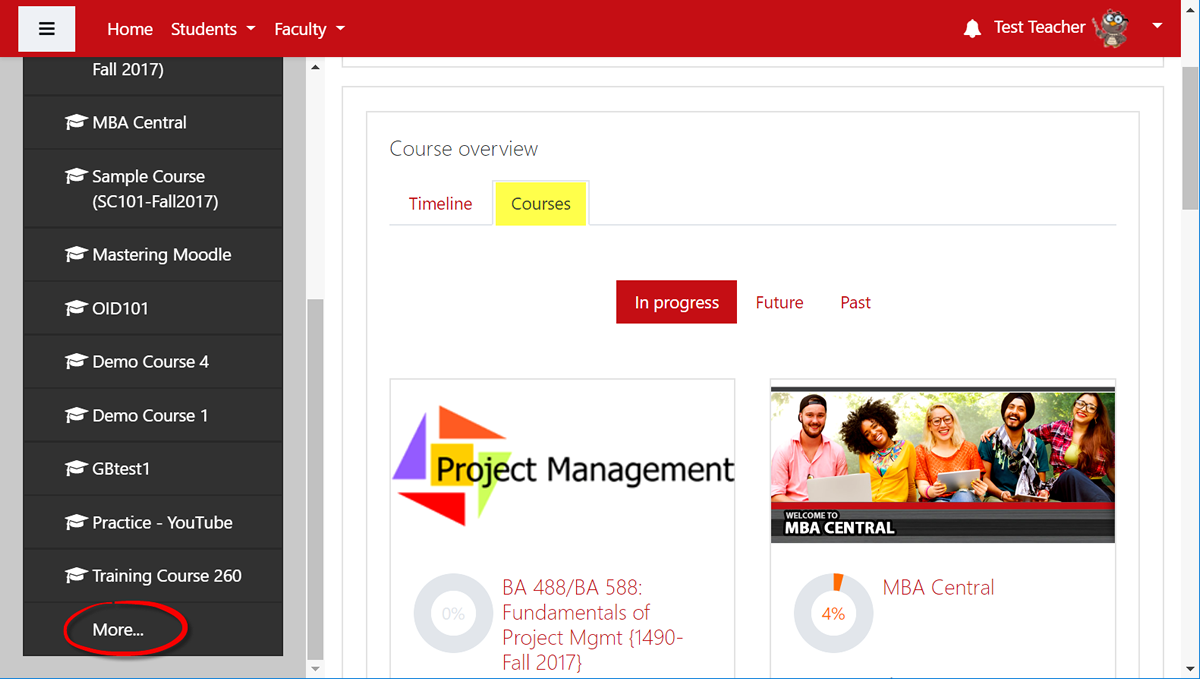
Enhanced Navigation: "More..." Class Listing
If you're enrolled in numerous courses, finding the course you're looking for just got easier! If a course link does not appear in the list of courses in progress in your left navigation panel, clicking on More... at the end of the list will now bring up your dashboard, allowing you to select the In progress, Future or Past tab to locate the course you need. Remember, you can always bookmark a course main page for quick retrieval.
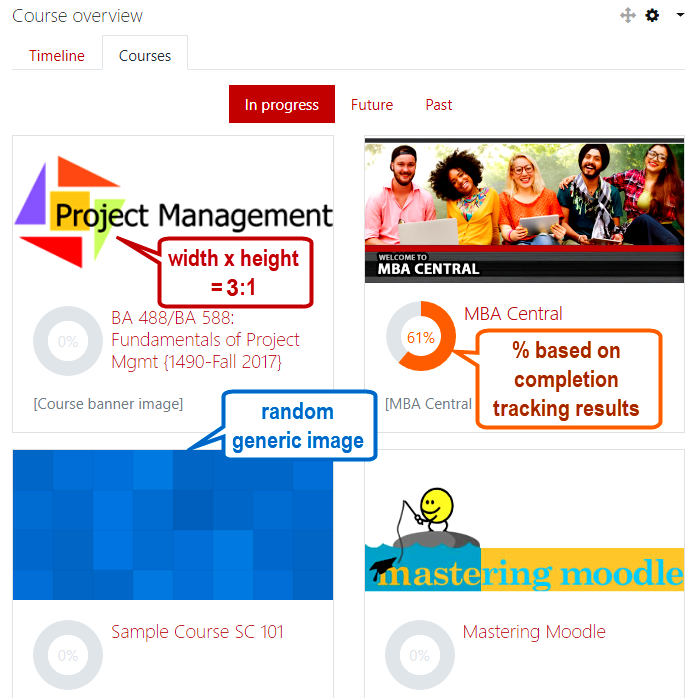
Banners in the Dashboard
In 3.5, courses in the dashboard are highlighted with images. Abstract images are randomly assigned to courses; you can add a customized image to your course if you wish. For best results, use an image that is twice as wide as it is tall. (Contact the CIS staff for assistance if you need help resizing a banner.)
As with version 3.3, the dashboard includes a course completion indicator. Note that this dial represents the percentage of activities with completion settings established that the learner has completed.
Add a Custom Image
To customize the image that appears with the link for your course, click on the admin gear in the upper right corner of your course page, then click on Edit settings. Upload an image file (for best results, your image should be at least three times as wide as it is tall) to the Course summary files area and Save and display. Open your dashboard to see how it looks. To delete the current image and try again (if the image doesn't display as you'd like), click on the image in the Course summary files area, then click on Delete. Upload a new version and check it out on your dashboard again.
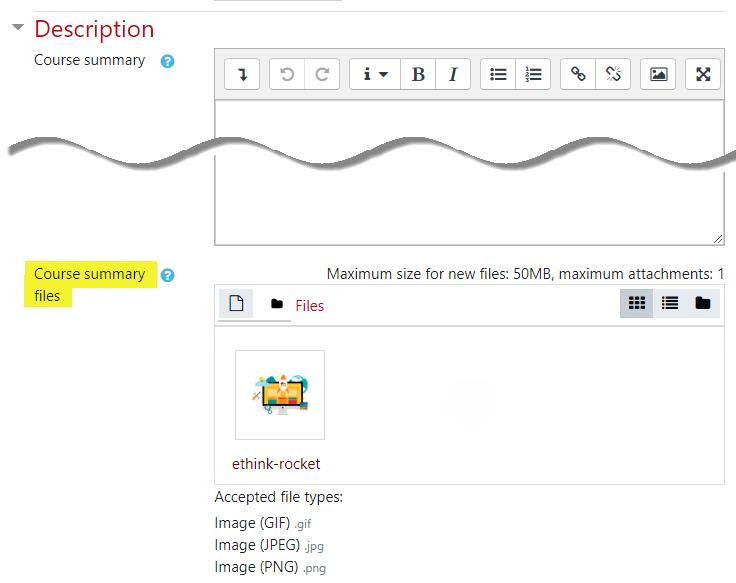
This is how this image turned out:

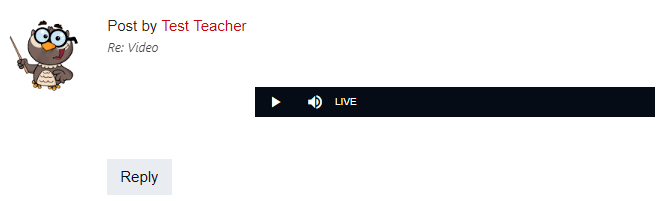
Recording in Atto
Add a personal touch to your course with the new record feature in the Atto editor. Any user can record up to two minutes in an audio or video file in any textbox that includes these tools.
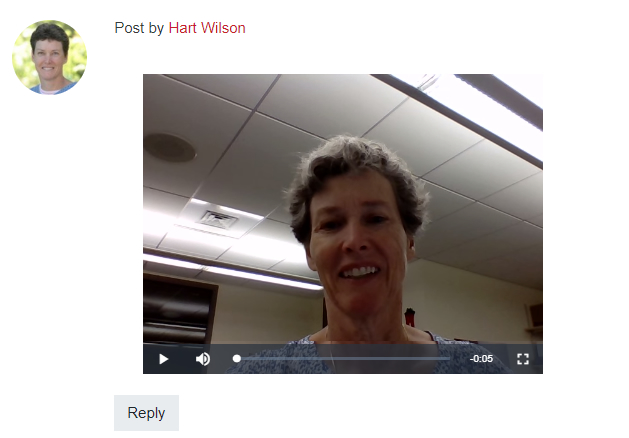
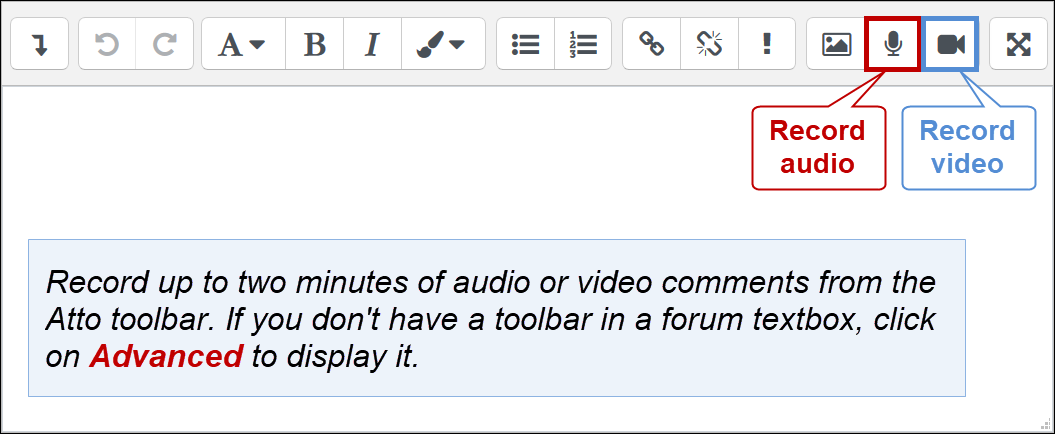
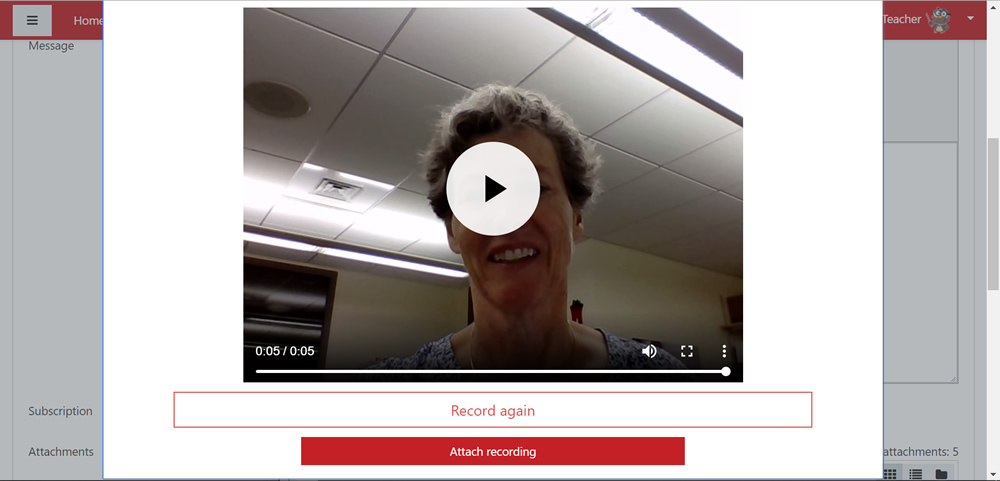
Record a Comment
To create an audio or video recording of up to two minutes, open a textbox using the Atto editor and click on the Show/hide advanced buttons icon on the left side of the toolbar to display more tools. Click on the appropriate icon, then click on the Start recording button. When you're done speaking, click on Stop recording, then click on Attach recording or Record again, depending on how happy you are with the result.
Note: In a forum post, click on Use advanced editor and other options to open the Atto editor.
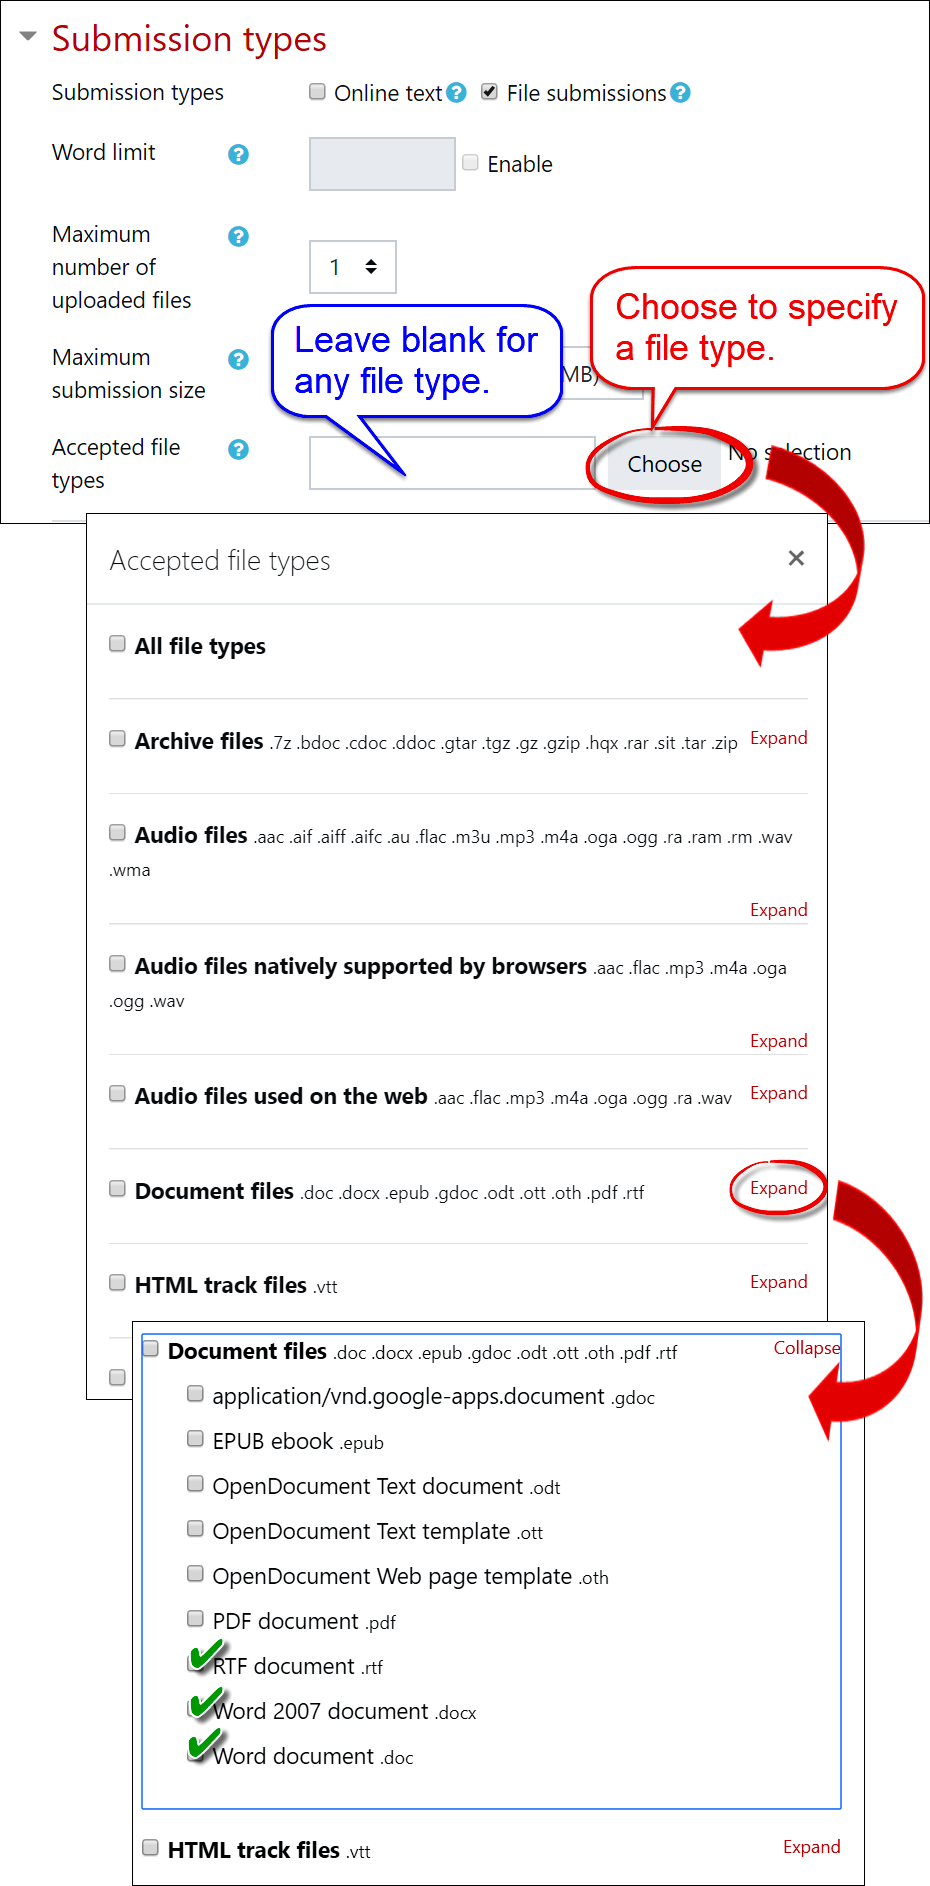
File Type Selector
In version 3.2, it became possible to limit file submissions in assignments to specific file types. The latest edition of Moodle includes a menu for selecting generic file types (e.g., document, image, and presentation files) that allows you to select several related file types at one time or expand the selection list and drill down to specify a limited range of file types that students can submit. (You can also still enter the file types directly in the field provided, separating types with a comma followed by a space — e.g., .doc, .docx, .rtf, etc.) Leaving this field blank results in any type of file accepted for submission.
The ability to specify file types has been expanded to include essay questions in quizzes in the latest version.
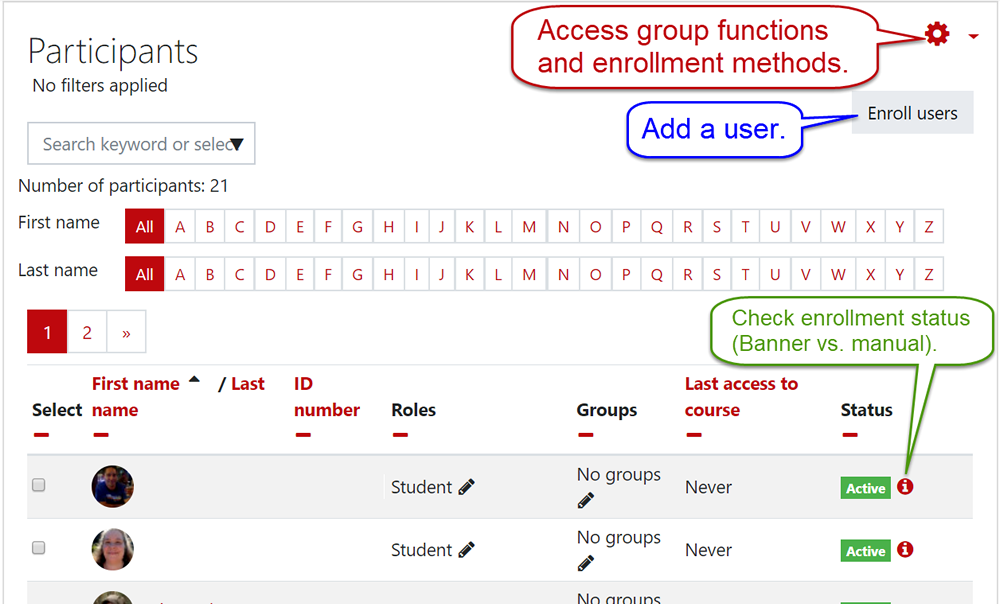
Participant View Changes
If you need to add a user to your course, the latest edition of Moodle will reduce the number of clicks it takes to do so. Clicking on the Participants link in the left navigation panel provides access to enrollment options.
Click on the admin gear to access group functions and enrollment methods; click on Enroll users to add a user to your course. Hover over the red i to check enrollment status (e.g., external database [Banner], meta course or manual enrollment).
Add a User
The add user interface has changed a bit, but still functions as it did in prior versions. Enter a name in the Select users search field. Choose the role that you want the user to have from the Assign role field. When you're done, click on Enroll users.

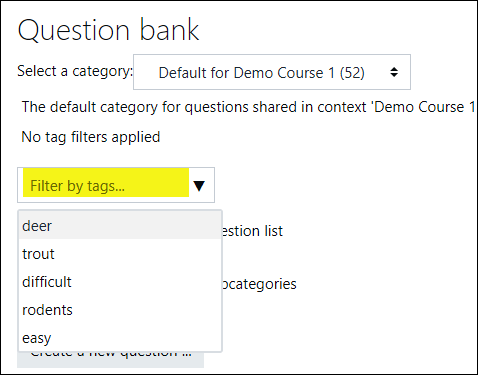
Tagged Quiz Questions
Have you ever wanted to select quiz questions by topic or degree of difficulty? With tags, you can! In fact, you can apply multiple tags to a question, making it possible to indicate how challenging it is AND identify the content it addresses.
With tags applied, you can filter questions to add specific types of questions to a quiz.
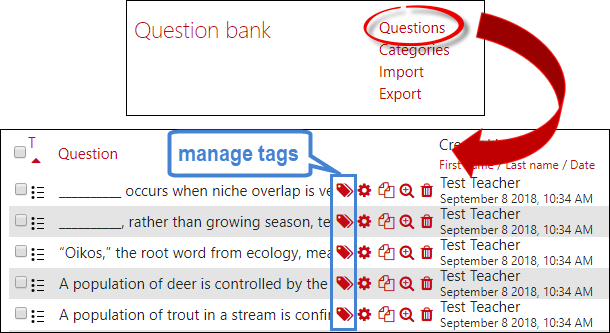
Add Tags to Questions
To add a tag to an existing question, click on the course admin gear in the upper right corner, then click on More... at the bottom of the admin menu. In the Question bank menu, click on Questions, then select the desired set of questions. Click on the Manage tags icon associated with a question. (To add a tag to a new question, click on the Tags option area in the question creation canvas.)
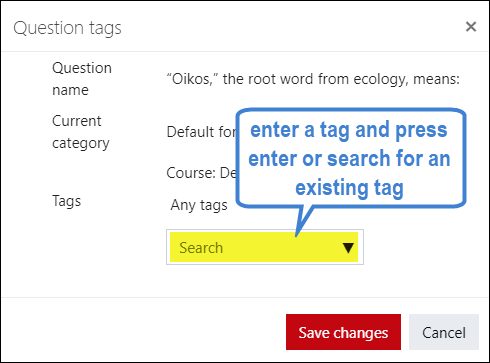
In the Question tags dialogue box, enter a word to describe the question, then press Enter. Once you have created some tags, you'll be able to use the Search pull-down menu to attach a tag—simply select the tag you want and press Enter to assign it to the question.
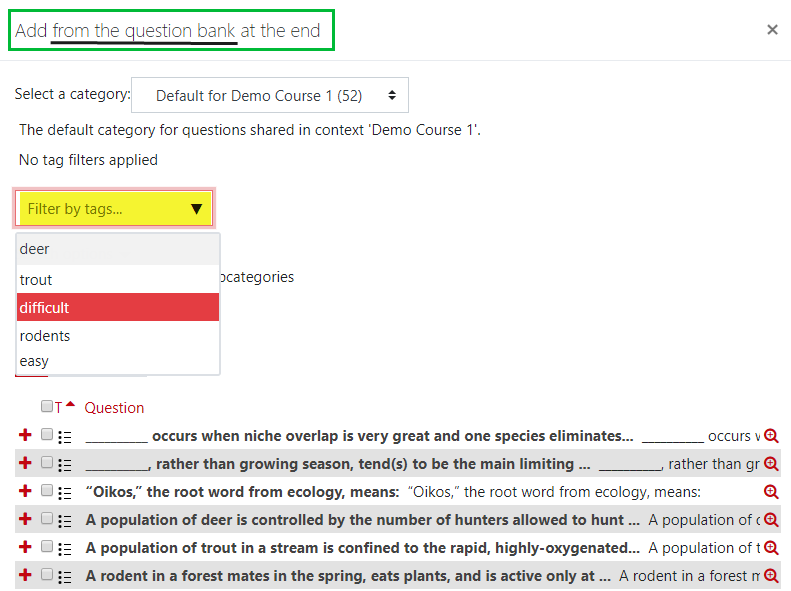
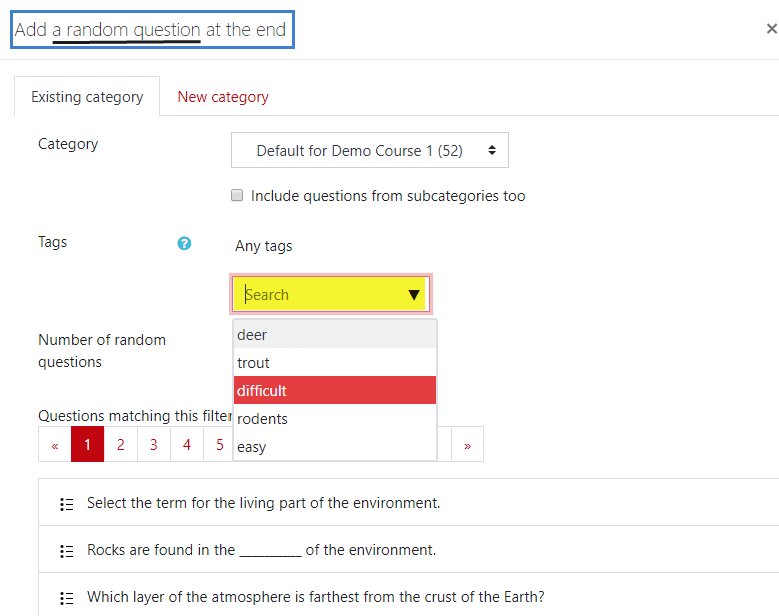
Add Tagged Questions to a Quiz
You can add specific tagged questions or pull a random selection of tagged questions by using the tag filter option. In the Edit quiz page, click on the Add questions pull-down menu and choose + from question bank (top image shown below) or + a random question (bottom image). Select the tag(s) that represent the type of questions you want to pull out of the question bank, then select the questions you want to add to the quiz.
Group Choice
Tired of circulating group sign-up sheets — how would you like to have Moodle enroll students in a group based on their choosing the topic?
With a "group choice" activity you can!
Basics Guide to 3.3!
Introducing 3.3 and Boost
On your mark.....
We have upgraded to Moodle version 3.3 and moved to our new host, eThink. Our move to eThink will allow us to include new applications that promise to make our academic lives just a bit easier.
Read on for more information about Moodle 3.3!

About "Boost"
As we migrated, we also upgraded to version 3.3 and adopted a new theme called Boost.
Moodle HQ has created helpful video tutorials, including this two-minute video introduction to 3.2 (our current version) and the new Boost theme:
Take the Tour!
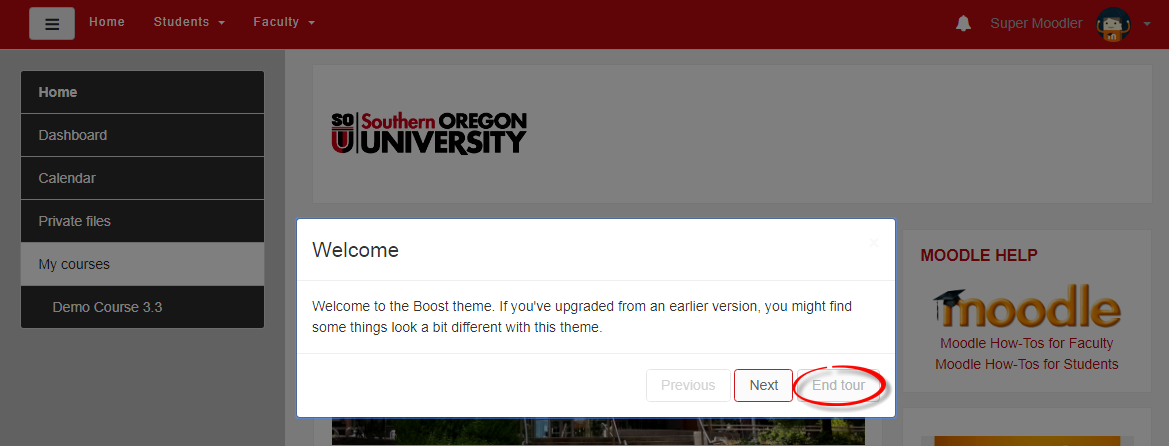
The first time you log into the updated version of Moodle, you'll be offered the opportunity to take a tour of the new site. With just a few clicks, the tour will show you what's new. You can skip the tour if you like—you can also reset it from a link at the bottom of the page if you'd like to catch it another time. You might also encounter a tour the first time you open a course.
Navigation in Boost
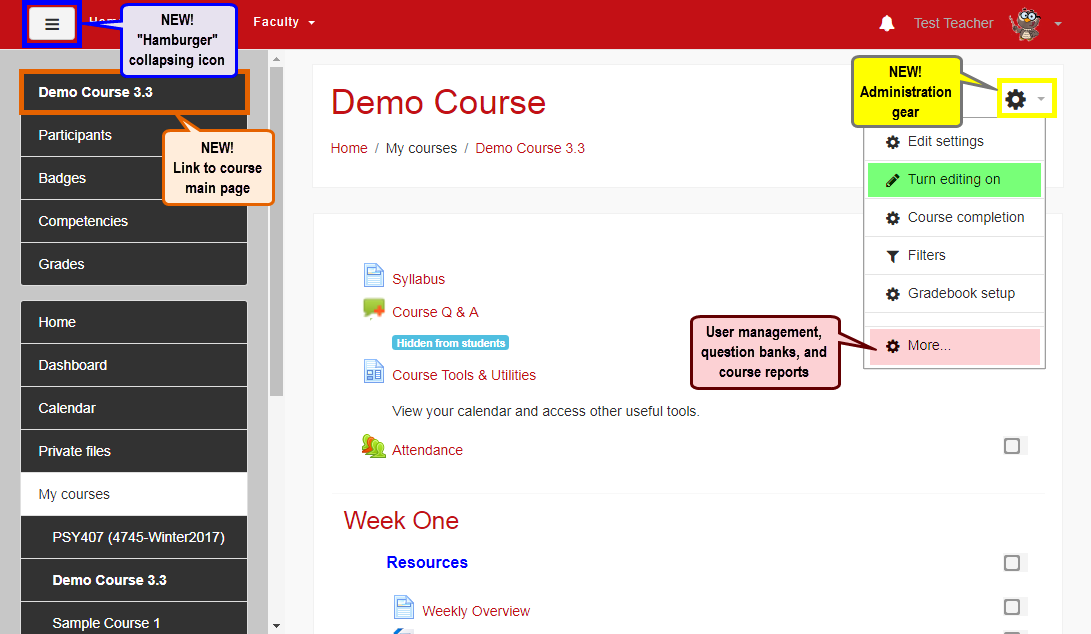
Here's how to navigate a course page in Moodle 3.3.
- Turn editing on and take care of other administrative tasks by opening the administration gear in the upper right corner.
- Scroll to the bottom of the option list and click on More if you don't see a link for a particular function.
- Create more working space on your page by clicking on the new "hamburger" icon in the upper left corner to collapse the left column. Click on it again to expand your page and access the course links in the left column.
More > Course Admin
When you open the More link, you'll find a page with two tabs: Course administration and Users. Each tab has links to functions that we're used to seeing in left blocks.
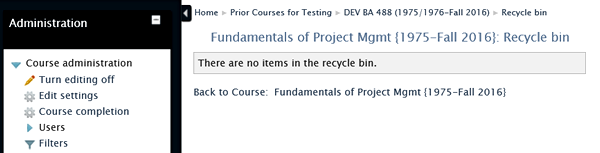
The Course administration tab has all of the standard course administration links plus links related to reports, badges, and question banks. Note especially the Recycle bin (new in 3.1), Dates (described in this book), and Course completion links (described in the New Features in 3.3 book).

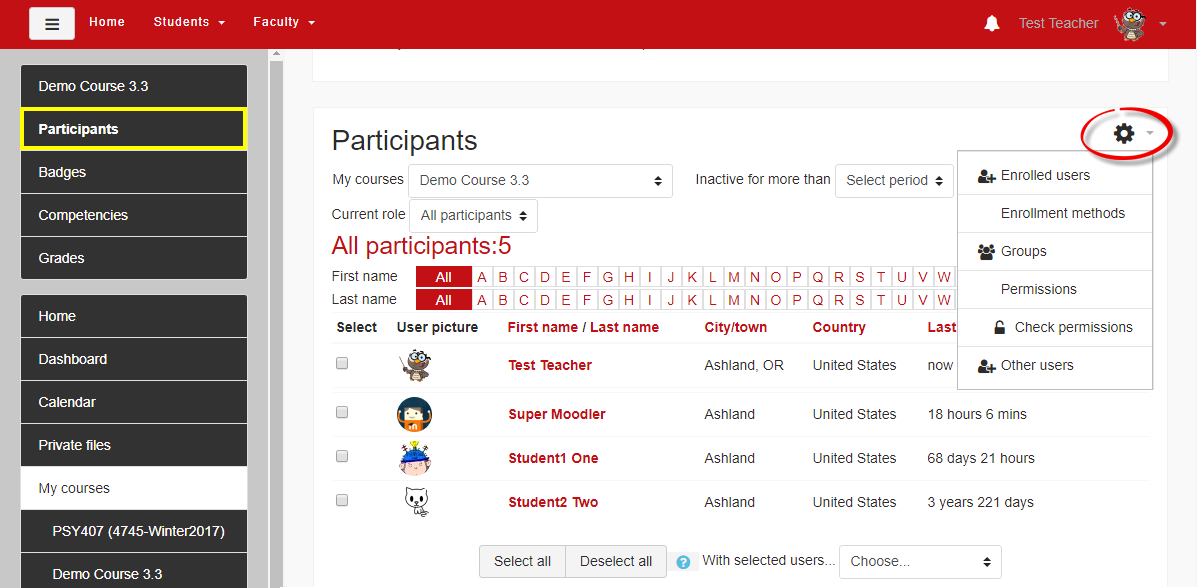
Participants Link
In Boost, when you open the Participants link, you'll also have quick access to User functions through the gear in the upper right corner. Rather than having to go into course administration settings, you can enroll a user or create groups directly from the participants page.
Activity/Resource Editing
How often have you discovered a typo in an item halfway down your course page and grumbled about having to scroll all the way back up to the top of the page to turn editing on? Say goodbye to that scenario!
In the new version, your editing icon is available when the item is displayed. Clicking on the gear icon in the upper right corner will display all of the options that you're used to seeing in the item settings block on the left in our current configuration.
Blocks in Boost
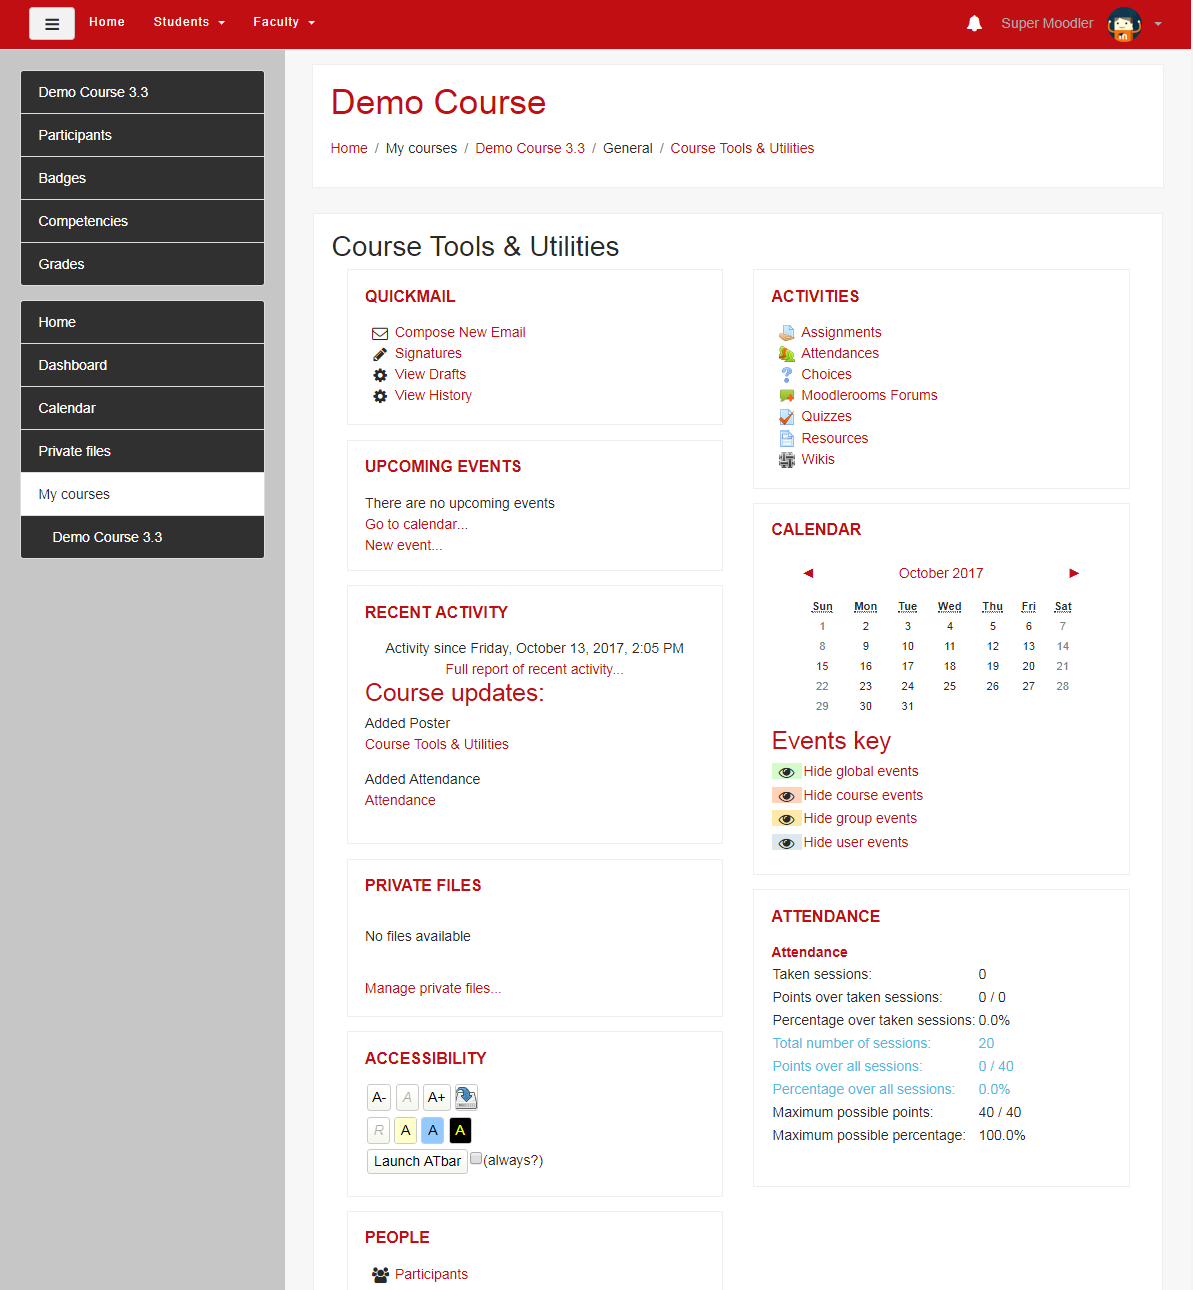
The Boost theme is designed to work well on mobile devices. In this theme, when you view a Moodle course using a phone or tablet, course blocks are not displayed—they simply disappear. Blocks can be really useful, however, so we've found a way to collect blocks and display them on a page called a "poster."
In this version, you'll be able to import a pre-configured poster page like the one shown below that will provide access to the latest news, upcoming events, course calendar, Quickmail, and much more. Look for instructions coming soon.
Work Better Faster!
 With the move to eThink and upgrade to version 3.3, we're able to add new tools to help us do our work. Check out these features:
- Update assignment and quiz due dates from one page!
- Collapsed topic format reduces scrolling.
- Marking Manager block makes grading easier.
Look for these other options in the New Features in 3.3 book:
- Set Completion Tracking settings for multiple items.
- Show students who is in their groups.
- Enable students to sign up for appointments—and assign points for attendance (great for oral exam or presentation sign-ups!).
- The "journal" feature is back!
- Accessibility features for all users—increase the font size and contrast of your personal Moodle view. Settings can be saved.
NEW! Update Due Dates
We now have a special "report" that allows us to update due dates in a course in one page. If you import content from a prior term into a new course shell, you know how much work is involved in editing all of the assignments and quizzes to reflect the new terms due dates.
For instructions, see the related article in the New Features in 3.3 book.
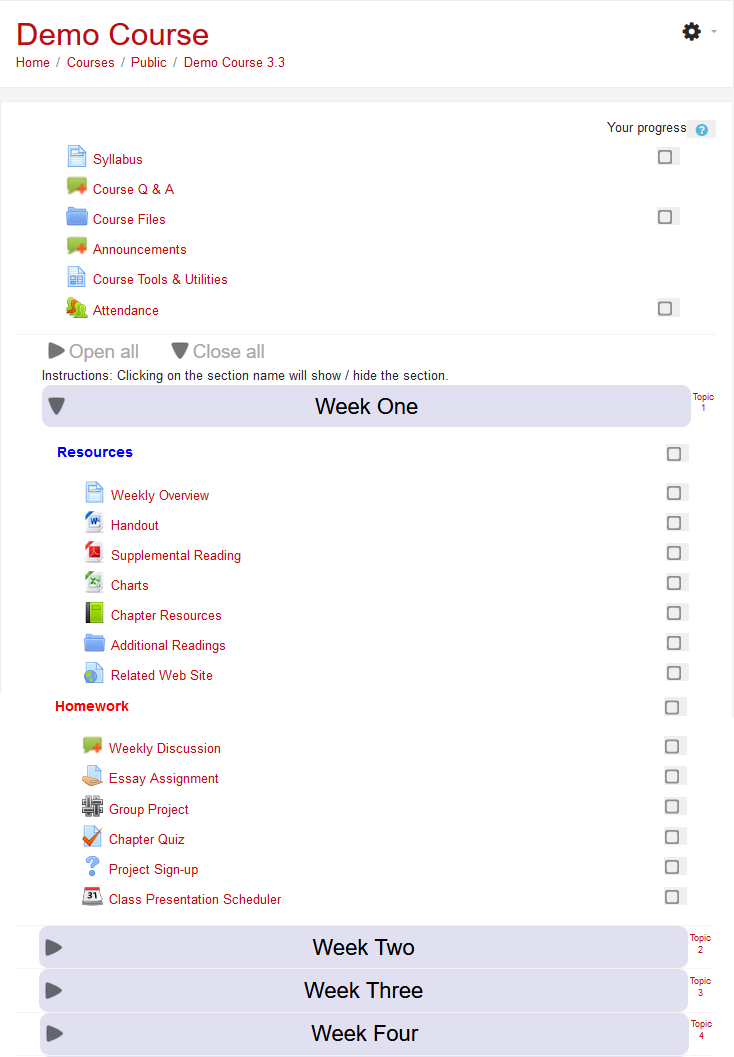
NEW! Collapsed Topics Format
In addition to the weekly and topics format, our new installation features "Collapsed topics" as a course format. This format is great for eliminating Moodle's famous "death scroll."
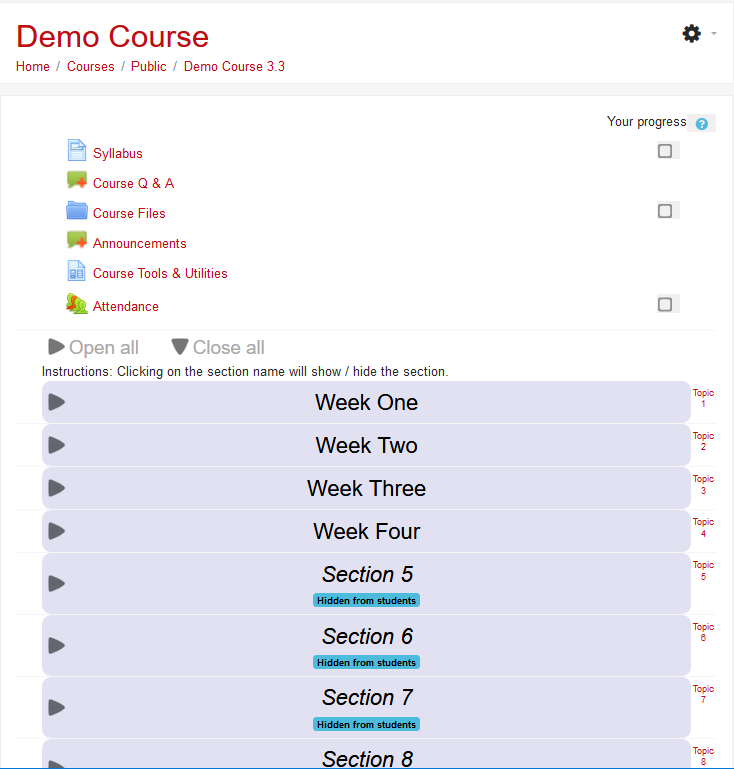
Collapsed Topics: Open Section
Clicking on the section name opens the area up and displays the section's content.
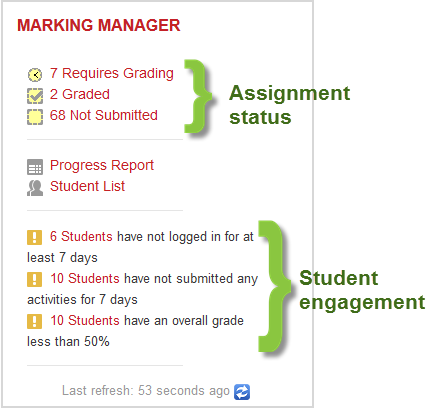
NEW! Marking Manager
 One of the few features that we will no longer have as a result of this move is the Moodlerooms Grader (better known as Joule Grader). The Marking Manager block approximates the Moodlerooms Grader in many ways, although it does not facilitate forum grading.
Faculty can see this block, but it remains hidden from students.
One of the advantages of the Marking Manager block is that it not only provides a recap of assignment status for the entire course, but it also displays a snapshot of student engagement. Clicking on the links provided shows you which students have not been active and reports when they last logged in. By default, the block informs you that students are failing if their gradebook score is less than 50%, but you can adjust that number as you wish by configuring the block.
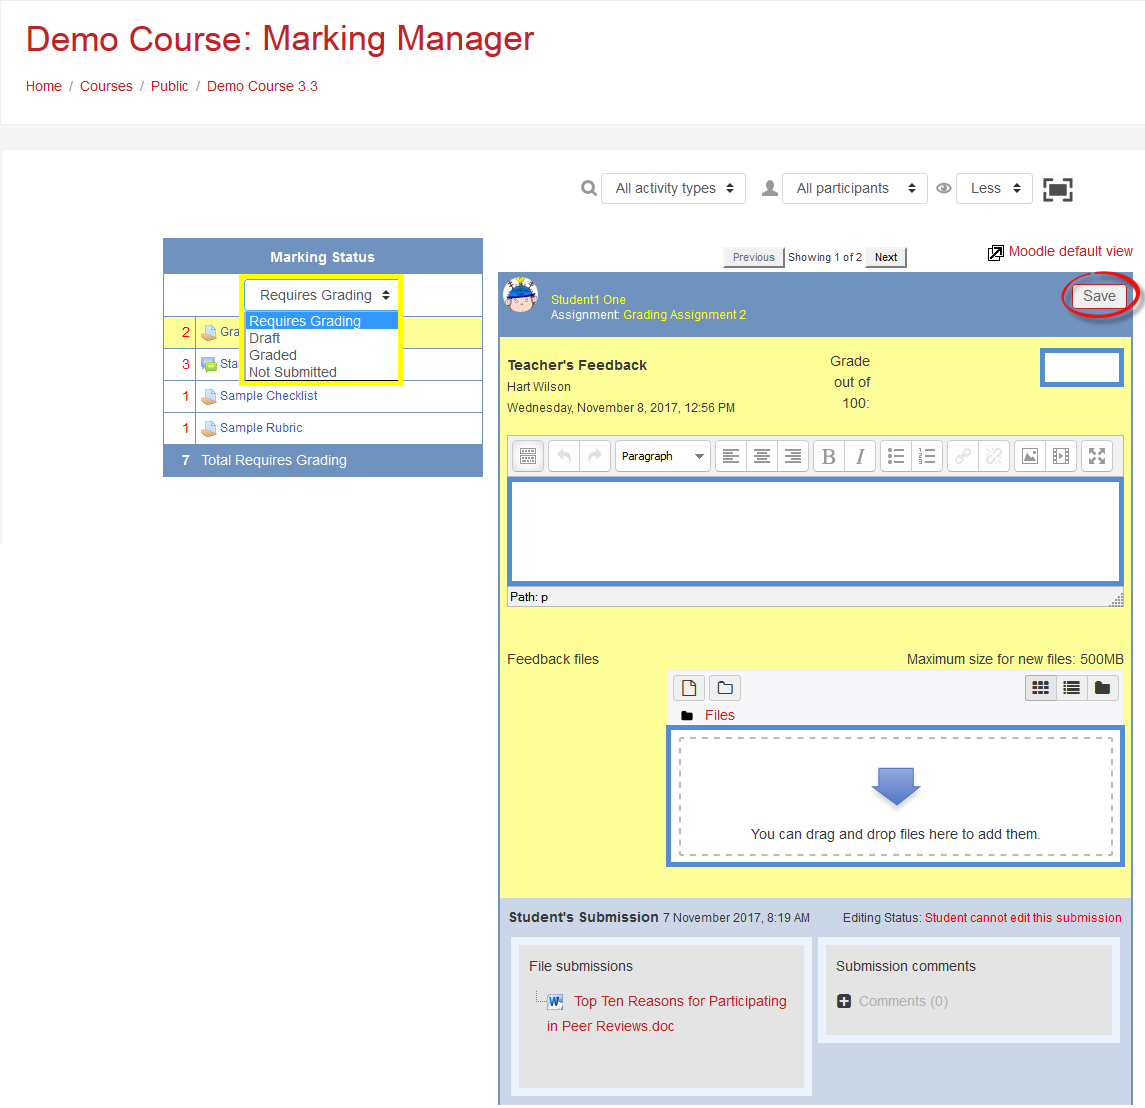
Grading with Marking Manager
Here's how the Marking Manager block looks when you select a file submission assignment for grading:
Learn More!
See the CIS Events Calendar for classes in the new version. Moodle drop-in and orientation sessions for Moodle 3.3 will be held held between New Year's and the first day of Winter term. Sign up for a session.
Cool New Features in 3.3
Moving Up to 3.3
On your mark.....
We have upgraded to Moodle version 3.3 and moved to our new host, eThink. Be sure to review the Basic Guide to 3.3 for information about navigating in the new version.
Read on to learn about new features in Moodle 3.3....
NEW! Update Due Dates
If you import content from a prior term into a new course shell, you know how much work is involved in editing all of the assignments and quizzes to reflect the new term's due dates. We now have a special "report" that allows us to update all of the dates in a course in one pass!
First, open the administration gear link and click on More...
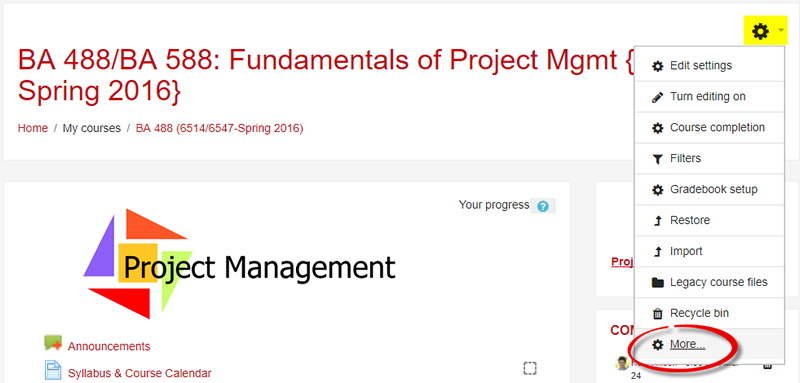
In the Reports area, select Dates.
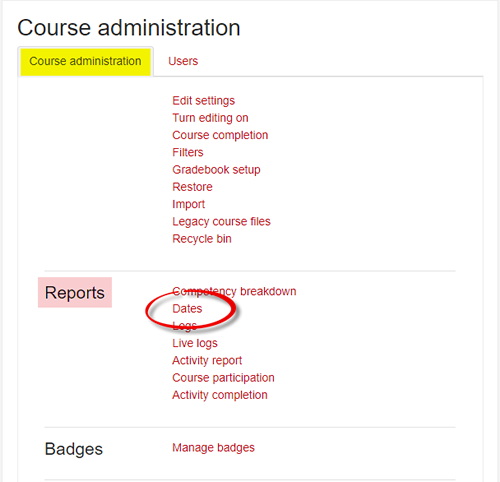
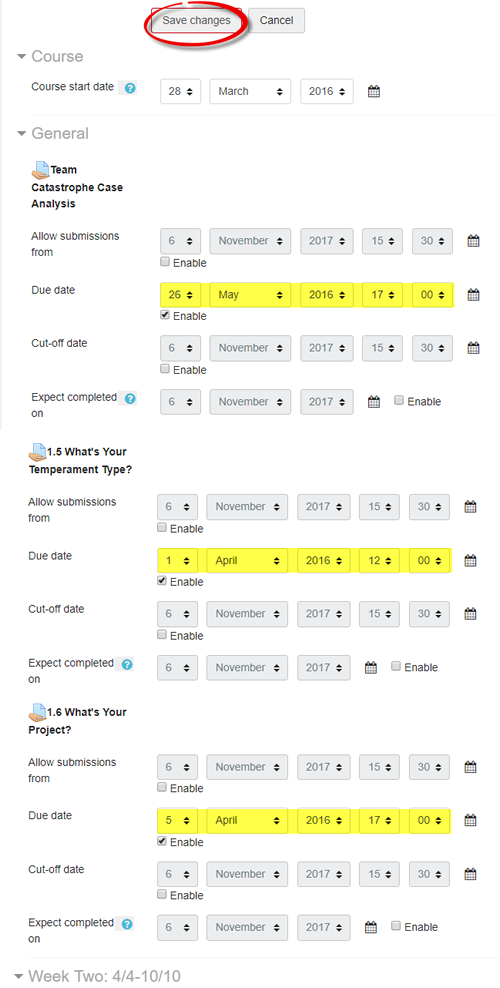
From the Activity type pull-down menu, select Assignment and click on Expand all.
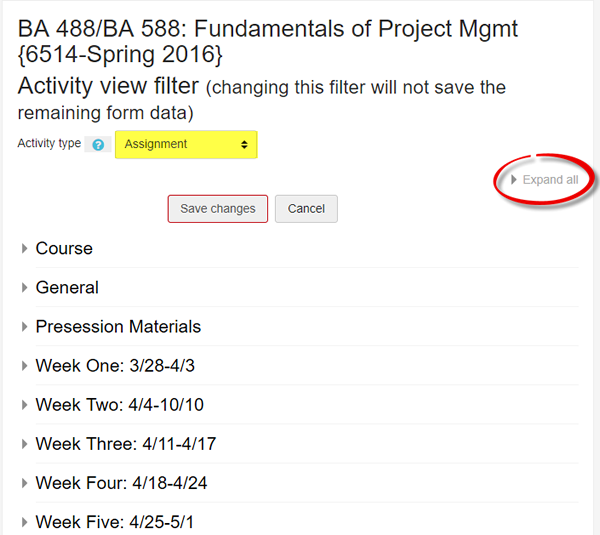
After selecting the Assignment activity type, all of your course assignments will be listed down the page. Update the due dates as needed, then click on Save changes.
Note: Keep in mind that you don't have to have a date set to begin allowing submissions—as long as the assignment is visible to students, they can submit their work. Similarly, you don't need to indicate a cutoff date or an expected completion date for any assignment.
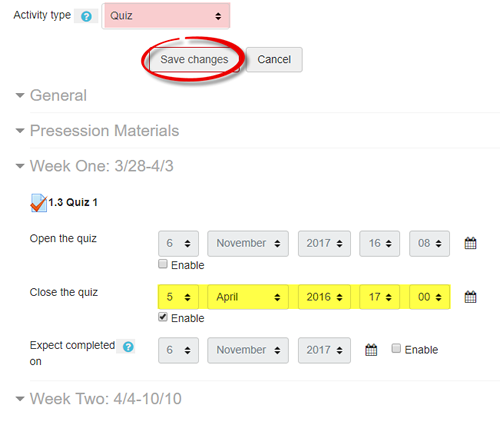
Quizzes are another area where we can update course due dates. Select Quiz from the pull-down menu and update the open and close dates as needed. Save changes.
NEW! Completion Tracking Options
Completion tracking is all about the check boxes to the right of most items in our courses. This feature is very helpful for students, allowing them to track their progress through a course. Completion tracking also allows you to see how students are engaging with the activities and resources in your course.
By default, students can check items off manually, but we can also set materials up so that students have to interact with them in some way and then Moodle checks them off. The kinds of interactions you require vary with the type of item you've created—you can make completion conditional on students viewing a page or file, submitting an assignment, or contributing to a forum.
By opening the Course completion option in the course administration gear, you can set up default requirements for all new items created in your course and/or adjust a batch of existing items all at the same time.
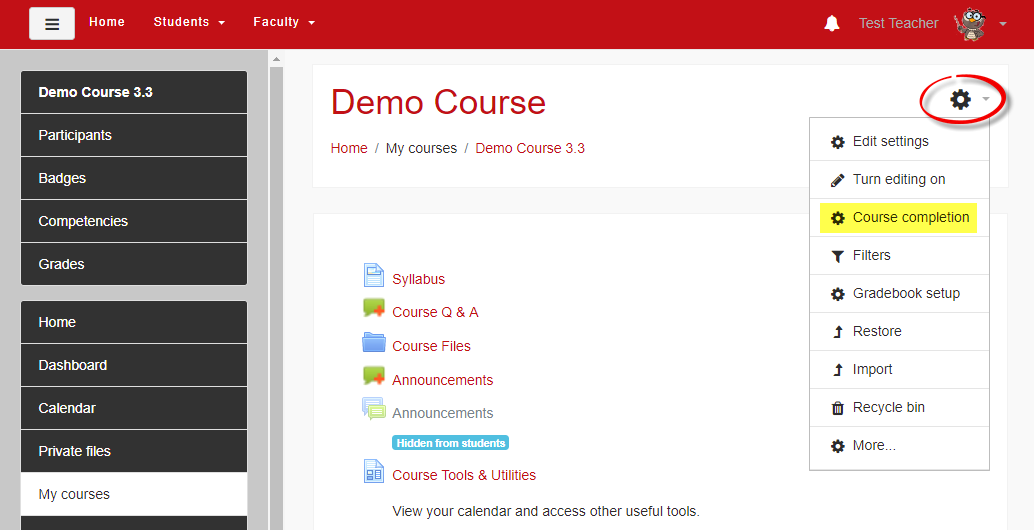
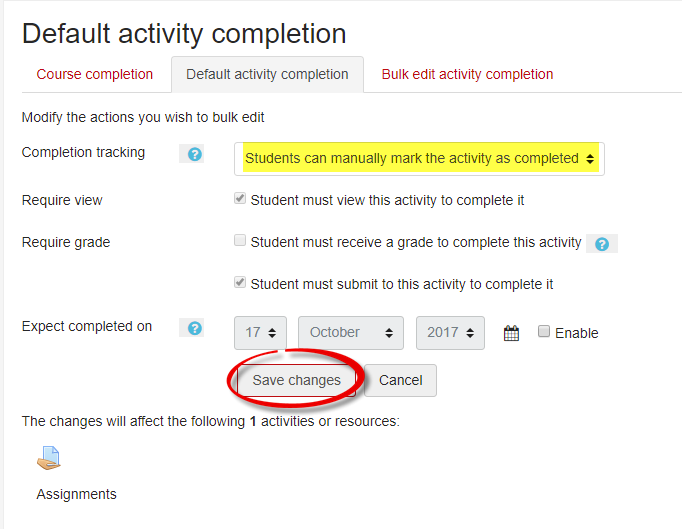
Open the Default activity completion tab and select the type of item for which you wish to set new tracking conditions.
Click on Edit.
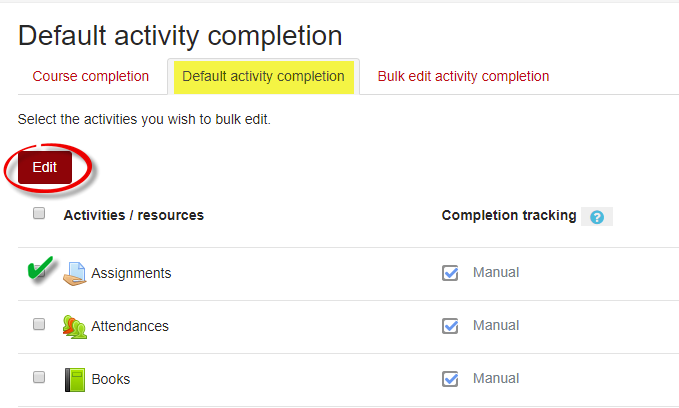
Select the desired conditions for completion from the Completion tracking pull-down menu. Save changes.
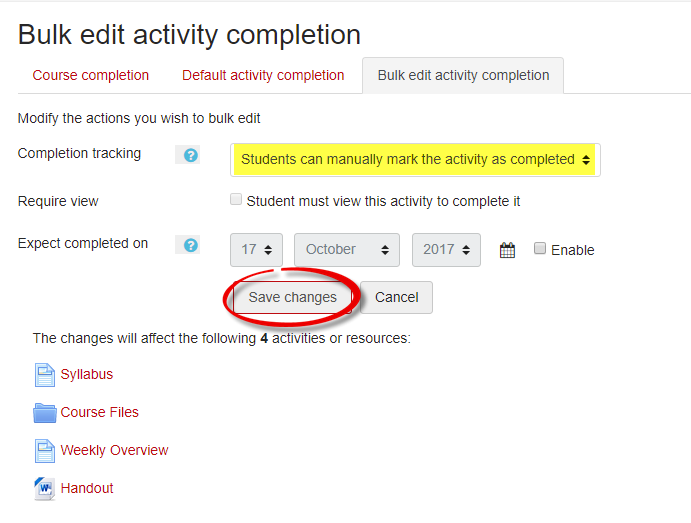
To update completion tracking settings for multiple existing items, open the Bulk activity completion tab and select a group of items that you wish to share common completion requirements. Click on Edit.
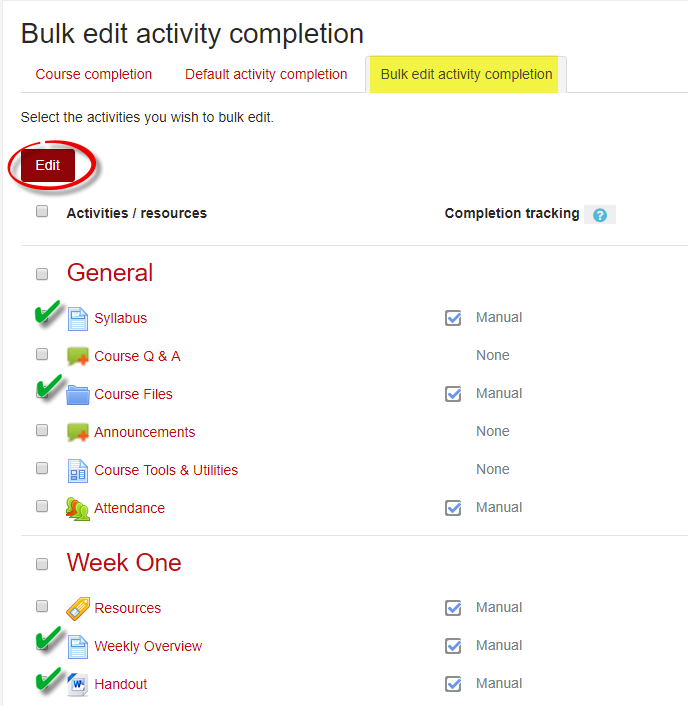
Choose the desired completion conditions from the Completion tracking pull-down menu. Save changes.
NEW! Group Members Display
It's always been challenging for students to find out who's in their group. Our new "Group Members" resource creates a page that lists either just the members of a student's group or all of the students in all of the groups.
In addition to choosing whether to show all or some of the groups, you can also choose to reveal email addresses just for other group members or for all students.
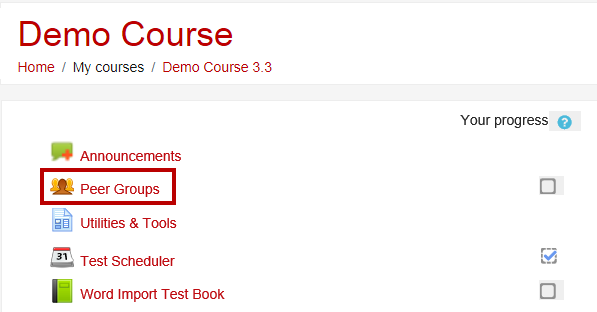
Here's what the link looks like on your course page—note that you can name the link however you like (Teams, Groups, etc.).
Here's what Student One sees when the Group Members resource is set to show "Own group" and email addresses are displayed:
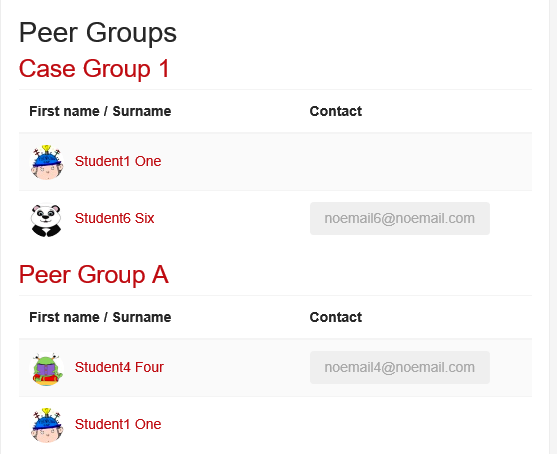
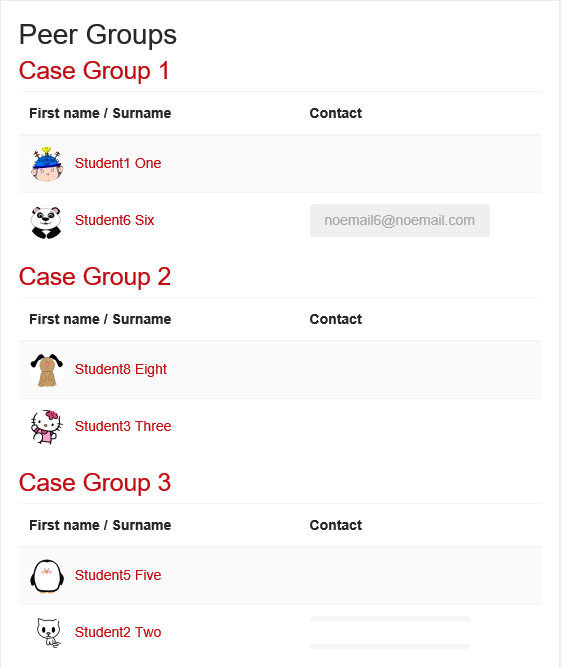
And here's a partial view of what Student One sees when all of the groups are displayed and just his group's email addresses are shared:
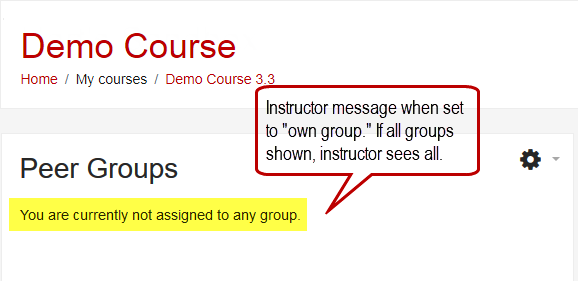
If you work with groups in Moodle, you're probably aware that you don't need to be enrolled in a group in order to track your students' activity within their group. Because as a teacher you aren't formally enrolled in any groups, when you post a Group Members resource set for "Own group," you'll see the message shown below when you open the link. Never fear, students are seeing their groups! If a Group Members page is set to "All groups," you will see all of the students listed just as they do.
Faculty can see who is in which group by clicking on the Participants link in the navigation drawer on the left, opening the gear to select Groups and selecting the Overview tab.
NEW! Scheduling Tool
One of the new apps that we've added is a "Scheduler." A scheduler activity allows you to established time slots for your students to meet with you—office hours, oral exams, even class presentations can be scheduled using this tool.
You can set up graded slots and assign points to an appointment. A feedback box is provided for the student as well as a confidential note-taking area for the instructor.
Reminders can be auto-scheduled to be sent to students prior to the appointment.
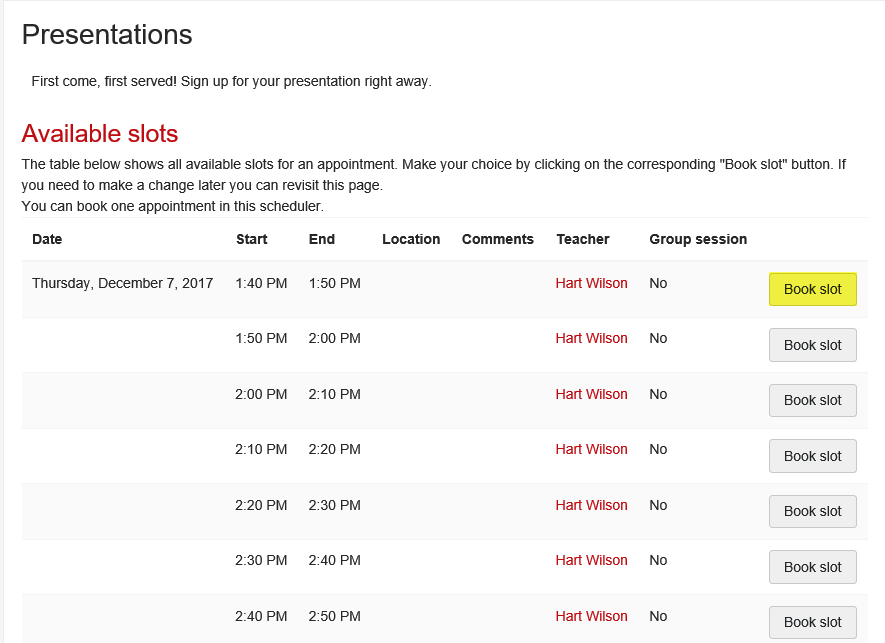
The Scheduler activity below is designed for students to sign up for class presentations.
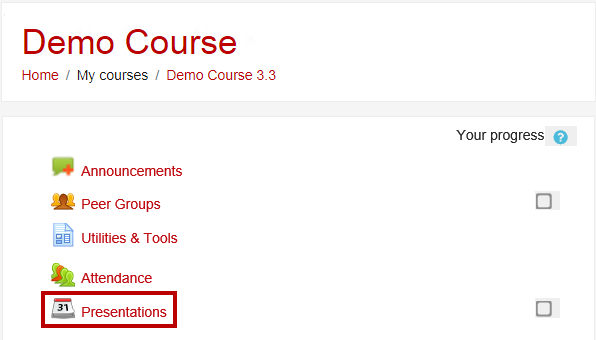
Here's what the options look like for students—they click on Book slot in order to claim an appointment (or in this case, the time they want to present):
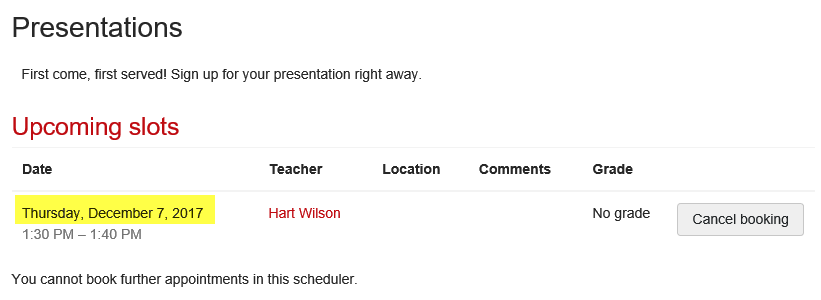
Once a student has booked a slot, this is what they see when they open the scheduler:
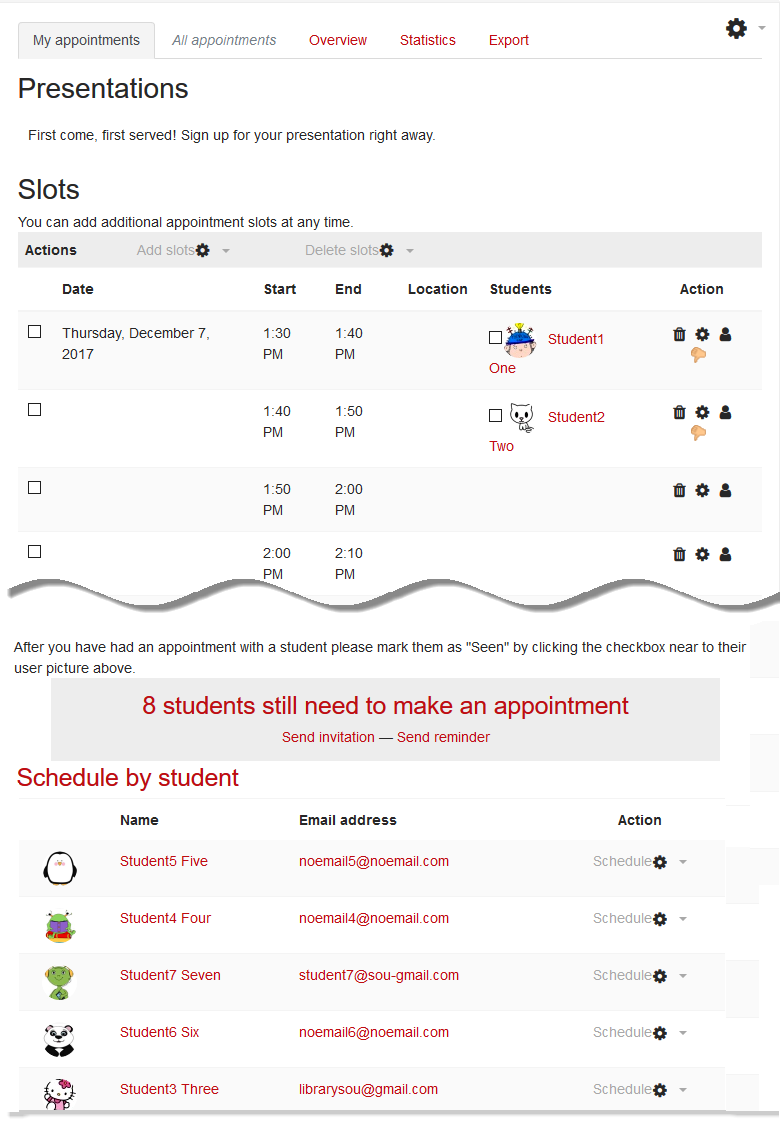
Once students begin booking slots, you can review their choices and see which students have not yet booked a slot. Note that you can email students who have not yet signed up (nagging made easy!).
Opening the appointment slot allows you to enter a grade (if you've set the session up to be graded) and provide feedback to the student. You can also include a confidential feedback box for your own notes.
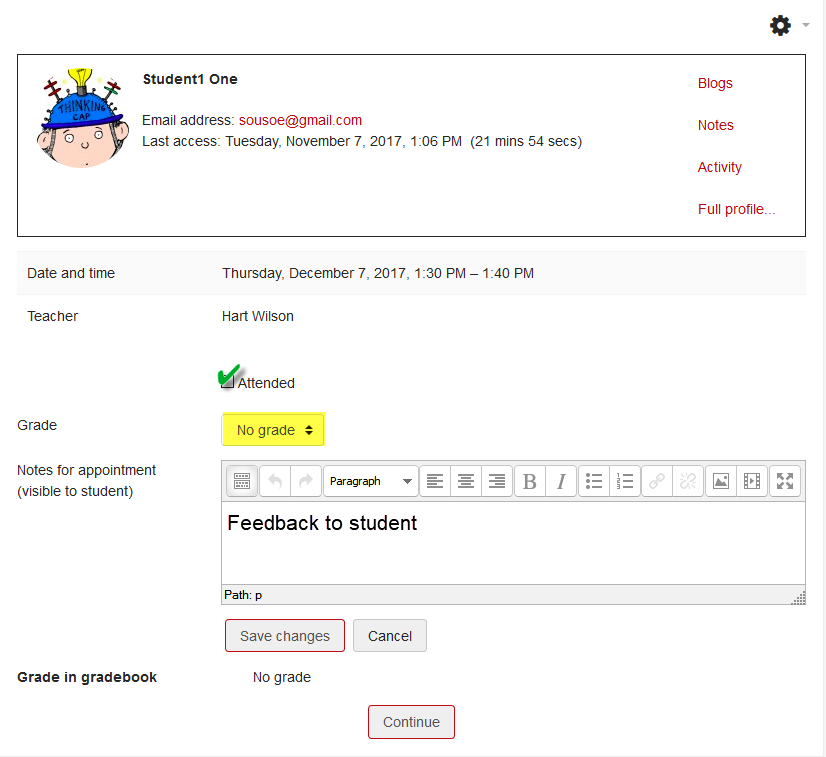
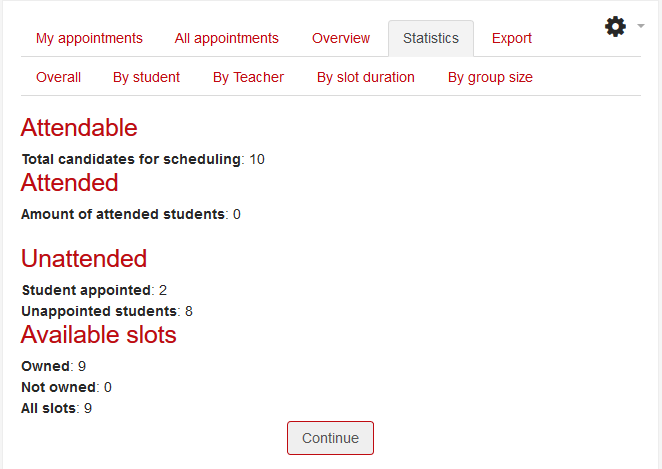
The Scheduler is clearly very robust—here's an example of the stats you can review at a glance:
NEW! Grading Reminder
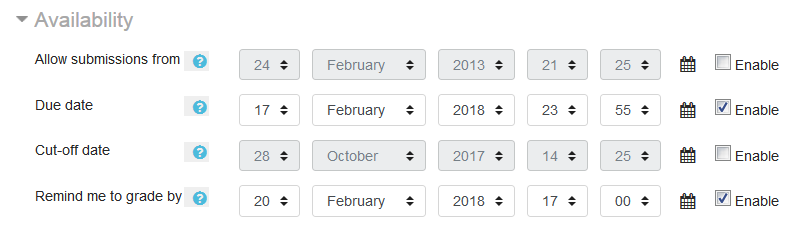
Set a reminder date for getting your grading done!
When you create an assignment link, add a reminder to let you know when you've missed a deadline you set for having an assignment graded. Reminders show up as late notices in your user dashboard (accessed via the user menu in the top right corner of the page).
NEW! Journal Activity
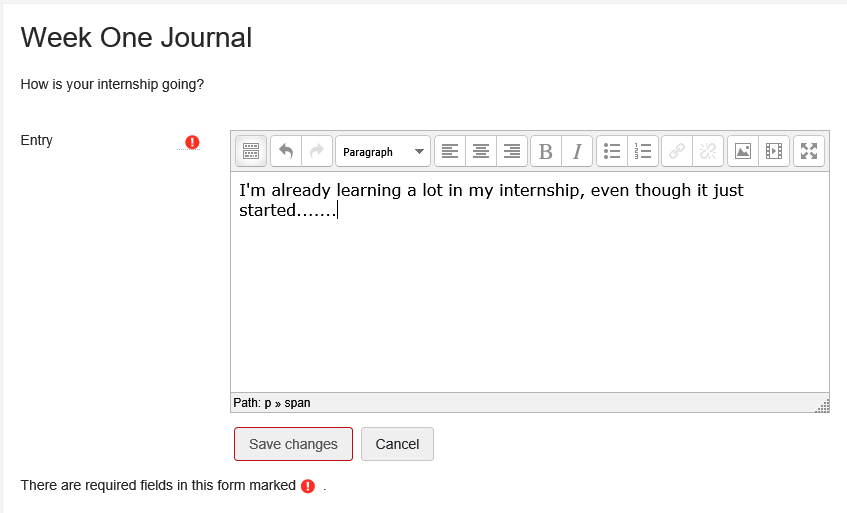
The Journal activity is making a comeback! Once part of our installation, this unique online text assignment is available to us again in our new installation.
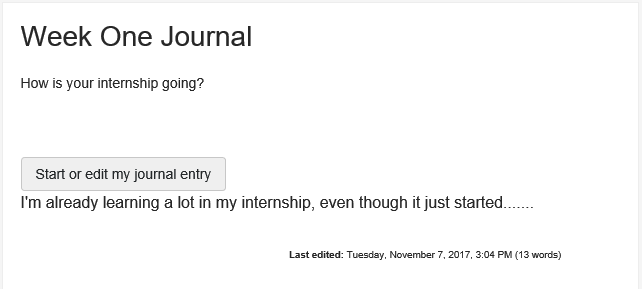
This activity allows students to continue to add to an online text assignment over time. Points are recorded just once, but instructor feedback can be entered as often as you like in response to student reflections.
When students open the link, they can enter their response.
Student view after saving:
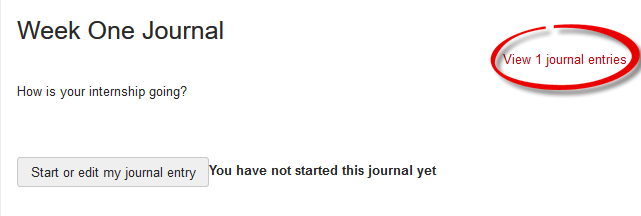
On the instructor side, this is how you access student journal submissions:
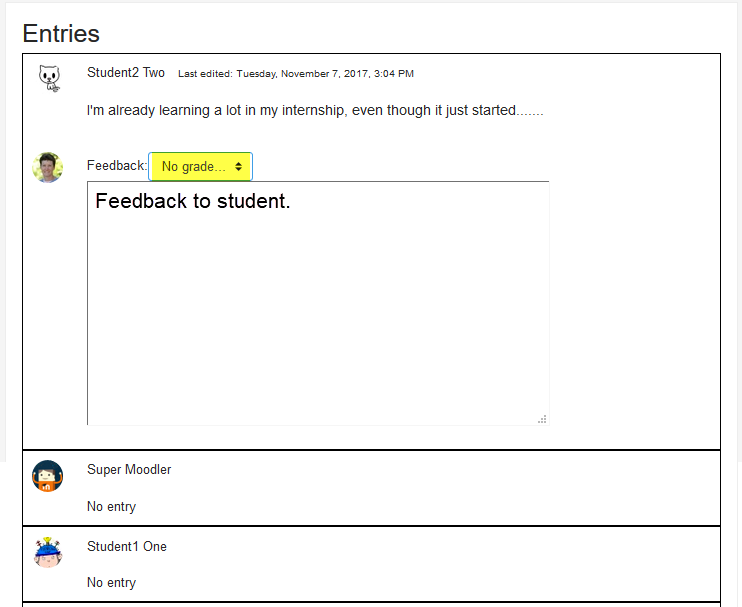
Once you view submissions, you can assign grades and provide feedback:
What's New in 3.2!
![]()
On your mark.....
On July 6, we'll be upgrading to Moodle version 3.2. Moodle will have a new look, but not much else will be changing at this time. While more significant changes were initially anticipated, we're going to hold off until next Winter break to adopt the "Boost" theme which provides new navigation for course builders. This will be less disruptive for faculty and students in summer courses, and will allow more time for us to provide orientation to the changes for faculty during Fall term.
Our New Look!
Our new theme is "responsive." It's designed to work well on mobile devices as well as on laptop and desktop computers.
Shifting Blocks
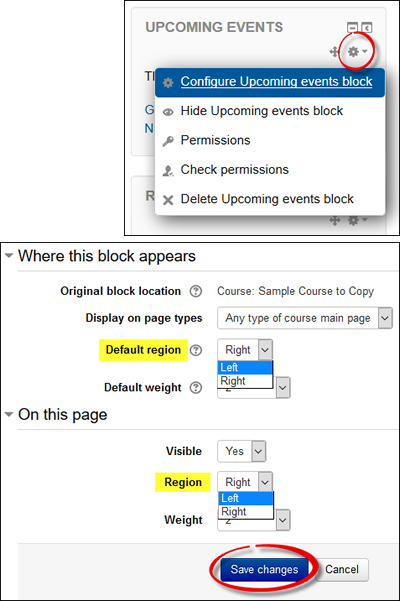
With our new layout, you may find that your course has blocks on the left and right sides instead of just on the left. Shifting a block from the right back over to the left just takes a moment. To do so:
- Turn editing on in your course.
- Navigate to the block that you want to move and click on the Configure icon in the upper right corner.
- Select Configure [name of block] block .
- In the configuration page, use the pull-down menu in the Where this block appears options area to set the Default region to Left.
- In the On this page options area, select Left again for the Region.
- Save changes.
Once the block is on the left side, you can use the move icon (next to the configuration icon) to drag and drop the block into the desired position.
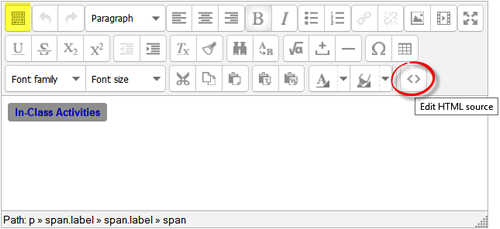
Label "Style"
If you use "labels" in your course as headings for different types of resources and activities, you may find that the new Moodle has applied a style code to them, making the text small and the background gray, as shown in this example:

These labels are hard to read and do not provide sufficient contrast to meet accessibility standards for users dependent on screen readers to read course content. We are working with our Moodle host to fix this coding problem, but in the meantime, it's easy to remove the code and eliminate the gray background.
To do so:
Open the label in edit view and click on the Toolbar Toggle icon in the upper left corner to display additional rows of editing icons. Then click on the Edit HTML source icon in the bottom row.
In the HTML editing window, select the text that applies the code—<span class="label"> and delete it (in this example, the code appears twice, for good measure!), then click on the Update button to save your changes.
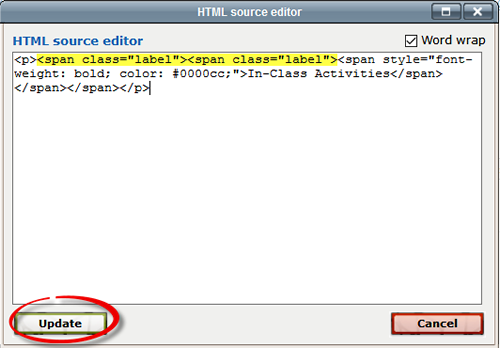
The label text will now be displayed without the gray background. Save the changes you made to the label.
Relocation for Switch role to...
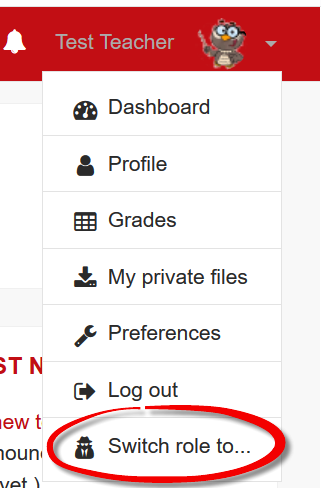 The link for switching your role to student for viewing your course has migrated from the Course administration block to the user menu associated with your image in the upper right corner of any Moodle page. To access the link, click on the tiny control immediately to the right of your user image and open the user menu. To return to your normal role, reopen the user menu and select that option.
Relocation of "Grades" Link
The Grades link that formerly resided in the Course administration block has been moved. It has been shifted to the Navigation block as shown in this screenshot:
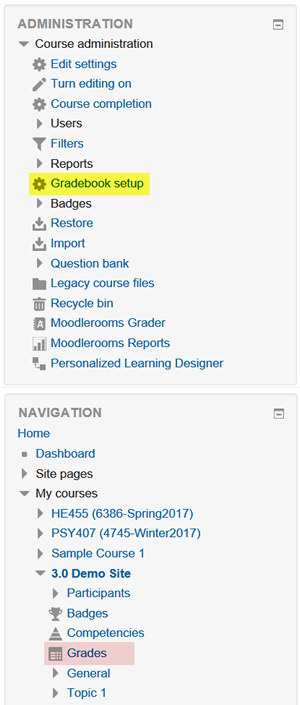
For many of us, the new location is not as convenient, but there is a simple workaround. If you click on the Gradebook setup link, clicking on the View tab is the equivalent of clicking on Grades.
New Icons/Names
Standard icons have also been updated with this theme, and some items that used to be called "Joule" have been rebranded as "Moodlerooms," (named for our host that developed them). Note that advanced forums have been renamed "Moodlerooms forums" as well:
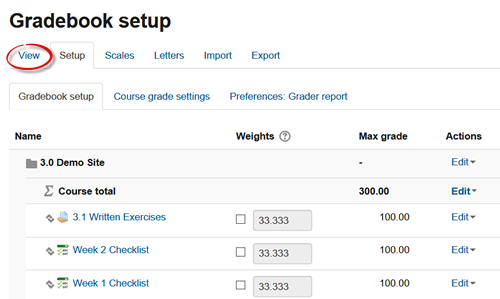
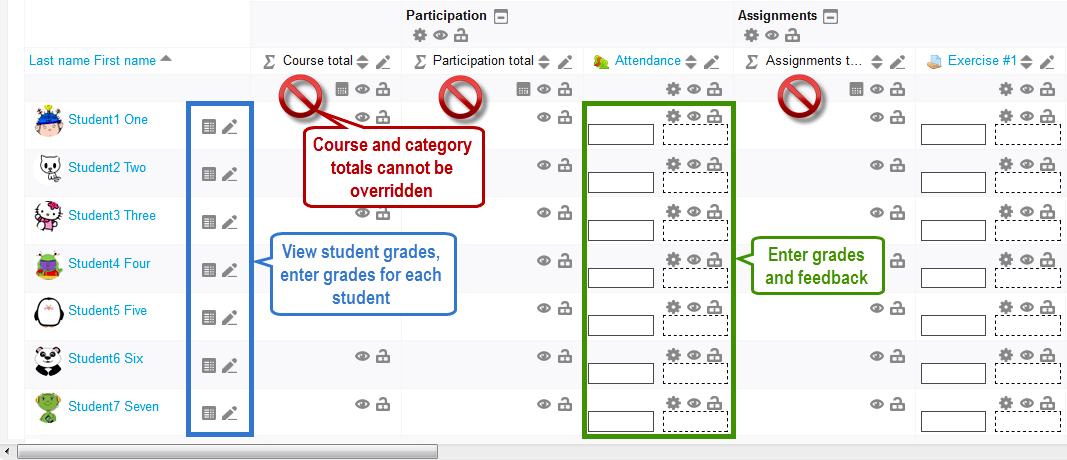
Changes in Gradebook View
Moodlerooms is discontinuing the old standard gradebook view, "Joule Gradebook." (NOTE: They have NOT discontinued the "Joule Grader" tool. It has been renamed "Moodlerooms Grader.")
The new gradebook view will default to an updated version of Grader report:
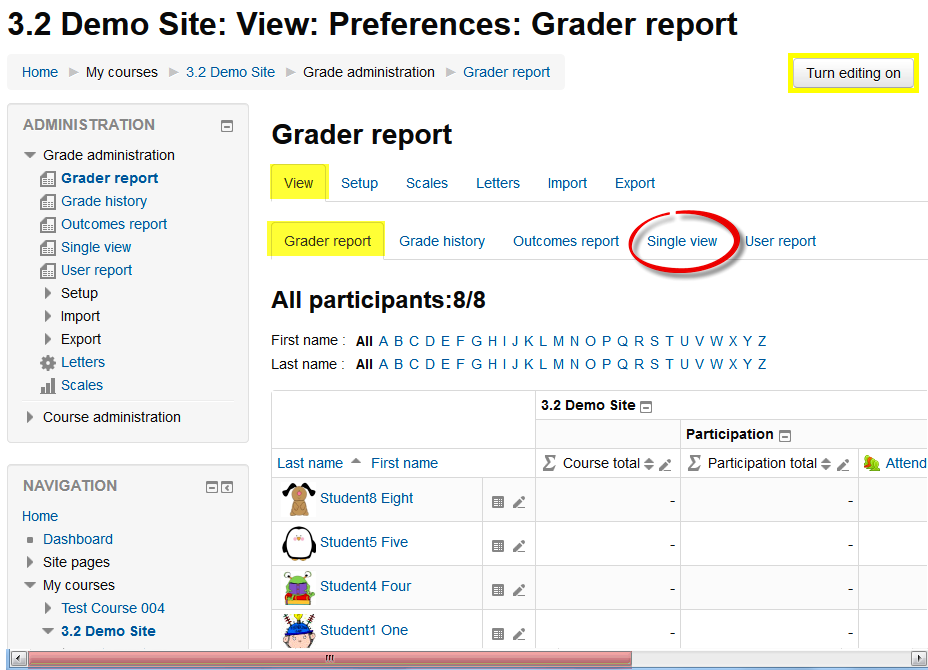
Grader Report Tips
Five helpful things to know about the new "Grader report" view:
- The link for Grades has been moved to the Navigation block. The link for Gradebook setup is still located in the Course administration block.
- In older versions of Moodle, the Turn editing on button was located on the extreme right edge of the Grader report page. In this version of Moodle, the button is located on the gradebook landing page and you no longer have to scroll to find it.
- If you used the "Column grader" or "Row grader" options in the Joule gradebook view, the Single view option will provide you the same functionality.
- The horizontal scroll bar (highlighted in pink in the image below) is attached to the window itself, not to the gradebook. Rather than scrolling to the bottom of the gradebook list, look for the the scroll bar at the lower edge of your browser.
- Student names remain fixed in the 3.2 gradebook, so you always see names in the grade rows as you scroll across.
Grader Report Functions
Here's what you'll see when you turn editing on in the Grader report view:
Course Evaluation Links
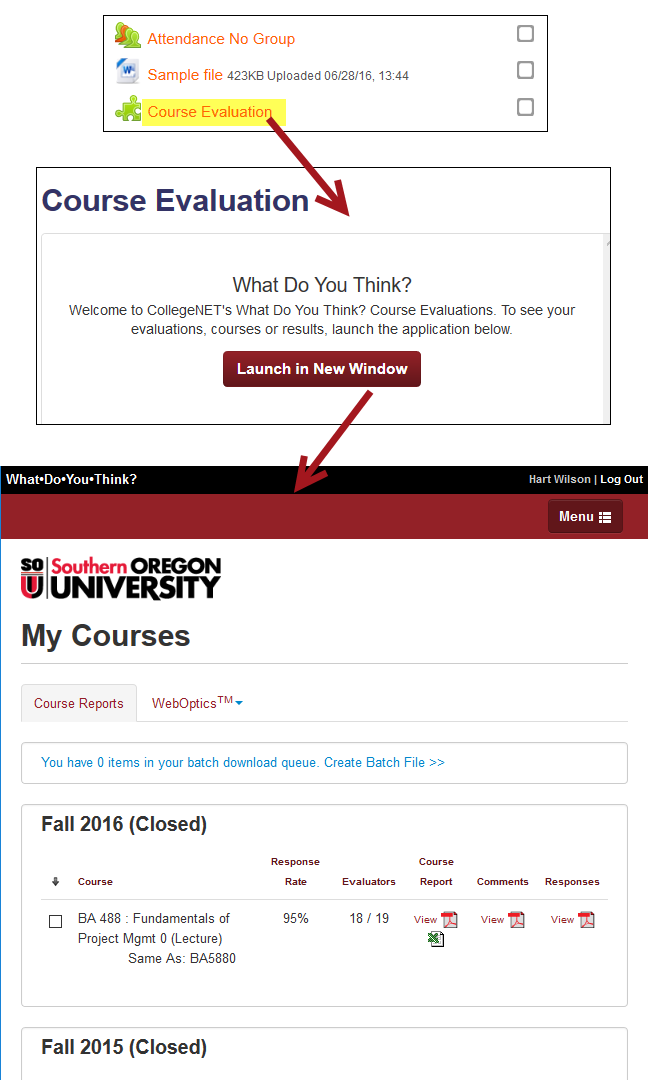
We're adding a new tool in Moodle to encourage students to complete online course evaluations. Fall term Moodle courses will include a link at the top of the page for students to use to access their "What Do You Think?" course evaluation forms. Because the forms are only available to students at the end of the term, access to the links will be "restricted" so that they will only be visible to students between November 27 and December 15. (Faculty can access their evaluations from prior terms by clicking on the link any time.)
Clicking on the link will open a window with a link to launch the "What do you think?" interface. Faculty will see course evaluation reports from completed terms, while students will see links for the courses they are currently taking. Here's what it will look like:
Setting Up the Link
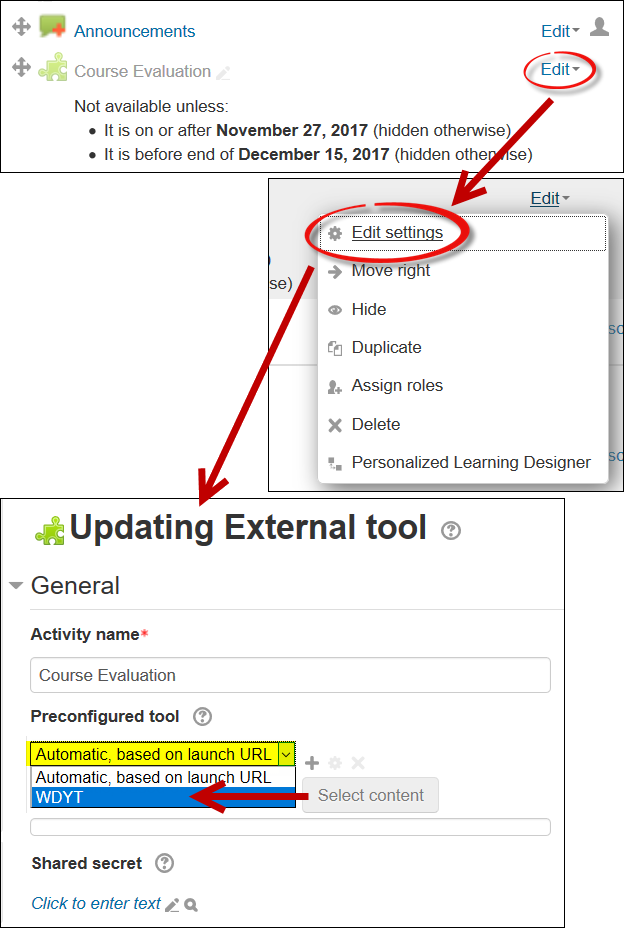
A link will be embedded in every course shell for your convenience. Access to the link is restricted to the course evaluation period, the last two and a half weeks of the term. It will be completely hidden from students the rest of the time.
To make the link work as it should, you need to connect it to the course evaluation system:
- Turn editing on in your course.
- Click on the Edit link associated with the
 Course evaluation item.
 - Click on Edit settings.
- Open the Preconfigured tool pull-down menu and select WDYT .
- In the Grade option area, use the Grade Type pull-down menu to select None . No other fields need to be adjusted.
- Scroll down and Save changes.
Course Eval Video Tutorial
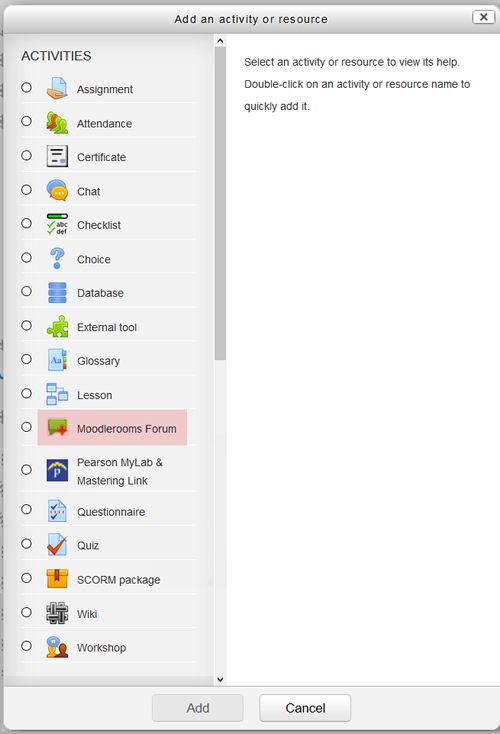
Course Format Option
Moodlerooms is discontinuing the "folder view" option with the upgrade to 3.2. While most faculty use the "weekly" or "topics" format for their course, the folder view format offered a more condensed view of the course main page and reduced the dread Moodle "death scroll."
Happily, there's an alternative that is very easy to set up: displaying one section per page. This is how it looks:
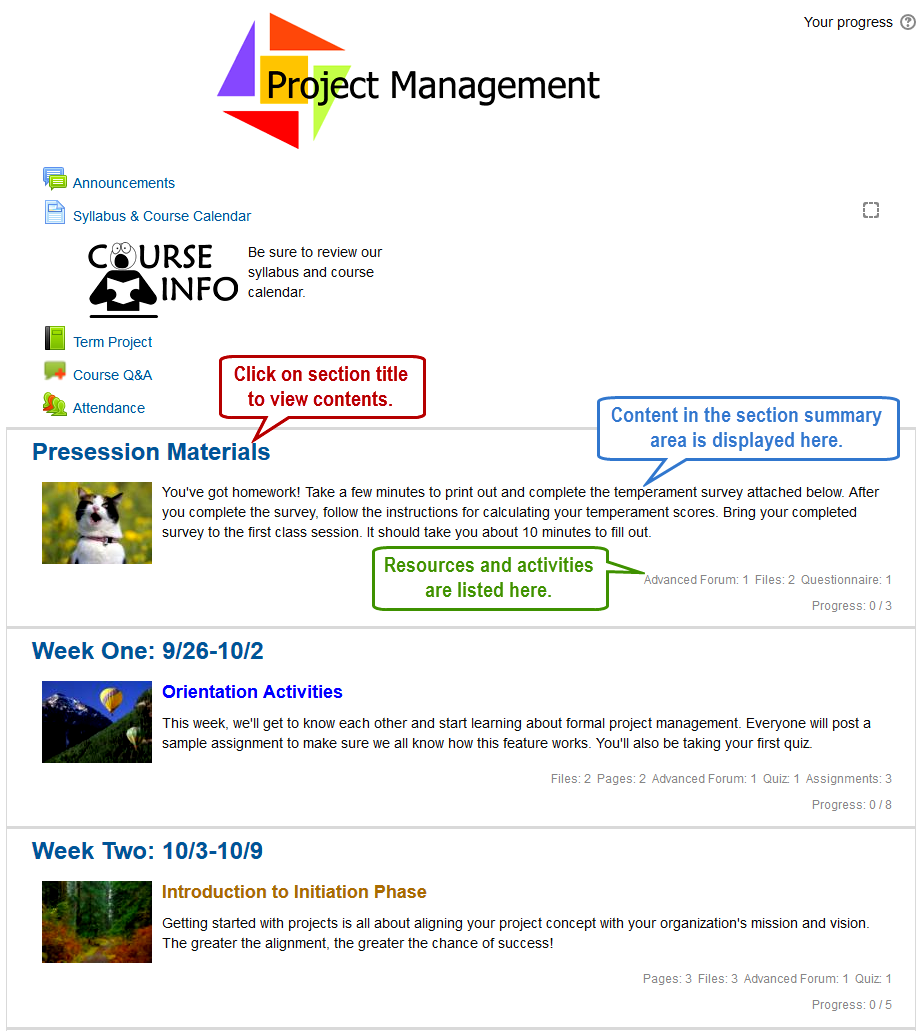
See what it looks like when you open the section.....
One Section View
Here's what the section looks like when you open it:
Assignments: Due Date Overrides
It's now easier to provide an extension for a student who needs more time to complete an assignment. Due date overrides can quickly be entered for either individual students or groups. Once you've created the assignment, use the Save and display link to display the Assignment administration block on the left. Then follow these three simple steps:
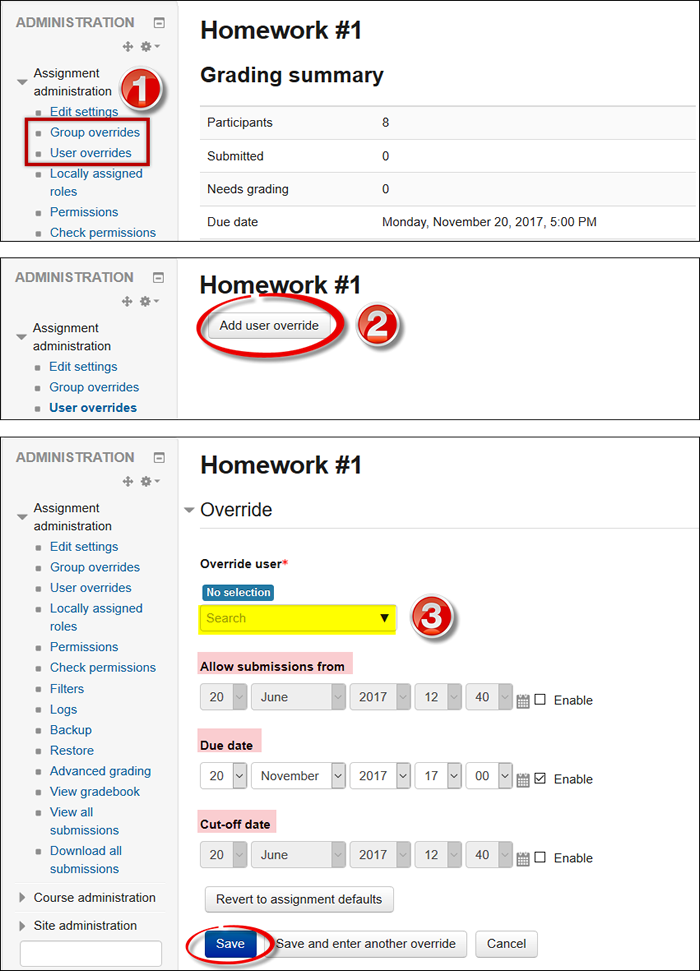
- Select either Group or User overrides from the Assignment administration block.
- Click on the Add ___ override link (either Group or User, depending on your needs).
- Select the student or group name from the pull-down menu, then set the related date(s) as needed.
Save or save and enter another override, as needed.
Assignments: Required File Types
It's now possible to limit the types of files that students can upload when they submit an assignment. Leaving this new field blank will continue to allow students to submit any type of file.
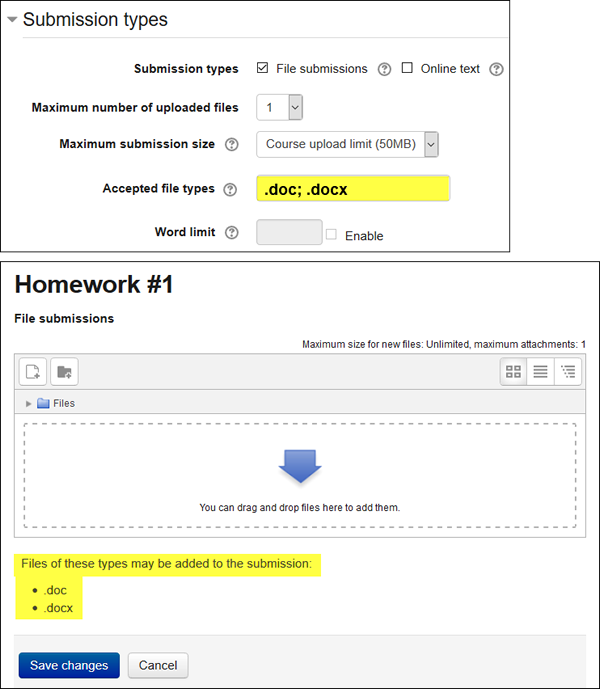
In the Adding or Updating an assignment page, the Submission types option area includes a field for indicating what types of files you will accept for this assignment.
To prevent students from uploading anything other than a Word document, for instance, you'd enter .doc and .docx in the field, separated by a semi colon and space, as shown in the example at right.
As shown here, the file type limitations are then displayed in the student's submission page. If a student attempts to upload a different file type, the file will not be accepted.
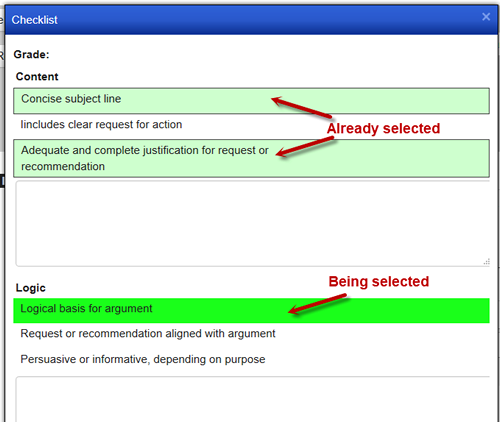
Advanced Grading: Checklists
If you use Moodle's checklists as advanced grading tools, you'll find that there are no longer check boxes to tick off! Instead, you can now click on each criterion that you wish to check off:
Forums: "Discussion" Locking
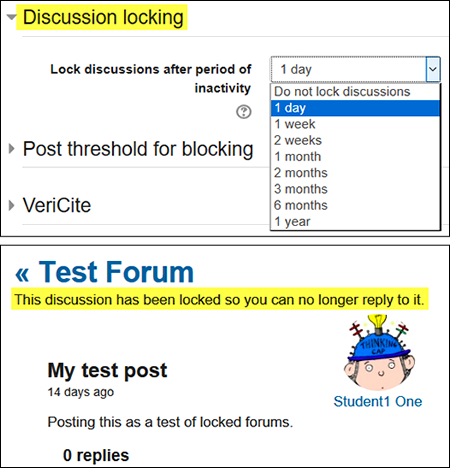 Moodle 3.2 introduces a "discussion" locking option for forums—but don't get too excited yet.... this does not mean that we can set due dates for posting to a forum.
If you enable the locking function, individual discussion threads will close down after a set period of inactivity—the forum as a whole will remain open to continued participation, but any thread that hasn't had a response made to it after that time will be shut off from new posts. The image at right shows what students would see once a discussion thread closes.
We don't recommend enabling this function unless you have a compelling need.
Choice: Select for Student
The "choice" activity is a great way to have students sign up for groups or topics. With Moodle 3.2, instructors can make a selection on a student's behalf.
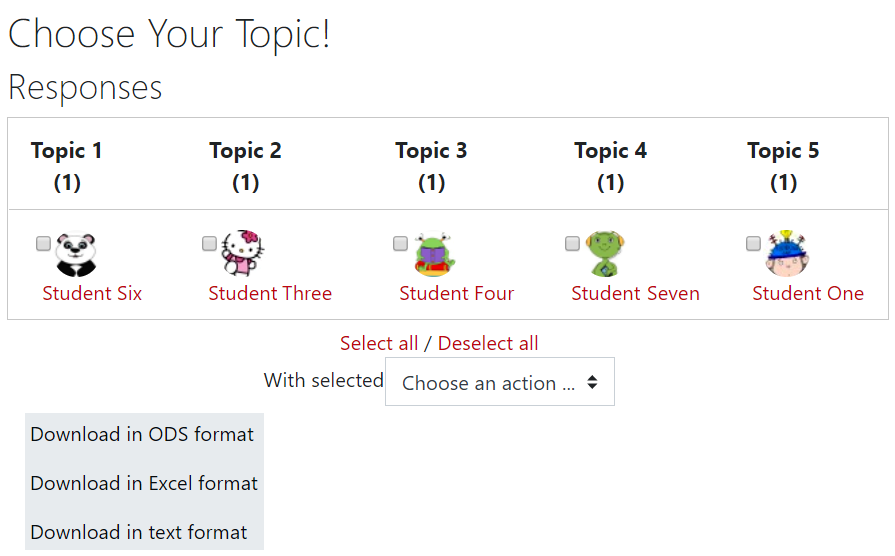
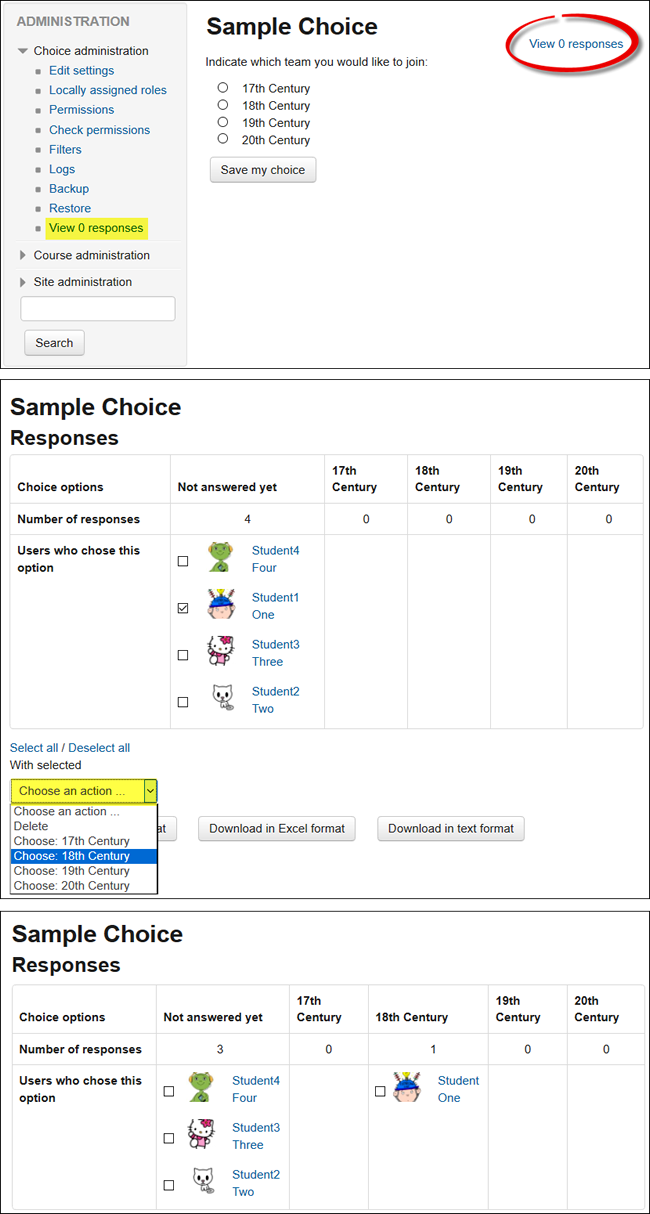 To select an option for a student, click on the View # responses link in the upper right corner (or in the Choice administration block).
In the Responses page, check the box associated with the student's name. Scroll down and use the With selected pull-down menu to select the desired choice.
(Note: If you need to clear a student's choice, selecting Delete from the pull-down menu will achieve that effect.)
As soon as you make the selection, the student's name will appear in the chosen column.
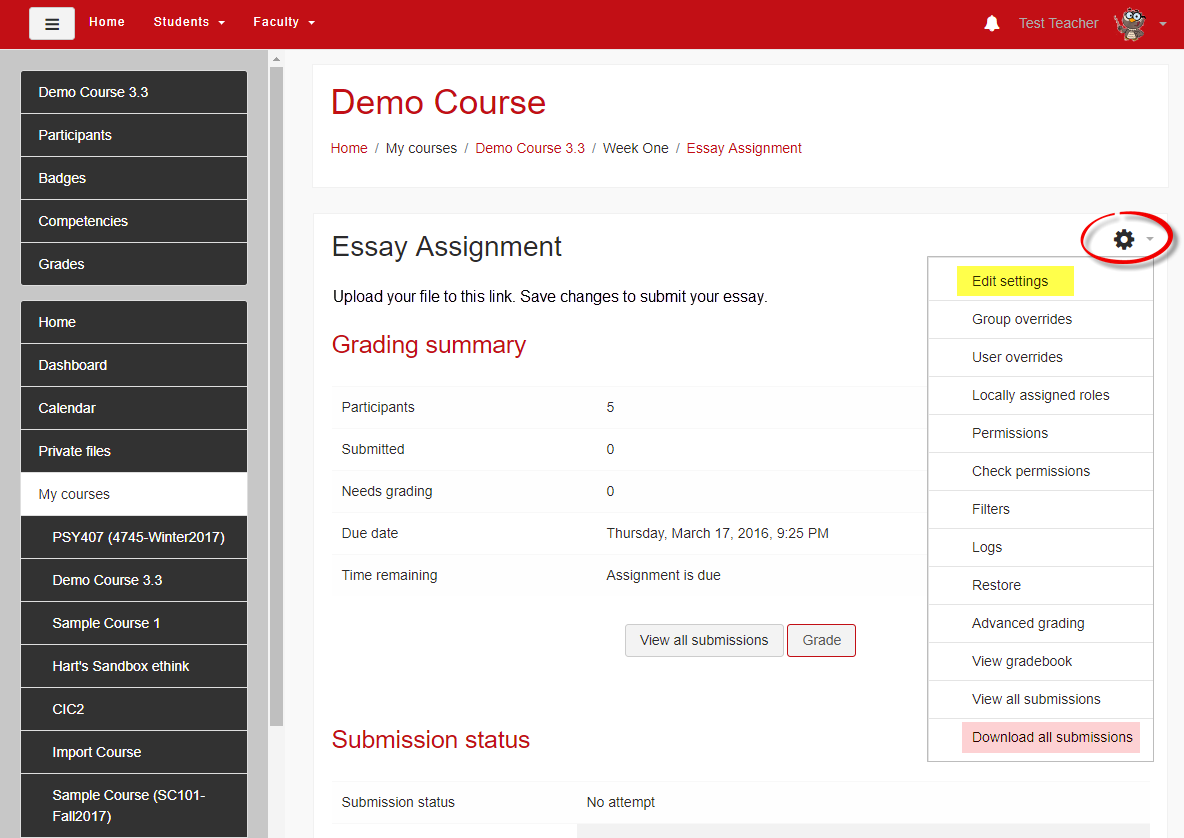
Bonus Tip: Assignment Downloads
In case you missed this during the upgrade to 3.1:
Has Moodle decided to download student assignment files in individual folders for you? There's a quick and easy fix for that!
- Open the assignment link.
- Click on View all submissions.
- Scroll to the bottom of the page and uncheck the box labeled Download submissions in folders.
That setting will remain your preference for other assignments.

VeriCite Update
The look of the VeriCite system,our plagiarism checking software, is changing slightly. This video describes the changes.
What's New in 3.1!
We upgraded to Moodle 3.1 on December 29. Check out the new features on the following pages.

Overview
Moodle HQ offers this overview of new features in 3.1. Note that messaging is currently turned off in our installation.
New: Recycle Bin!
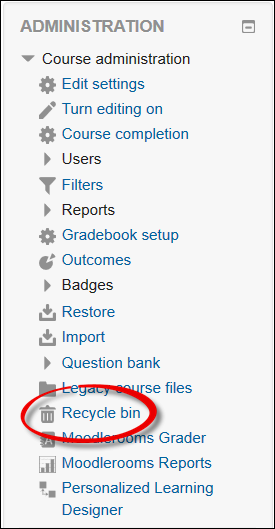
For all of us who have hit delete just a little too quickly, the latest version of Moodle offers a safety net! Deleted items fall into a recycle bin, allowing you to retrieve a resource or activity that you didn't mean to remove from your course.
Important things to know about the recycle bin:
- Any student work submitted to an activity will be restored!
- Grade items that you create manually in the gradebook will NOT be restored—always use caution when deleting items in your gradebook!
- A restored item will be displayed in the section from which it was deleted, but it will appear at the bottom of the section regardless of its original position in the section—you can drag and drop it back into the correct position after restoring it.
- After seven days, an item will be deleted from the recycle bin automatically.
Read on for more....
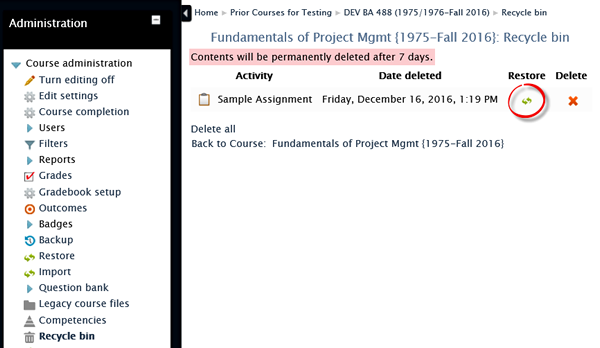
Recycle Bin in Action
To retrieve an item that you've deleted, open the recycle bin and click on the restore icon on the right. Note that any items in the recycle bin will only be held for one week.
New: Assignment Grading Interface
Viewing and grading functions for assignments have been split into separate links in our latest version of Moodle.

The View all submissions option opens the same view we have experienced in prior versions of Moodle.
Selecting the Grade option provides the opportunity to mark up a student's submission with comments and symbols. See the next page for more on grading assignments.
Grading Views
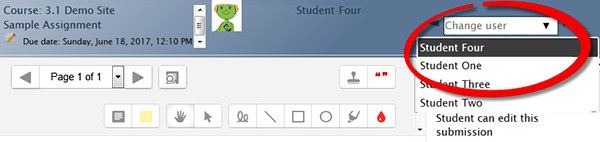
The assignment Grade view is very different from what we are used to. A pull-down menu in the upper right corner allows you to select a student's name to see submitted work.
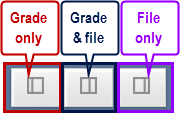 We can view a mark-up page (File only), grade submission page (Grade only) or a combination of both (Grade & file). These option icons are located in the lower right corner of the grade page.
In the file only and combined file/grading views, student submissions are converted to pdfs which you can mark up with comments and symbols. See this complete guide for details. Note that not all file types can be converted—if a file cannot be converted, the mark-up window will remain empty.
Download Options
Being able to download all of the submissions to an assignment link is really handy. In Moodle 3.1, we can select just a handful of assignments if we wish, rather than having to download all of them. It's also possible to have multiple files submitted by each student downloaded in folders to make them easier to manage on your computer.
To access these options, use the View all assignments link.

New: VeriCite Plagiarism Checker
![]() Due to significantly rising costs and diminishing customer service and reliability, a group of faculty and staff explored alternative plagiarism detection services in anticipation of the end of our contract with Turnitin this spring. Based on the committee's recommendation, VeriCite has been selected as our new service. VeriCite has been activated in Moodle so that faculty and students can begin becoming acquainted with it this term.
Due to significantly rising costs and diminishing customer service and reliability, a group of faculty and staff explored alternative plagiarism detection services in anticipation of the end of our contract with Turnitin this spring. Based on the committee's recommendation, VeriCite has been selected as our new service. VeriCite has been activated in Moodle so that faculty and students can begin becoming acquainted with it this term.
Besides being much cheaper and affording similar levels of service, VeriCite offers these advantages over Turnitin:
- Simpler set up due to full integration with Moodle assignment links — just activate VeriCite within a regular assignment link.
- Assignments can be copied — no need to replace assignment links when we import courses from prior terms.
- Less confusion for students — there's just one kind of assignment link for them to keep track of and respond to.
- No wait time between submissions — students no longer have to wait 24 hours to resubmit for a new originality report.
- No national repository — student work is submitted to an institutional repository and does not become part of any external entity's database, eliminating some intellectual property concerns posed by Turnitin.
See this faculty user guide for more details and check out the new VeriCite interface today!![]()
New: Pin a Forum Post
Wouldn't it be handy to be able to keep a forum thread at the top of a bunch of responses? In 3.1, we can!
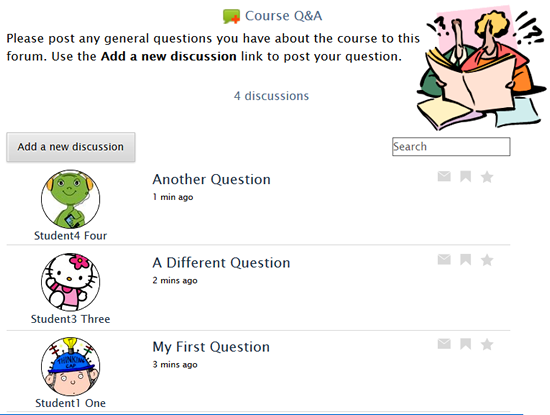
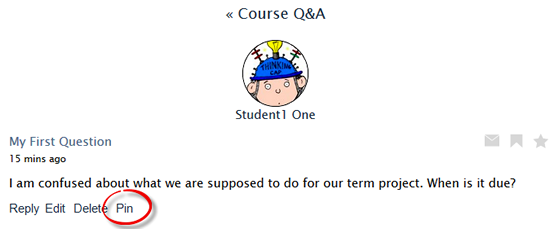
Here's an example—let's say you have a course Q&A forum and a student asks a question early on that you know students often ask. By "pinning" the post, you can make it stick to the top of the list of responses—and with luck, other students will see it there before posting the same question again two or three weeks later.
This is how the forum looks at first, with Student One's most frequently asked question languishing at the bottom of the list:
Read on to learn more.....
How to Pin a Post
To move Student One's frequently asked question to the top of the list and make it stick, open the post and click on Pin to attach it to the top of the forum:
After you pin the post, you can reply (if you haven't already) or read another post, return to the forum or return to your main course page. Note that you can Unpin a post that has been pinned, if you want to.
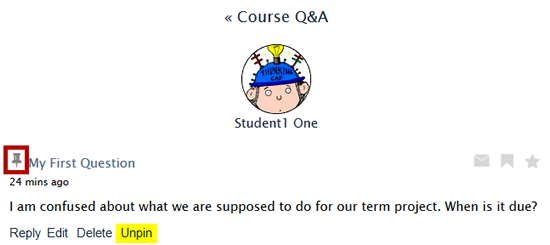
How It Looks
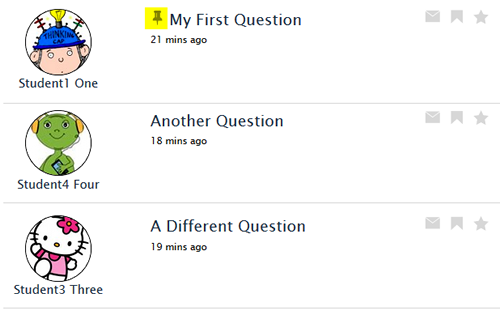
Now that you've pinned it, the post—and any replies made to it—will remain at the top of the forum as long as you like. The pushpin icon is visible to all users.
New: Tag Course Concepts
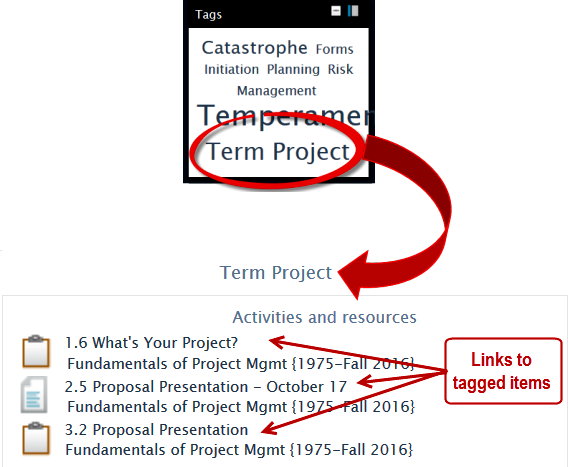
There's a new block feature in Moodle 3.1 that allows you to provide links to resources and activities by using tags. Here's how it works:
As you create resources and activities, you tag them with an appropriate key word (or words). The tags will appear in the Tags block. Clicking on a key word will display links to all of the items you have tagged with that key word.
Tag an Item
To tag an item, open it in edit view, then expand the Tags option area. Enter the first key word in the field provided and click on Enter to save the tag. Add more tags if appropriate. Save the item to record your changes.
Add a Tags Block
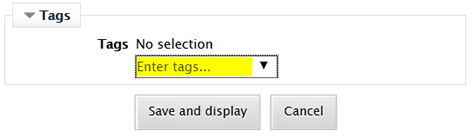
With editing turned on in your course, scroll down to the Add a block.... block and select Tags from the list of available blocks.
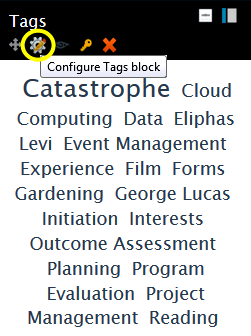
|
Locate the new Tags block (ignore all of the random tags in it) and hover over the top of the block to display the editing icons. Click on the Configure Tags block icon. |
|
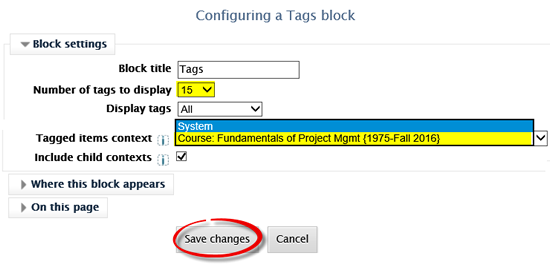
In the Configuring a Tags block page, set the number of tags to display. In the Tagged items context field, use the pull-down menu to select your course name. Click on Save changes to display the tags that you have attached to items in your course.
|
New: Edit Section Names
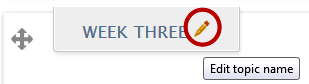 Updating the name of sections just got a lot quicker! With editing turned on, one click will open the title area of a section so that you can rename it.
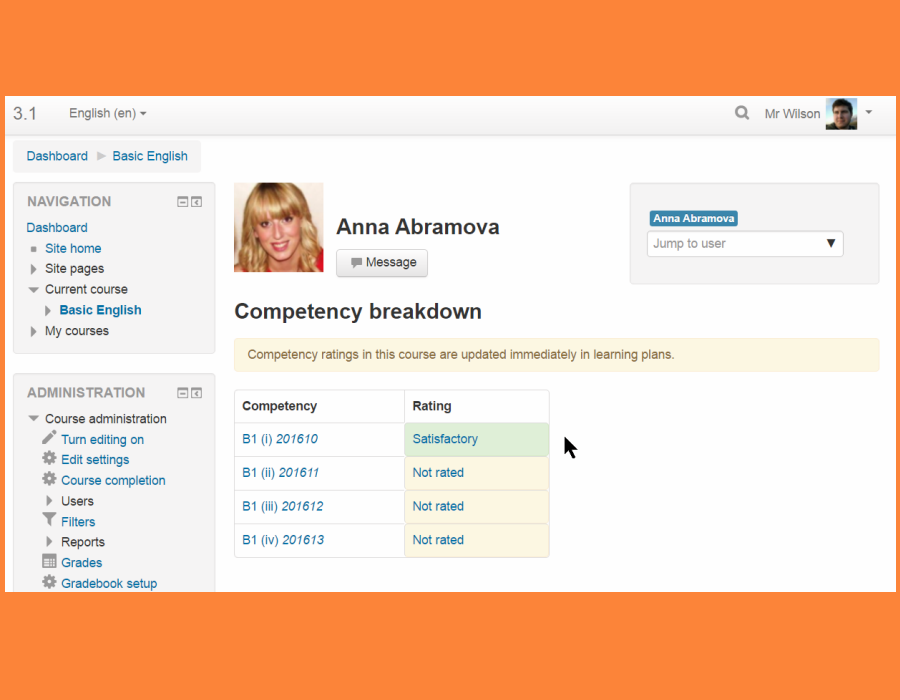
New: Competencies
It's possible in Moodle 3.1 to establish "competencies" in order to track student proficiency in reaching course outcomes. We have not yet integrated University Studies outcomes to Moodle, so there are no SOU standards to include in your course, but you may set up unique competencies for your course if you wish. You can read about competencies in Moodle at Moodle.org.
New: Grade Recalculation Message
A quick head's up—you may encounter a new message when setting up your gradebook:
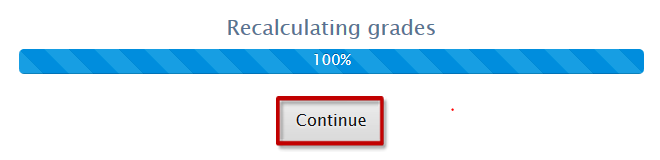
There is no need to wait for something to happen—just click on Continue in order to return to your gradebook.
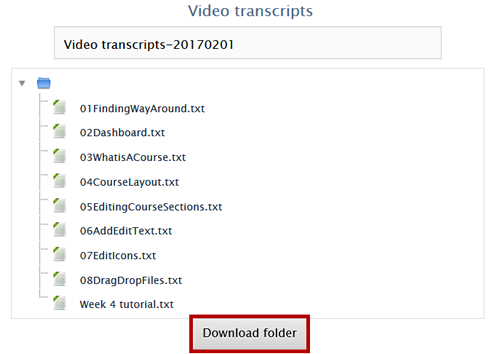
Download Folder Option
Rather than having to download files in a folder one by one, students can now download all of the files at one time.
Intro to 3.0

Good news—the changes you'll find in the latest version of Moodle are minor tweaks and enhancements. There's almost nothing to relearn, one great new tool, and some nice shortcuts in store.
Let's go explore......!
New! Checklist Tool
 The checklist is a new activity for Moodle that allows you to create a to-do list based on the resources and activities you have posted in a section. The illustration shown at right is a checklist of six items that were created on the main course page.
Students can see items checked off automatically as they meet the conditions you've established in completion tracking settings (e.g., making a post or submission). Besides helping students keep track of what they've completed and what still needs to be done, checklists are helpful to faculty, allowing you to track your students' progress and offer feedback on their performance.

When you view an individual student's progress, you can add comments to an item to provide feedback to the student. You can also toggle the view to see a date/time stamp of when each activity was completed.
For more information on using checklists, see this complete guide.

Update! Attendance Setup
If you use Moodle's Attendance feature (and we hope you do—it's easy to use and is an effective tool in supporting student success), you'll find that elements in the Add session interface have been rearranged a bit. Note that the course end date has been shifted to the bottom of the dialogue box. We think you'll like the new layout:

Bonus Tip: The starred option to allow students to record their own attendance may sound crazy at first, but there are some interesting things you could do with this function. For instance, you could create a set of student status options based on how confident students were feeling about their progress in the course or their mastery of the content ranging from not at all confident to very confident. You could then add a series of weekly "sessions" tied to that status set and select the option to have students record their response to your prompt. See the complete guide to Attendance for more ideas and instructions for creating additional status sets or check out the related video in the Moodle Support Theater site.
Edit Sections
Editing controls for sections (modules) have been consolidated in a drop-down menu in the upper right corner of each section.
Note: While you can now delete a section easily with this control, the delete symbol only appears if content has been added to the section. You'll be asked to confirm that you are absolutely sure you want to delete the section and the activities it contains, so there is little likelihood of deleting a section by mistake. To eliminate empty sections, update the number of sections indicated in the Course format options area under Edit settings in the Course administration block or use the Reduce the number of sections minus sign in the lower right corner of the main course page to remove a section at a time.
The illustration on the left shows where we have been accustomed to locating these controls and the image on the right demonstrates where the new controls can be found. The Edit topic link allows you to change the name of the section and add information about the section in the textbox provided. Editing the topic also allows you to restrict students' access to the section based on a specific date or completion of a previous activity.

Display File Info
It's now possible to have the size of a file and/or the date it was posted displayed on the course page. In the Adding a file page, check the desired boxes in the Appearance options area to display additional information on the main course page following the file name.
Note: If you drag and drop a file onto the main page, you can still display information about the file by clicking on the file's edit settings icon to open this view.

Set Up Gradebook
 Tired of having to go to the gradebook and then clicking on the Setup tab to adjust your settings? You don't have to any more! A direct link has been added to the Course administration block that will take you right there.
Filter Users by Group
The Enrolled users interface has been updated to include an option to filter by group membership. The handiest thing about this feature may be its ability to generate a list of students who have not been assigned to a group.
Another enhancement to this page is the ability to sort the users based on their last access to the course. Click on the Last access to course column heading to view the students by most recent access or click it again to see which students have been away from the course site the longest.

Duplicate Rubric Criterion
If you use rubrics through Moodle's advanced grading feature, you might find this enhancement useful: it's now possible to duplicate a row in your rubric, then update the wording as needed. If your rubric has similar language for several criteria, this may save you some keystrokes.
Note: This duplicate feature does not yet work on marking guides or advanced grading checklists.

Create New Question Types
If you're looking to expand quiz questions beyond simple true/false and multiple choice, Moodle 3.0 has a deal for you: multiple answer questions, two types of fill-in-the-missing-word questions, and drag-answers-over-an-image questions. For assistance in creating any of these question types, contact the Center for Instructional Support.
|
"All-or-Nothing" multiple choice questions The most accessible of the new question types, this multiple answer question type requires students to correct indicate all of the correct answers to a question in order to receive full credit for the question. These images illustrate how to indicate a correct choice (at right) and what the resulting question looks like (below).
|
 |
|
Drag and drop into text questions This question type allows you to set up a series of blanks with corresponding choices. Students drag and drop their selection into the blanks provided. Be sure to ask for assistance if you'd like to try this question type—setting it up is a bit of a convoluted process, although it's not difficult once you know how. |
 |
|
Missing word questions This question type is similar to the drag and drop into text type, but instead of dragging, students select the correct response from a drop-down menu. Again, ask for help with this question type if you'd like to try it. |
 |
|
Drag and drop onto image questions The most sophisticated (read complicated!) of the new question types, this kind of question requires students to drag and drop text onto an image in order to demonstrate their understanding. Not surprisingly, it is even more complicated than the preceding types to set up, but we're here to help! |
 |

Welcome to 2.9!
![]()
Moodle 2.9 features a few adjustments to item settings, but does not include any major changes to how we interact with Moodle or what it does for us. We recommend reviewing this quick overview of what's new and different in the next few pages....
Happy Moodling in the New Year!
Drag & Drop Images
In this version, you can drag and drop images into any textbox. Once the image appears in the textbox, adjust its settings as needed by selecting the image and clicking on the Insert/edit image icon in the toolbar. (For more about working with images, see this article.)

Section Deletion
Now you can delete an entire section and its contents... not to worry, you'll have the chance to cancel the operation if you click on the delete icon by mistake!


Grade to Pass
 Prior versions of Moodle tucked away the opportunity to indicate a passing score on a graded activity deep in the gradebook. This upgrade brings designating a passing score to the grading options area in the activity creation page.
You can take advantage of this feature in two ways:
Completion tracking—if you set completion tracking conditions for the item, you can require a passing score in order for it to be displayed as completed by the student.
 Grade display—grades belong the passing score will be displayed in the instructor's gradebook in red, while those above will be displayed in green. (All grades are displayed in black in students gradebooks.)
Quiz Layout
 Quiz functions have not changed with this update, but there is a slight adjustment in setting up quizzes.
As described on an earlier page, you can designate a passing score for a quiz in the Grade options area.
The only other change falls in the Layout area: you won't find an option to shuffle questions randomly in this option area. Instead, you'll find a "Shuffle" option in the upper right corner on the Edit quiz page. Select Shuffle to display questions in random order.

Group Settings
Version 2.9 offers a few handy refinements to working with groups.
Restrict Access
 If you frequently work with groups and sometimes restrict access to an item to specific groups, version 2.9 makes that process easier.
Once you set an item for separate or visible groups in the Common module settings area, a new button lets you indicate that the item is going to be restricted to a specific group.
Nothing will change in the Common module settings area, but when you open the Restrict access menu, group restriction options will be displayed. Choose the desired group—don't forget to click on the eyeball if you want the item to be hidden from all students except those enrolled in the selected group. Visible or hidden, only the students belonging to the designated group will be able to access the item.
Limit Submissions
In 2.9, you can specify in the Group submission settings options area that only students in a group can submit to an assignment link. Selecting the Require group to make a submission option will restrict the Add submission link to students enrolled in a group for that assignment.
Attendance Settings, Part 1
The Attendance feature has long been a favorite of ours here in Moodle Central! And it's even better in 2.9!
One of the limitations of this feature has been that you only had one set to pull from in describing a student's status for a class session. (Found on the Settings tab, the default set is P L E A — Present, Late, Excused, and Absent.)
Now, you can create additional status sets to track other elements (participation, pop quiz results, task engagement, etc.).
Possible Applications
There are many possibilities for applying this new feature:
- Create a status set to reflect participation in a special activity such as peer review, interviews, guest speakers, presentations, etc.
- Use a new set to record the results of pop quizzes or in-class writing exercises.
- Activate the option to Allow students to record own attendance and have them rate their participation.
Can you think of other ways to use this feature? Let us know!
Create a New Status Set
|
In the Settings tab, select New set of statuses from the pull-down menu provided in the upper left corner. |
 |
|
Provide an acronym, description and point value for the first status in this new set and click on Add. |
 |
|
Repeat these steps until the new set is complete. Click on Update to save the new set. |
 |
|
To apply the new status set to a series of sessions, click on the Add tab and enter information about the sessions where you would like the new status set to be applied. Select Status set 2 from the Use status set pull-down menu. When it's time to record the results for one of these new sessions, the new set of status options will be displayed. |
 |
Attendance Settings, Part 2
There have been two additional enhancements to the Attendance feature...
 Set status for all users.
Select a status for all users to auto-fill that status for everyone. You can easily go down the list and adjust the status for the students whose status varied from the norm.
Show lowest.
On the Report tab, a new option highlights the lowest score that each student has received for the Attendance. Low scores are shown in red.
(Note: The Summary below the report displays a running total of recorded status for the course.)

Choice Option Preview
 Another feature that we're especially fond of in Moodle Central is the Choice polling activity. With 2.9, you can allow students to preview the possible responses before the choice becomes available.
 To set up a preview, check the box provided in the Availability options area.
Introducing the "Dashboard"
The recent upgrade to Moodle 2.9 has not made much of a difference for students. The only change that they'll notice is that they now have a "dashboard" associated with their Moodle account—and so do you!
 To view your dashboard, click on the pull-down menu to the right of your name in the upper right hand corner of any Moodle page. (You'll also find a link for your dashboard in the Navigation block on the left of any page.)
Read on to learn more about the dashboard...
Dashboard
When you click on the Dashboard link, you will go to a page listing the courses you are teaching (formerly called My home). Adjust the order that your courses appear in by clicking on the Customize this page link in the upper right corner.
TIP: Moving courses for a new term to the top of the page while they are still unavailable to students makes it much faster to locate them while you're prepping your course sites.

Profile
Click on the Profile link to edit your profile settings or view your recent activity in Moodle.

Grades
When you click on the Grades link on the dashboard pull-down menu, you'll see a list of all of the courses in which you are enrolled. Click on the name of a course to enter its gradebook.

When students click on the Grades link, they can see the total points they have earned in all of their courses. Clicking on the course name takes them to the gradebook for that course.

My Private Files
By clicking on the My private files link, you can upload up to 100MB of files to Moodle storage. This two and a half minute video tutorial provides an excellent overview of how to use this handy repository.
Welcome to Moodle 2.8!

Our move to Moodle 2.8 is less about new features and more about enhancements to existing features, especially advanced features such as creating quizzes and using the grade book. Students will see no change in functionality in this version.
- If you don't use quizzes and the grade book, go ahead and skip the related pages in this book. You will want to know about File Attachments for Assignment Links, Hidden Sections and Enrollment Changes, so don't miss those pages.
- If you do use quizzes and the grade book, you'll want to check out the related pages here and be sure to let us know if you have any questions.
- If you're interested in web conferencing, be sure to read about Zoom, our new application that can be easily integrated in a Moodle course site.
Happy Moodling from your friends in the Center for Instructional Support!
Quiz Enhancements
In 2.8, it's easier to assign questions to a quiz.
As usual, begin by creating your quiz shell—set the time frame, number of attempts, question shuffling, and review options. You'll note that the review options now refer to "Points" instead of "Marks." All other quiz options are the same as they were in our most recent version.

When your quiz settings are complete, click on Save and display to access the Edit quiz link where you can add questions to your quiz.
Read on for more.....
Building Your Quiz

Once you've set up how you want your quiz to appear, it's time to add questions. Click on Edit quiz to get started.
The new test canvas is much simpler than what we are accustomed to—look for the Add link on the right below the maximum grade field to bring up a menu of your choices for inserting questions in your quiz—create a new question, add questions from a question bank, or add random questions from a question bank.

Add Questions from a Test Bank
| Categories and question banks work the same way in 2.8 as they did in 2.7. To add questions from a question bank, click on the Add link and select + from question bank from the pull-down menu. |  |
|
From the Select a category pull-down menu, choose the desired test bank. Once you select the pool of questions you would like to use, those questions will be displayed on your screen for you to make your selections. |
|
|
Use the boxes adjacent to the questions to select questions. The check box at the top of the column allows you to select all of the questions at once if you wish. To preview a question, click on the magnifying glass icon on its right. When you have chosen all of the questions you wish to add, click on Add selected questions to the quiz to return to the quiz canvas. The next page shows how the canvas will look with the questions you have selected. |
Selected Question Options
Once you have selected questions, you'll be returned to the quiz canvas where you can adjust the maximum grade, drag and drop questions to reposition them, click on an insert page break icon to move questions to a new page, and revise the points possible for any item. You can also Add new questions or select another question bank from which you can draw questions.

Add Random Questions
 To add random questions, click on Add and choose + a random question from the pull-down menu. Select the desired question bank (Category) and indicate how many questions you would like to add.

Click on Add random question to insert the number of questions selected. Note that you may need to repeat these steps until you are able to select the total number of questions you need.

Random Question Options
Once you've added random questions, your canvas will look something like the illustration below. You can update the total points possible, Add more questions, edit a question or preview, delete or revise the point value of a question in this canvas.

Student View of Results
For students, there are no changes in quiz layouts or function, but knowing what to do after they submit a quiz has become much clearer.
If you have set up the quiz review options to allow students to see their answers and if they were correct, a Review link will be displayed along with their score. Another new feature is a Back to the course link to help them find their way back to the course home page.

Grade Book Overhaul
The most significant changes in this version of Moodle will be found in the grade book.The basic functions are generally the same, but there have been many enhancements that will allow for clearer communication with students about their achievement to date.
We'll be working on a comprehensive guide to the grade book this fall, but will highlight the most significant changes here. For help setting up your grade book, contact the Center for Instructional Support.
The first change you'll notice is that the "Categories and Items" tab has been renamed "Setup," a much better name for it!

Default "Aggregation" Method
The most obvious change will be seen if you use the default "aggregation" method, that is, how Moodle calculates grades. (If you use weighted grade calculations, you won't see much of a difference.)
The Way We Were
By default, our courses have been set up to use "Sum of grades" to calculate a student's scores. A big disadvantage of this method is that course totals were calculated based on the total points possible for the entire term: if the majority of the possible points were awarded during the last few weeks of the term, students' total scores would show them as failing until the final scores were added. Students could see the percentage of the possible points they earned on an individual assignment, but would have to calculate their actual standing based on the points possible to date in order to be sure they knew where they stood overall.
What's New
"Sum of grades" has been replaced by the "Natural" aggregation method. With this method, items that have not yet been graded are not included in calculating students' final scores: students have a clearer sense of how they are doing in the class overall. The first time you open a course site that was initially set for for "Sum of grades" aggregation, you'll see the following notice—click on Dismiss notice to remove it from your page.

As you'll see in the illustration below, each item in the grade book is listed with its "natural" weight. This does NOT mean that you are now weighting your grades. There's nothing that you need to calculate or do with these weights. Moodle has calculated the total possible points for the course based on the items you've created with the points you have assigned, and has automatically calculated the percentage that an individual item contributes to the overall course total. This percentage is shown as the weight for the item.
In the example shown below, four items have been added so far. Based on the total possible for each item and for the course as a whole, Moodle has calculated the weight of each item towards the overall course total of 230 points (100%).
What You Need to Know
- Each time an item is added, Moodle will recalculate the weights so that they always add up to 100%.
- You can use the Edit pull-down menu to edit the settings of an item (see more on this on the next page).

Setup Options
The interface for working with items on the Setup page has also changed.
The Way We Were
When we used the Categories and Items page to set up a grade book, we had two views of our categories and items: Simple view and Full view. The Full view option was the page we used for advanced settings like identifying items as extra credit or arranging to have the lowest quiz score dropped.
 What's New
There's only one view of the Setup page. To make adjustments to an item or category, click on the Edit pull-down menu associated with it, then select Edit settings.
Note: The options available to you will depend on the grade item itself. You'll have the greatest number of options for items that you create manually in the grade book. You'll have fewer options for items like forums, assignments, and quizzes that you create on your course main page—some changes (such as point values) have to be made by updating the item itself back on the course main page.
Up next.....
On the next page, you'll see how to identify an item as extra credit.
Extra Credit
|
Let's say that you want to make the Week 1 Forum extra credit.
|
|
|
|
|

Drop Lowest
|
What about dropping the lowest item in a category?
|
 |
|
|
|
|
|
|
|
Bonus Explanation Why didn't I set the drop lowest option to one, since that's the desired effect? When you use the "drop lowest" option, the lowest score will be dropped from the beginning of the term. Thus, a student may not perceive a problem with quiz scores (for instance) since a failed quiz won't be factored into the category total — not until a worse grade is achieved on a subsequent quiz. By keeping the highest, all scores earned up until the last quiz is taken will be factored into the category total, giving students a more accurate view of their overall grade. |
|
Hidden Items
While Moodle allows you to hide items in the grade book, we don't recommend doing so and here's why:
Hiding Graded Items
If you want to hide existing assignments or quizzes from students because you don't plan to incorporate them in your course this term, we recommend that you remove the points attached to them and save your changes. Once the items have no points attached, they should no longer appear in your grade book.
Avoiding the "Hide" Option
 When you open the Edit pull-down menu, you'll see a Hide icon, designed to make the item (and any associated grades) visible to you, but hidden from students in their grade reports. We don't recommend using this feature because the item is not all that gets hidden—when you hide an item in the grade book, students will no longer see the course or category totals when they check their grades. This can lead to confusion for students, and reduces the usefulness of the grade book as a tool for students to track their progress in the course.
It's important to know as well that if you hide a gradable assignment, quiz or forum (that is, one with points assigned to it) from students on the course main page, the item will also be hidden in the grade book, resulting in hidden totals and likely student confusion.
Bonus: What Do Students See?
 If you're curious about what students see when they check their grades, click on the User report link under the tabs at the top of the page, then select a student's name from the pull-down menu in the upper right corner. You'll see a close approximation of what students see (naturally, students see only the grades assigned to them).
"Single" View: Items
 Version 2.8's new Single view option is handy for entering grades in a manually created item. It's also useful for quickly reviewing all of a specific student's grades or for seeing all of your students' grades for a particular item.
To access this view, click on the Single view link just below the function tabs.
On the Single view page, you can use the pull-down menus to choose to display a particular grade item to either view or enter grades for that item OR choose a particular user to view or enter grades for a specific student.
In the example shown here, the grade item Presentation was selected. Note that it's possible to select the preceding item (Week 1 Forum) or the following item (Term Paper) by clicking on their links.
You can enter a score for each student in a grade box as well as enter feedback for students in the fields provided.
You'll find an option for "bulk inserting" grades at the bottom of the page. You can either fill all grades in with a particular score or enter 0 for students who did not complete the assignment.
Be sure to click Update to record the scores you have entered.
"Single" View: Student

If you selected an item to view or enter grades, you can quickly switch over to viewing/entering the grades of a particular student. Adjacent to each student's name is a pencil icon. Click on the pencil to bring up that student's list of grades as shown in the example here at left.
 The student grade page looks very similar to the item page, including being able to switch from the previous student to the next student by clicking on the links labeled with their names at the top of the page.
One difference on this page is that the grade and feedback fields for the Attendance activity are lightly shaded out and you cannot enter scores directly in those boxes. That is because scores for Attendance are entered directly in the activity link itself rather than in the grade book. If you wish, you can choose to Override that control and enter a score from this page. Be sure to click on Update to record any changes you make.
To switch to a view of all students for a particular item, click on the pencil adjacent to the item name in the Grade item column on the left.
Other Grade Book Changes
 Just a few more things are new in the grade book.....
Good news for anyone who has ever had this problem: you can no longer enter a score over a category subtotal! If you do, you'll see the cell background change to an orangey color as shown here, then the number will revert to the calculated total. Yay!
The Grade history view will display when grades were entered for each student for any graded item. If grades were revised, those changes can also be viewed.
NEW: File Attachments for Assignment Links
There has been one enhancement to assignment links that should come in very handy for many of us: you can now attach files to an assignment link without having to attach them to text in the assignment description text box.
Below the Description text box where you enter instructions for completing the assignment, you'll find a File picker box labeled Additional files. Drag and drop any additional files that you want to include with the assignment instructions, then Save changes.

The file will appear just below the assignment description as shown in this example:

NEW: Zoom Web Conferencing
![]() "Zoom" has been selected as our new web conferencing tool based on an extensive exploration and piloting project undertaken by the Center for Instructional Support last year.
"Zoom" has been selected as our new web conferencing tool based on an extensive exploration and piloting project undertaken by the Center for Instructional Support last year.
With Zoom, you can participate in a virtual meeting with up to 25 people. Zoom can be used for online gatherings such as class meetings, office hours, and study sessions. Everyone with an SOU computing account can create a Zoom host account. Anyone with an Internet connection can join a Zoom meeting, but only a host can start or schedule a meeting.
It's easy to create a "meeting" link right inside Moodle to have virtual sessions with your students.
Read all about setting up your Zoom account and hosting meetings here.
If you would like to post a link to your Zoom meeting space in a Moodle site, consider copying the following instructions into your course site:
Follow the instructions below the first time you use Zoom. After the first time, simply click on [link to your meeting space].
What do I need in order to use SOU Zoom?
SOU Account. To use SOU Zoom, you need to have an SOU account. To create your SOU Zoom Basic account, log in to My SOU, choose the Student SISWeb tab, and scroll down to the bottom of the list of Online Services for Students until you see “Zoom (Web Conferencing).” Your SOU Zoom account will be created the first time you log in to Zoom, and after that you will be automatically signed into SOU Zoom any time you log in to My SOU.
Zoom Installation. To participate in a Zoom web conference, you need to have Zoom installed on your computer or mobile device. The program will automatically install when you click on the meeting link posted here in Moodle. The installation process takes just a minute or two. Once you have installed Zoom, you can launch the application directly from your device. If you want to use Zoom on another device, you'll need to install the program on it, as well.
Hardware. As a meeting attendee, all you need is a phone or speakers to hear the host. If you wish, a webcam will allow you to share a live video streams of yourself.
How do I join a Zoom meeting?
To join a Zoom meeting, simply click on the link [link to your meeting space]. You can join the meeting using a PC, Mac, tablet or smartphone. See the “Getting Started” instructions applicable to your computer or device on the Zoom Support Center.
Click here for more information about using Zoom at SOU.
Multi-Choice Polls
Moodle's "Choice" feature is a great way to allow students to sign up for group projects or to indicate their preference for an activity such as a field trip location or exam site. In 2.8, students can choose more than one option, greatly enhancing the usefulness of this already handy tool.
Currently, choices appear with radio buttons signifying that one option only may be selected:

In 2.8, you can still limit students to making only one selection, but you can also allow them to choose multiple responses (represented by square boxes):

See the next page to learn more about creating a "Choice" for your students....
Enable Multiple Choice Selections
When you create a choice, you'll find the option for allowing multiple selections in the Options area. Note that it is still possible to limit the number of responses to any option, enabling you to reserve a selection for a particular number of respondents. In this example, we can accommodate up to 10 students in the tutoring session on Saturday, but we can only serve three or four on Tuesday and Wednesday.

Hidden Sections
 No more having to verify that a section in your course is visible to students!
If you hide sections from students, you'll find that the section title is grayed out, showing at a glance that the section is hidden. Draw your mouse over the right margin of the section to display the closed eye. Click on the eye to make the section visible.
Be sure to verify that all of the elements that you want to be revealed to students are visible as well: items created after a section has been hidden tend to remain hidden after you make the section visible.
Forum Display
 You'll find that the display of recent posts to an advanced forum has changed from two columns to one column with this version.
If you would like to reduce this potential contribution to Moodle's infamous "Death Scroll," click on the Edit settings icon associated with the forum and deselect the option to Display recent posts on course page as shown below. New posts will still be indicated in blue on your main course page and will be highlighted with a New! icon within the forum when you open it.
Bonus Tip #1: If you don't see new forum posts highlighted in blue on your course home page as shown in the example above, check out these instructions for updating your profile.
Bonus Tip #2: To view the time and date stamp for a student's forum post, hover over the notice of elapsed time (e.g., 3 hours ago) with your mouse and the actual time the post was made will be displayed in a pop-up window. (We'd wave our Moodle magic wand over this if we could to have the time stamp displayed instead of elapsed time, but at least it's possible to ascertain when a post was made.)
Enrollment Changes
 We have switched to a new method for creating Moodle course sites and processing enrollments that will result in more accurate and reliable data flowing between the two systems. For instance, if faculty teaching assignments change, the new instructor will be assigned to the course and the former instructor will be dropped out.
Other changes to Moodle enrollments...
Enrollment Updates Roll Twice Daily. Course enrollments used to be "live" events—as soon as a student registered for a course, Moodle enrollment would immediately follow. The new system means that data moves from Banner to Moodle twice a day, in the early afternoon and late evening. If a student needs immediate access to Moodle, you can manually enroll her in your course.
Student Drops. Formerly, students who dropped a course in the first four weeks of the term were automatically dropped from Moodle sites, while students who withdrew after that point remained in sites for institutional recordkeeping purposes. It is no longer necessary to track whether or not a student was passing at the time of withdrawal, so these students will now be dropped from course sites. For any student who drops, it is possible to reinstate enrollment manually if there is a need to resurrect work done in the course site.
Banner Crosslisted Courses
 On July 21, we updated the data file being sent from Banner to Moodle relating to sites that were cross-listed in Banner. There is a slight possibility that you may have worked in a site that is no longer accessible to you—we'll get it back, it's still there!
Here's what's new:
Summer and fall courses were created using a new system for transferring data from Banner to Moodle. Course enrollment data will be more accurate as a result, BUT for those two terms, faculty teaching cross-listed courses initially had access to the subsections of their course as well as the master combined course. For example, if you were teaching BA 488/588, you would have three sections on your Moodle home page: BA 488, BA 588, and BA 488/588.
Thanks to our friends in IT, we have been able to move the subsections into a hidden category and get them out of your way.
Back to our missing course scenario—it's possible that some faculty had begun building out their sites in one of the sections that have now been tucked out of the way. If you are missing a course that you were working in, send an email to disteducation@sou.edu and we'll copy the content into the combined course site for you.