Faculty: What's New in Moodle 4.5
| Site: | Southern Oregon University |
| Course: | Southern Oregon University |
| Book: | Faculty: What's New in Moodle 4.5 |
| Printed by: | |
| Date: | Saturday, June 27, 2026, 8:25 AM |
Moodle 4.5 is here!
 We skipped right past Moodle 4.2, 4.3 and 4.4 and went directly to 4.5 on December 18.
This upgrade offers some significant advantages in setting up and managing our courses. Many editing functions have been brought up to the course main page so we don’t have to open an item’s settings to make simple changes. You’ll find some cosmetic changes in the gradebook and some fine tuning in quiz making, but there are no major changes in the activities and resources that we use frequently.
Any work that you've done to prep for Winter term courses slid on over into the new version, no problem.
Edit Your Course
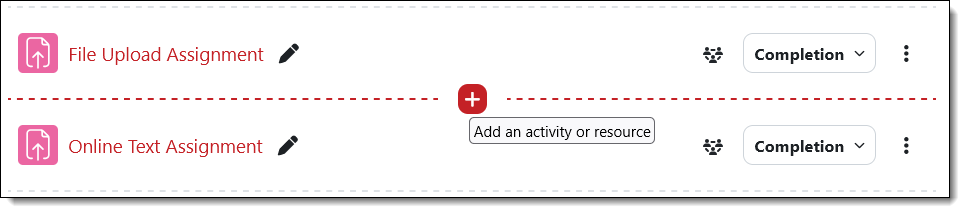
Add an activity or resource where you want it. With editing turned on in your course, you can insert a new activity or resource just where you want it by hovering over the space between existing items and clicking on the Add an activity or resource plus sign.
.
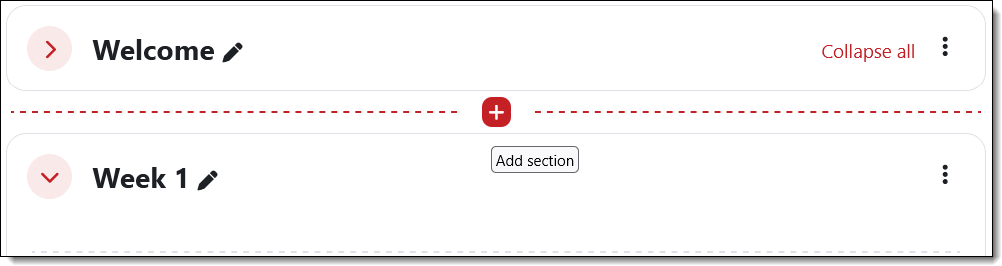
Add a new section where you want it. Similarly, you can add a section to your course by hovering between two sections and clicking on the Add section plus sign.
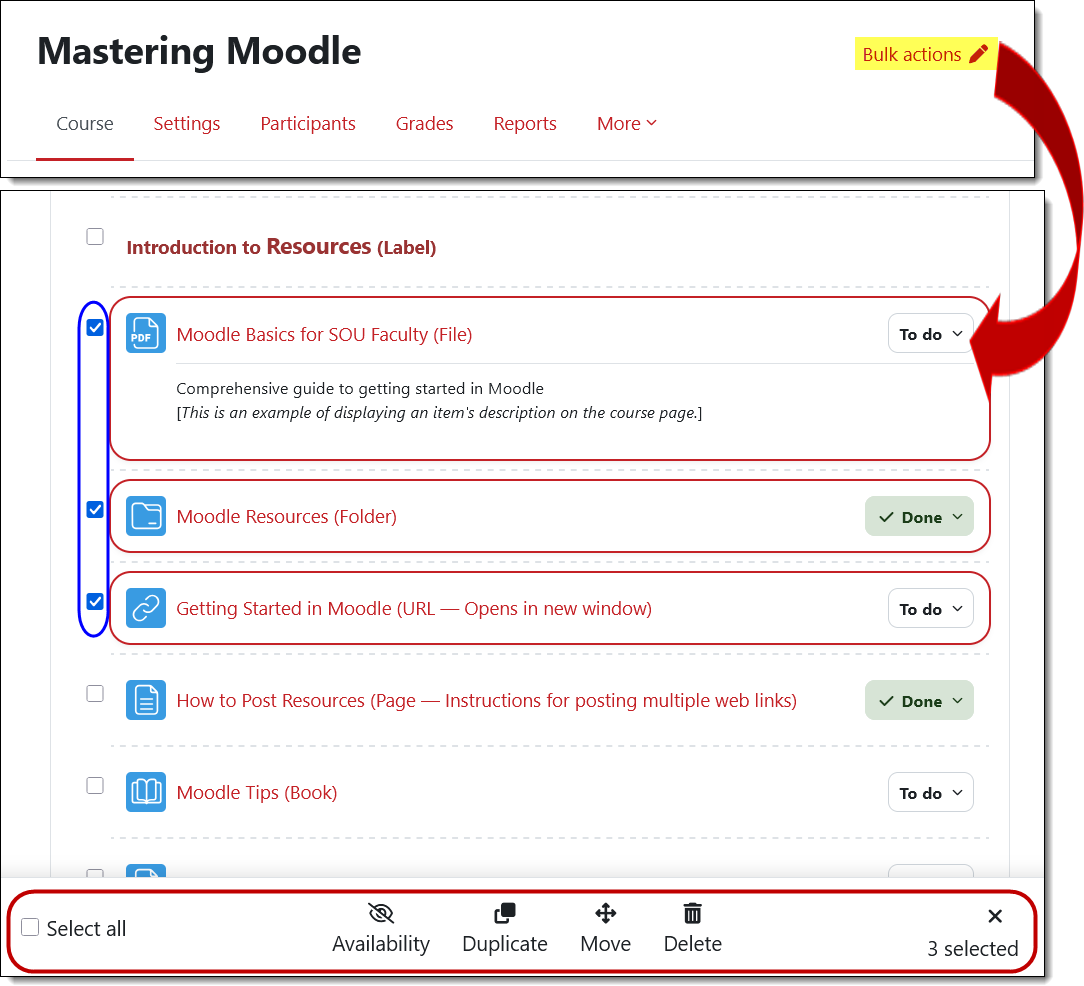
Apply bulk actions to items. Open the Bulk actions link at the top of your course page to make adjustments to multiple items at one time! (And if you get carried away, remember that deleted items can be restored from the recycle bin!)
Update Group Settings
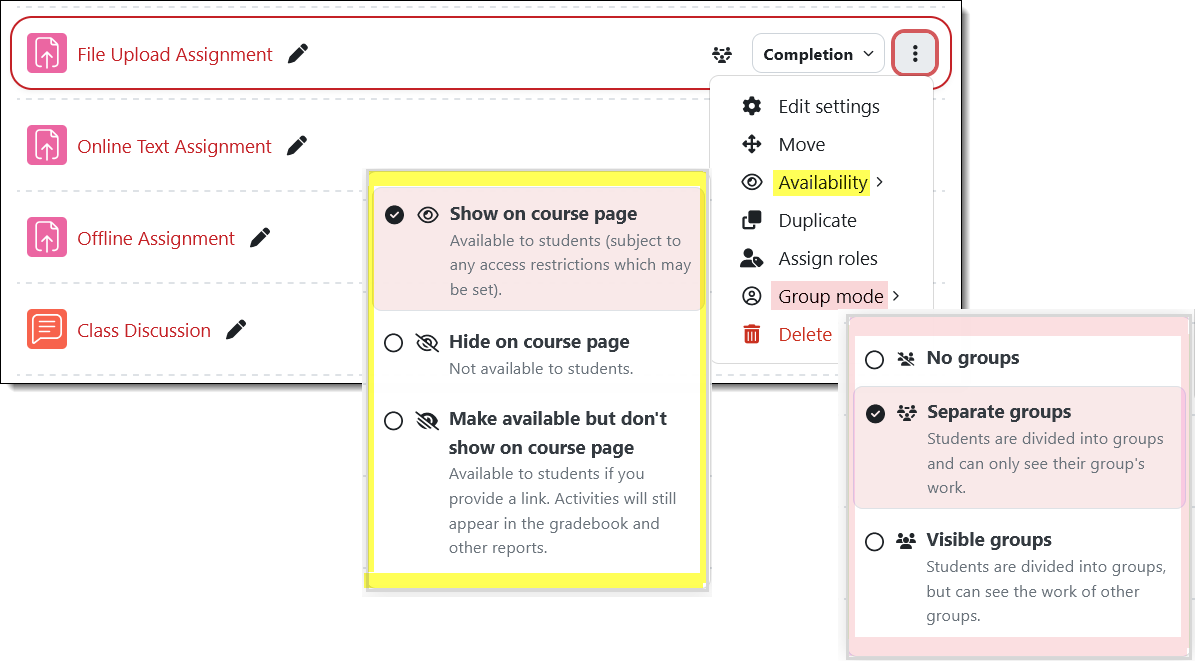
There’s now a groups icon next to the Completion setting field. Hovering over the icon indicates if an item is set for groups or not. This example shows that the assignment has been set for separate groups.
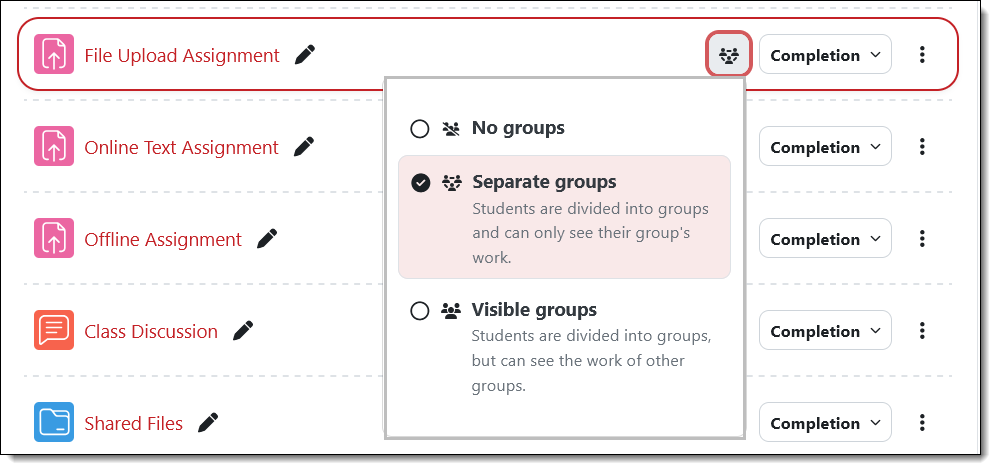
Update availability and group status on the course main page. The options available from the Edit menu to the right of the item name have been expanded. Instead of simply having the choice of hiding or showing the item, the Availability link provides the complete range of visibility options. (Learn more about items available but not shown on the course page.) Even handier is the ability to assign an activity or resource to groups by using the Group mode options.
Update Completion Settings
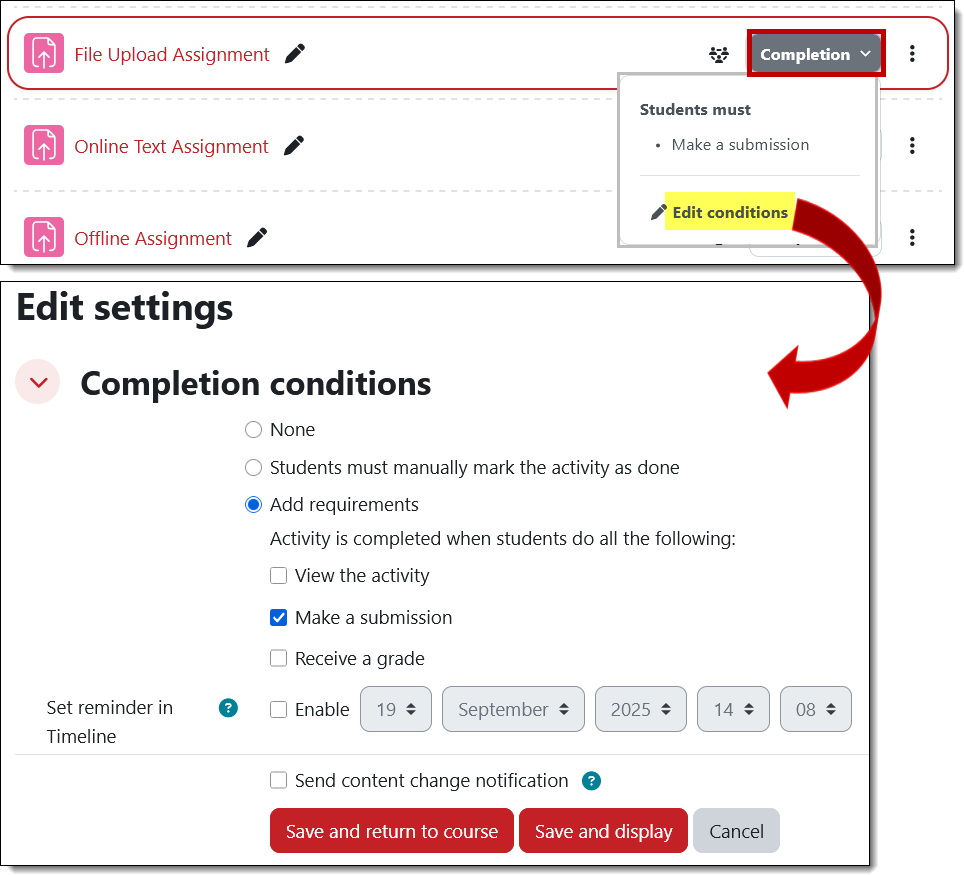
You can now update the completion requirements for an item without having to open it in edit mode. The Completion field includes a dropdown menu with a link to edit the conditions required for the item to be marked as complete. (Don’t forget that you can still edit completion requirements in bulk.)
Update Access Restrictions
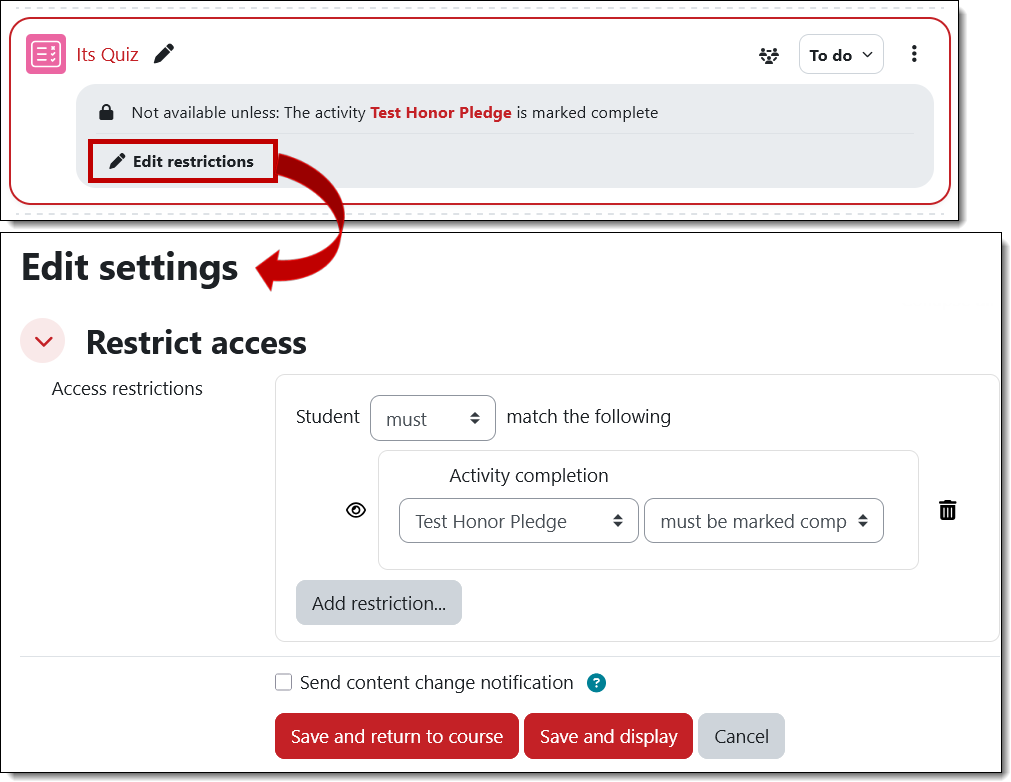
If you have placed access restrictions on an item, you can edit those settings by clicking on the Edit restrictions link. (Learn more about restricting access to course materials.)
Edit Sections
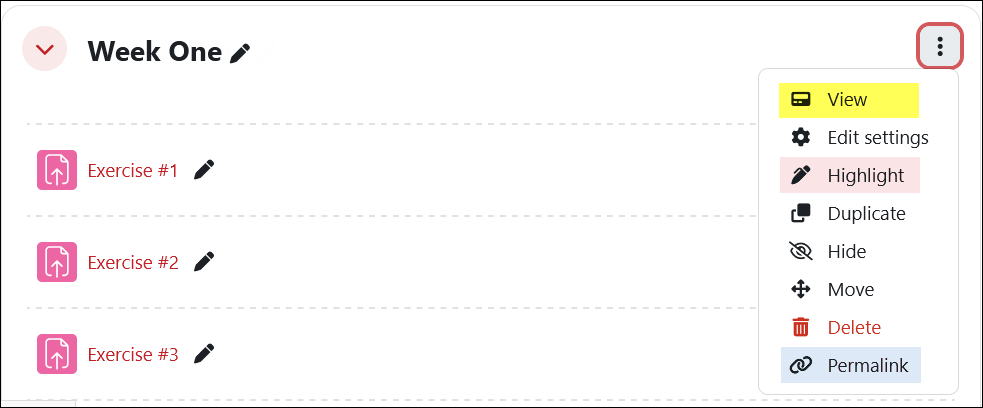
When you open the Edit options for a section, we have some new options:
- View opens the section in its own page so you can focus on building or updating the materials solely in that section. (Note: For all users, clicking on the name of a section in the Course index on the left will display just the elements in that section. Click on another section name or the Course tab at the top of the page to return to the main course page.)
- If you’re using the “Custom sections” course format (the “Topics” course format has been renamed to more accurately describe their function), you can highlight a section (the current week is automatically highlighted in the weekly course format—see these instructions if the wrong week is being highlighted in your course).
- The Permalink feature allows you to create a link to the section that you can paste elsewhere to give users quick access to the section (a handy tool if you have a section devoted to course or project information and want to refer students to it).
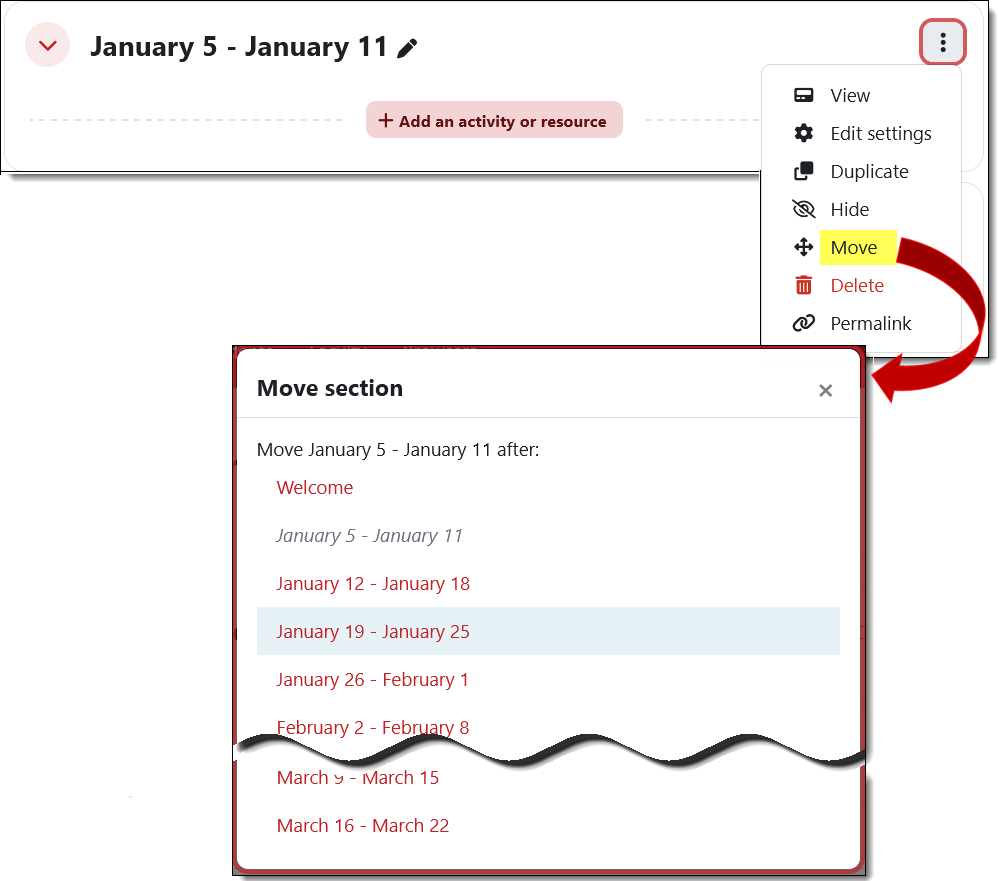
Move Sections
Forget all the times you tried to drag a section from the top of your course to the bottom! The section edit menu includes a Move option that lets you simply point where you want a section to reside.
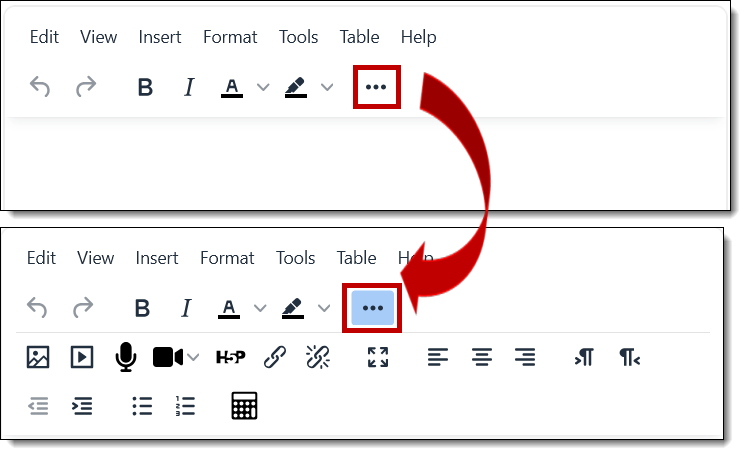
Edit Text
With this version, we'll all be using the "TinyMCE" text editor as the Atto editor has been retired by Moodle. The toolbars feature fewer icons on the top level and the pull-down menus feature a few new additions.
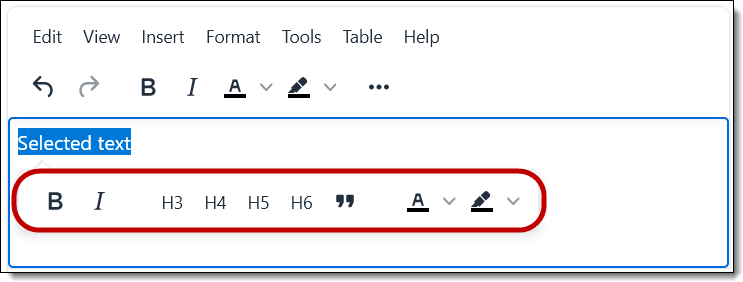
When you select text, the "quick tools" interface has been expanded to include font color and highlighter in addition to bold, italic and styles.
IMPORTANT REMINDER: Avoid using heading styles simply to enlarge text—heading codes convey meaning to individuals using assistive devices to read text. To ensure accessibility for all users, be sure to use headings solely to connote a hierarchical relationship within your text. Headings need to follow in hierarchical order and shouldn’t skip levels. The built-in page headers are levels 1 (<h1>) and 2 (<h2>), so the headings that we add in textboxes start at h3 and continue down to h6.
Use the Gradebook
You’ll find some helpful new features in the gradebook along with a few things that may take extra clicks. Note: Although there’s a prominent Save changes button on these pages, your changes are autosaved and it’s not necessary to click on it. See this article on managing your gradebook for additional background and explanation.
Renote: They still have NOT made it possible for instructors to see percentages or letter grades with scores while editing is turned on. Silly Moodle!
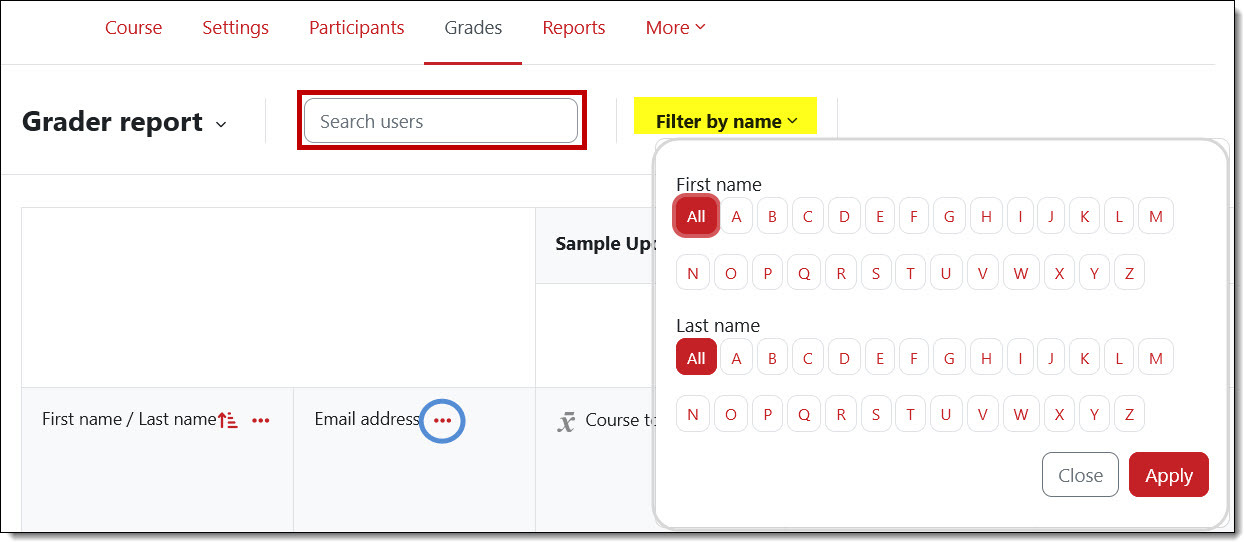
Filter by Users: Grader Report
In the Grader report view, enter a name in the Search users field or filter by first or last name to review scores for a particular student.
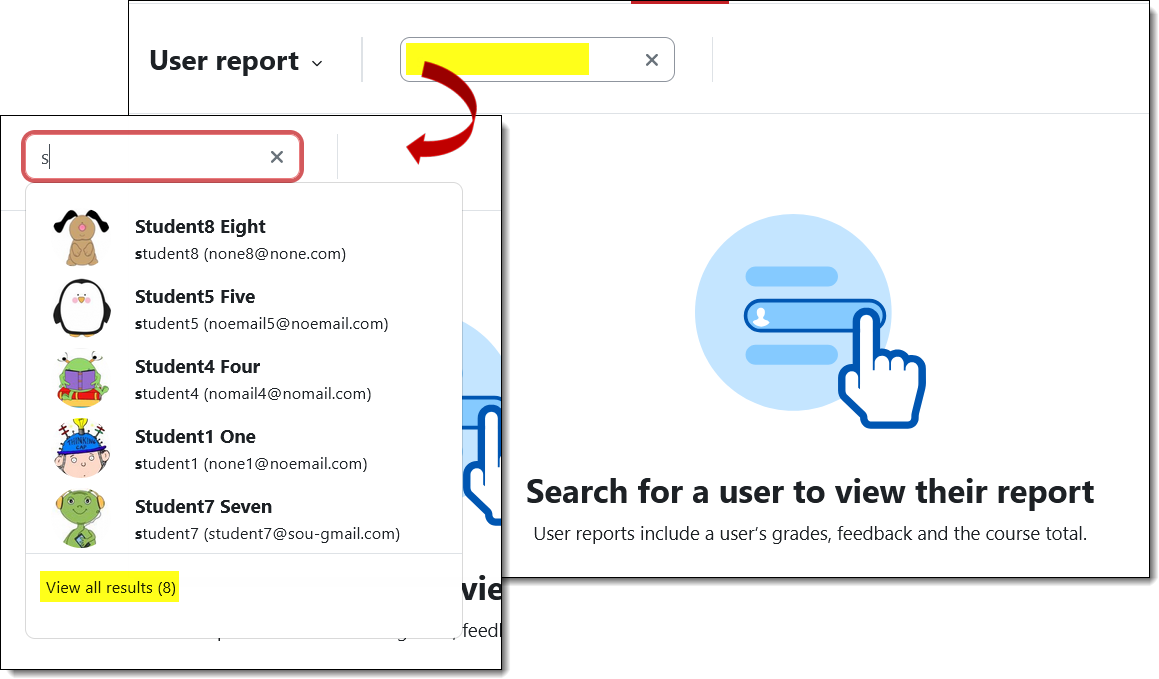
Filter by Users: User Report
The only way to see grades for any student in the User report view is to enter a letter in the Search users field. You can view reports for all students by clicking on the View all results (#) link below the list of names returned by your search.
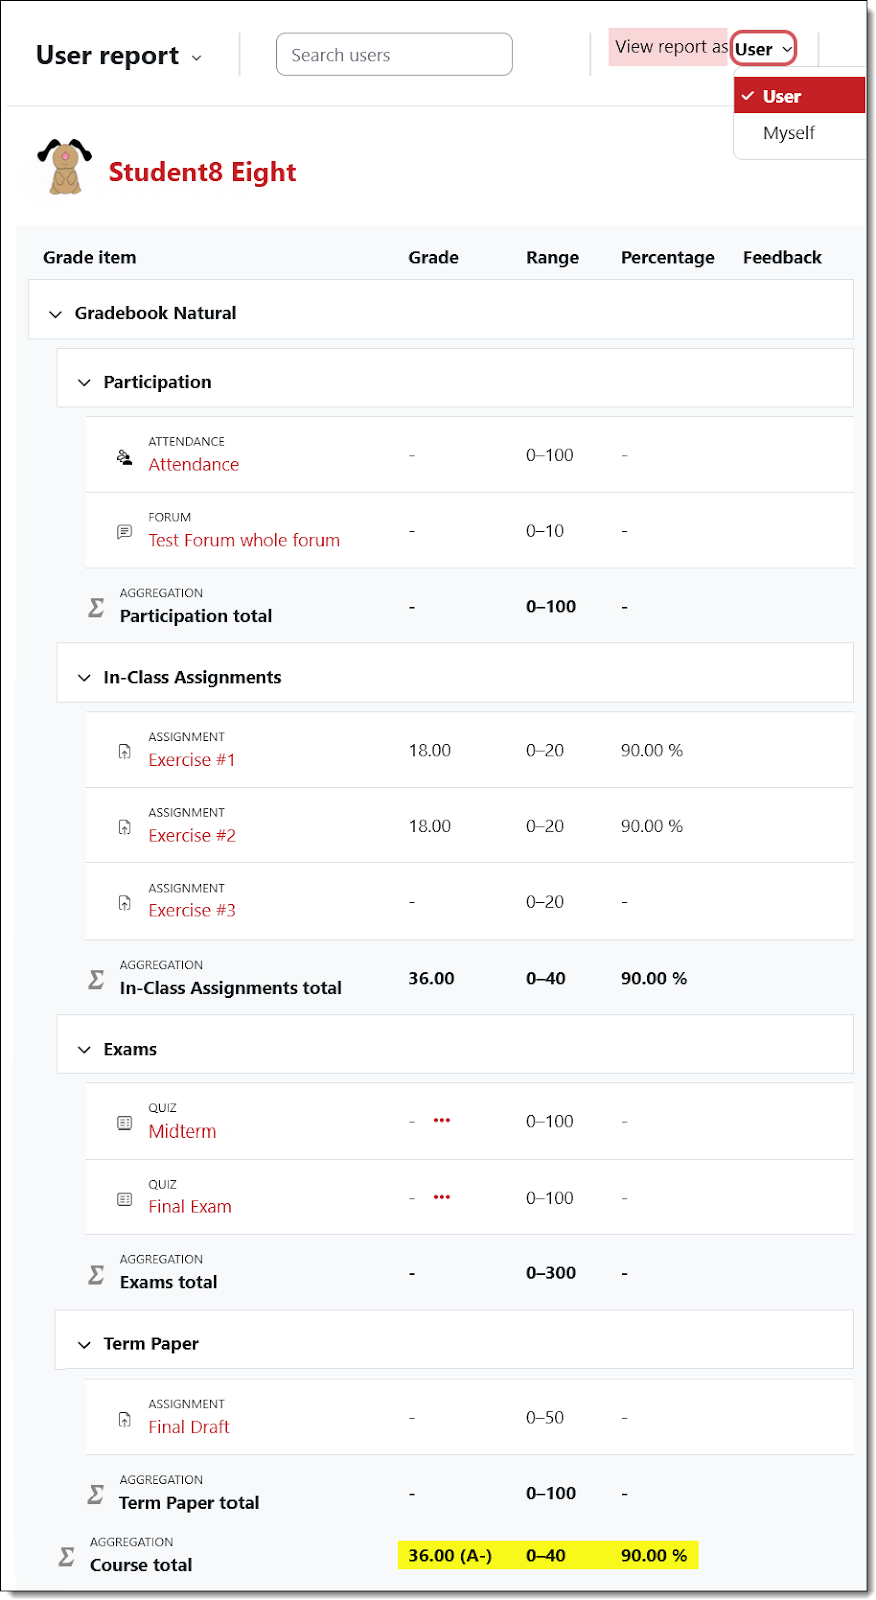
View User Grade Report
It is still possible to view the report either as the student sees it or as the instructor. Note that in this view, the total points earned are displayed at the end of the report instead of at the top. That is also the case in the gradebook setup view. A student’s total points earned will still appear in the first column of the grader report view.
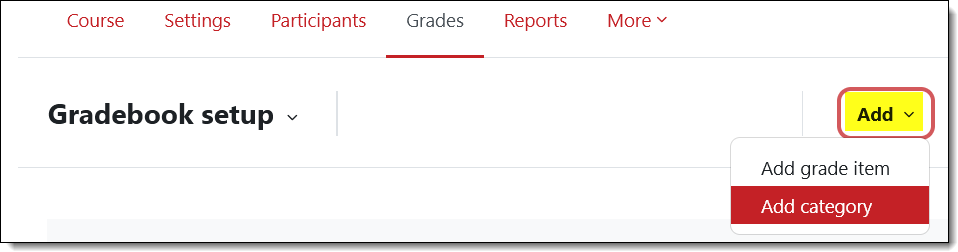
Set Up Your Gradebook
You’ll find a few changes in the Gradebook setup page. Instead of having buttons for adding an item or category at the top of the page, an extra click is required to reach those options (silly Moodle!).
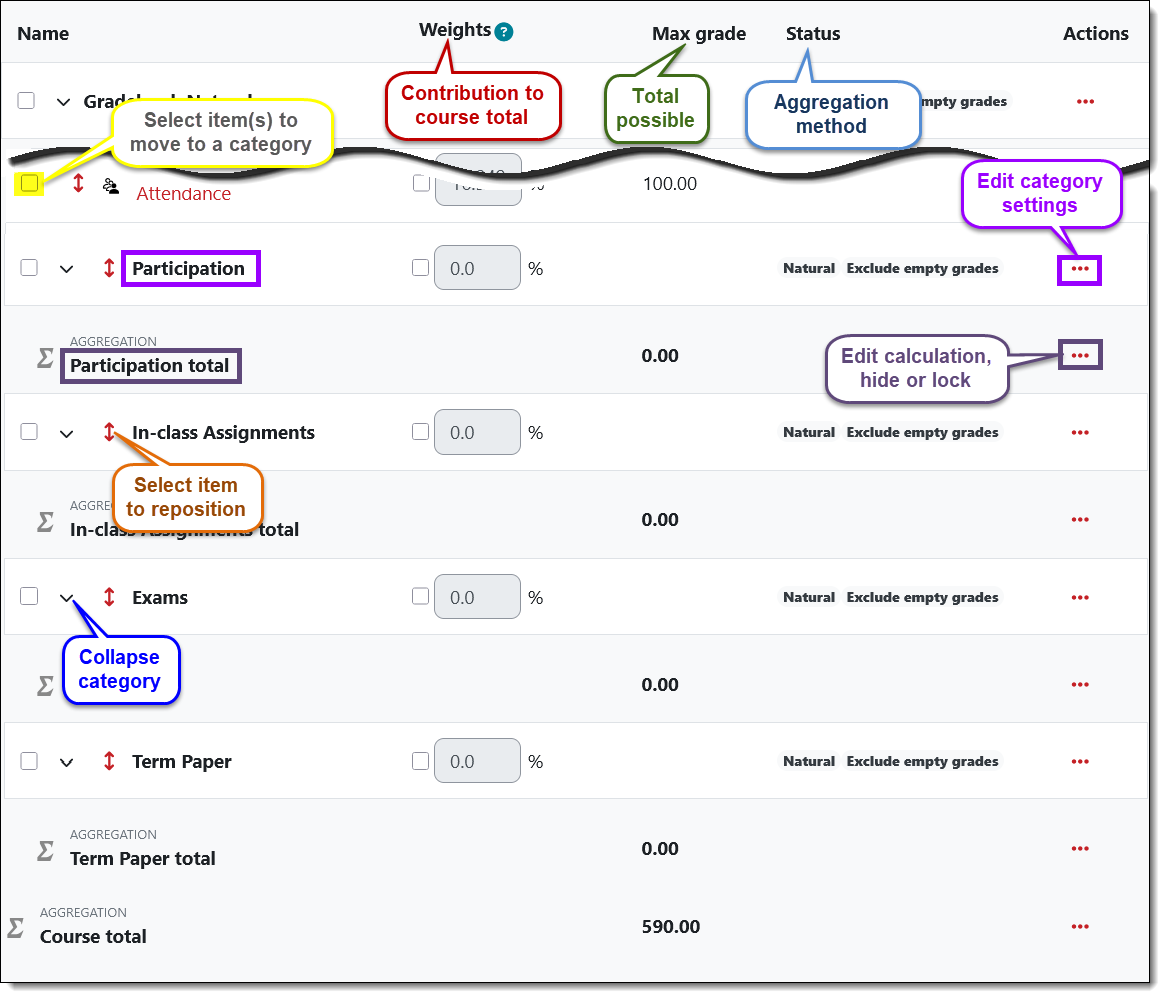
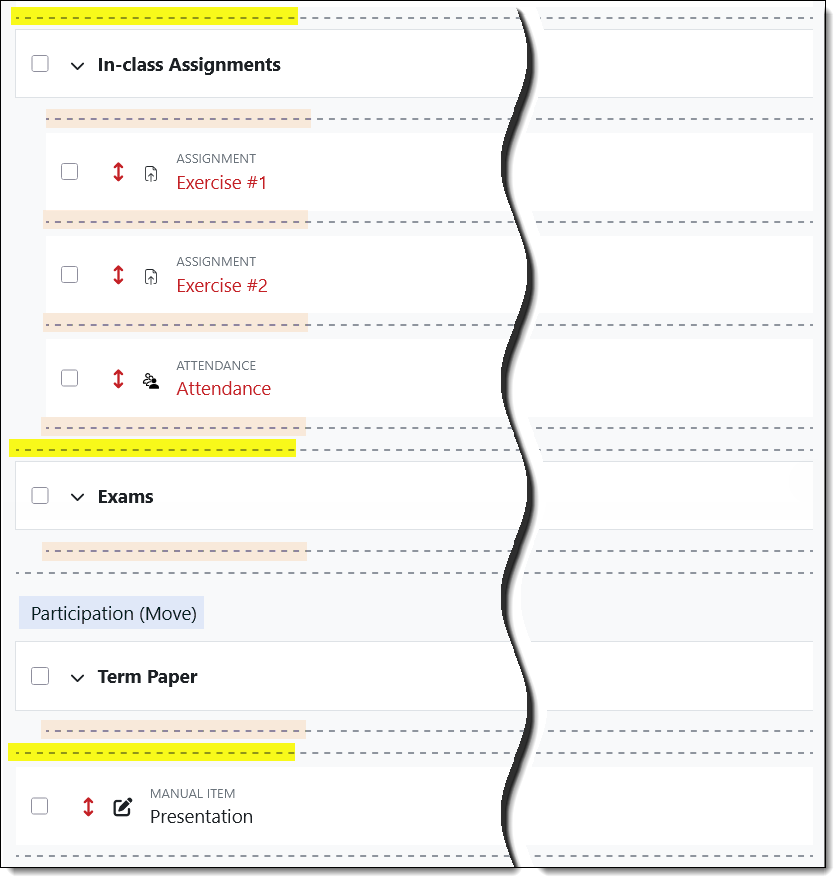
Reposition Categories
To shift a category to a different position, click on the red bi-directional arrow….
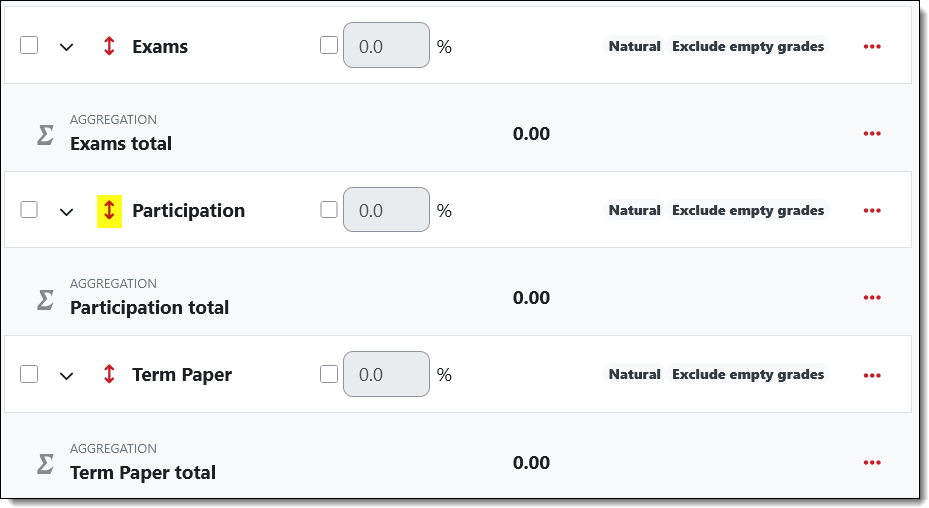
…. then click on the dotted line where you want it to reside. Be careful to choose a line that extends the entire width of the setup page (highlighted here in yellow) — if you choose a shorter, indented line (highlighted in tan), the category will become a subcategory.
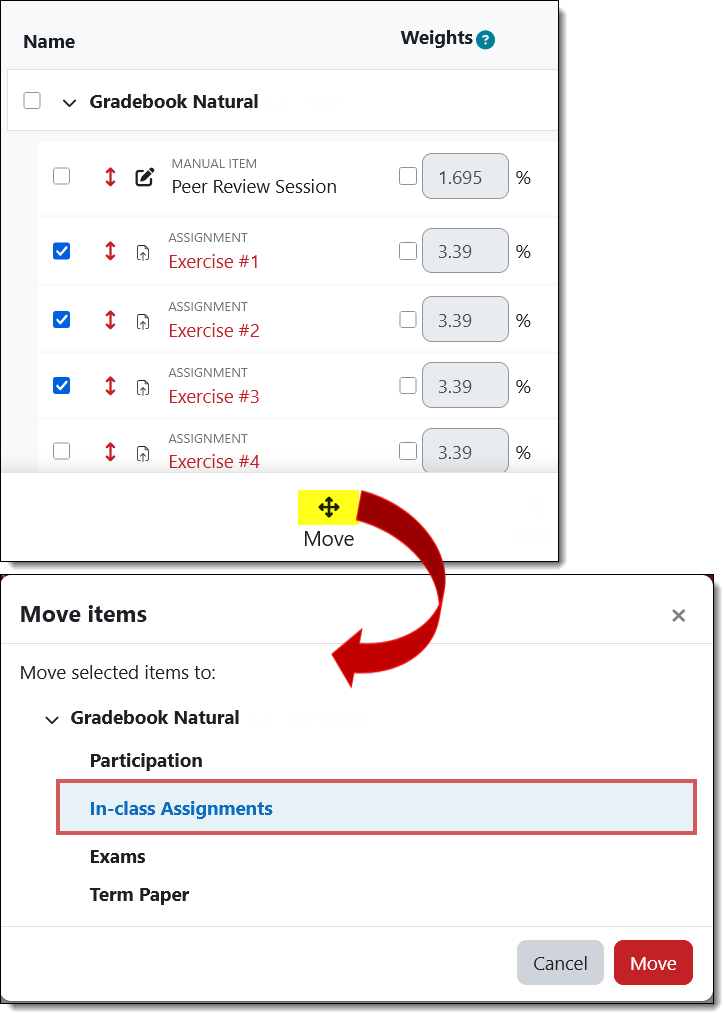
Reposition Grade Items
To move items into a category, check the box to the left of the item, then click on the Move icon at the bottom of the page. Here’s a quirky thing — if you select all the items in a category, the box for the category itself will also be checked! Go ahead and move the items, the category won’t move.
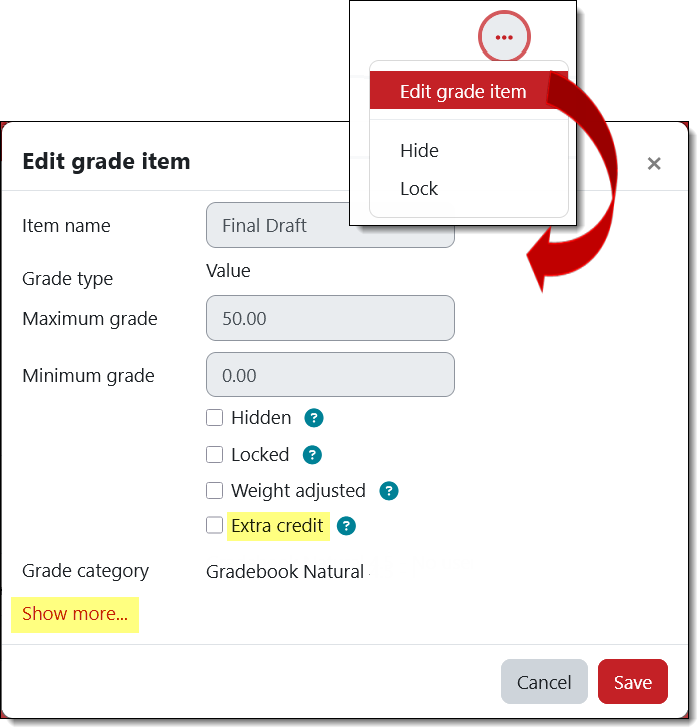
Assign Extra Credit
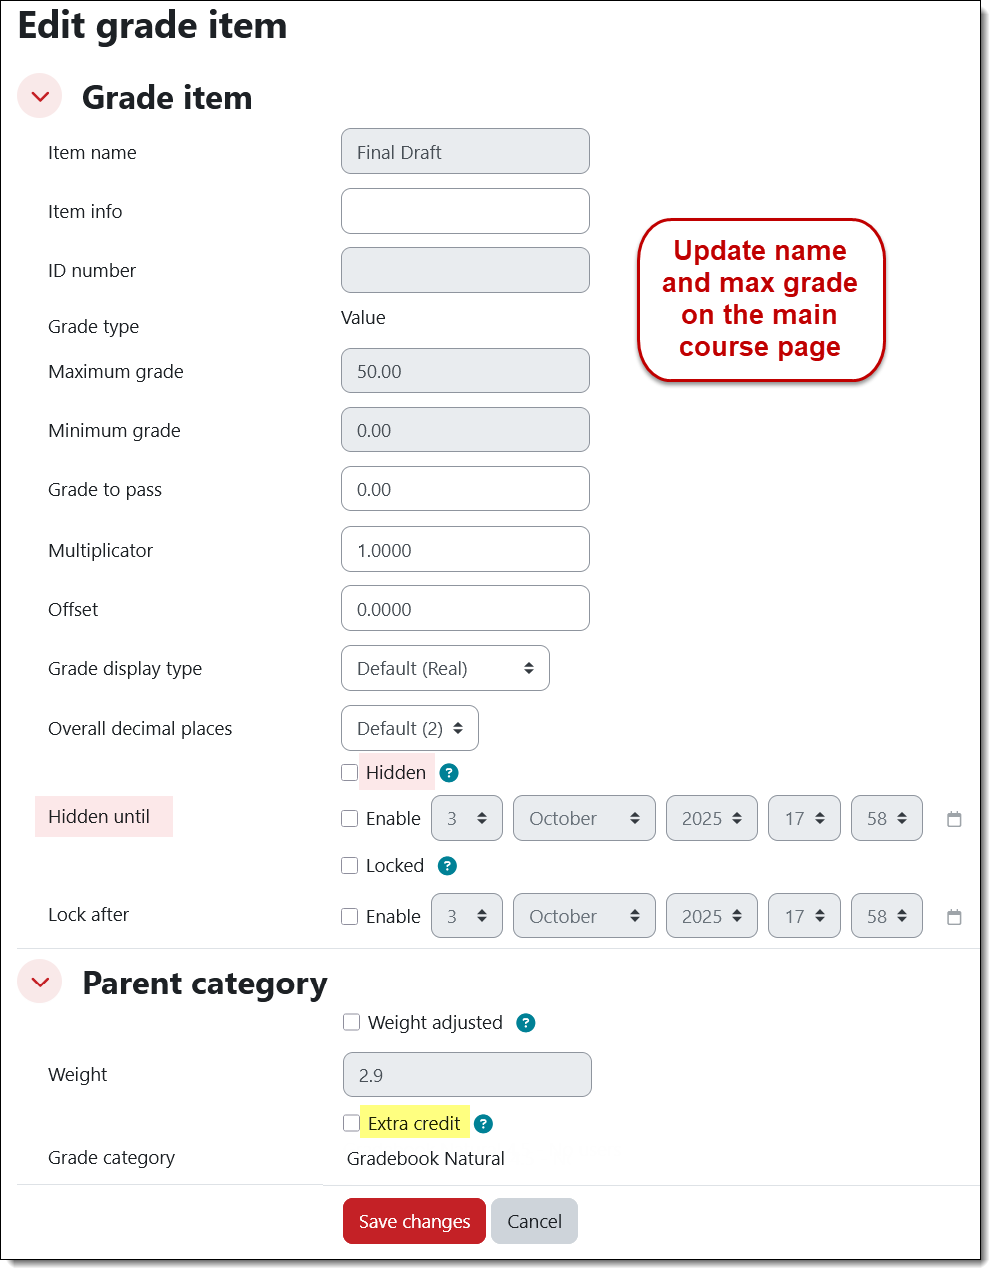
Click on the three dot “Cell actions” icon on the right to edit a grade item. (The item name and maximum grade for the assignment in this example can only be updated on the main course page where the assignment was created.) Check the box for Extra credit. (Learn more about extra credit.) The next page displays options from "Show more..."
Hide a Grade Item
You can set a date and time for grades to become visible to students.
Open the Cell actions menu to edit a grade item. Click on the Show more…. link to select the Hidden option and click on the Enable box to enter a date and time to display scores to students. (Because this item is an assignment activity created on the course main page, you would need to edit the name and total possible points by opening its setting from the main page.)
Edit a Category
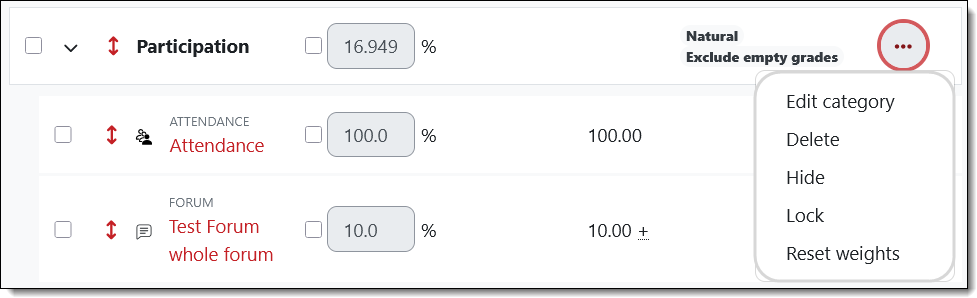
Click on the Cell actions icon associated with a category to make any desired adjustments.
Grade Assignments
Setting up assignments hasn’t changed, but the view submissions interface has gotten a makeover. And there’s a new way to access the “View all submissions” page!
ALSO: With this version, we have had to remove the ability for teachers to submit assignments. From our early days in Moodle, we've set up assignments so that faculty could see exactly what students see in an assignment link without having to switch to student view. With this new version, a teacher was included in the view submissions and grading interfaces, which nobody wants (trust us!). To eliminate that confusion, we've removed the view-as-student setting from assignments. You can still see what students see, but you'll need to switch your role to do so.
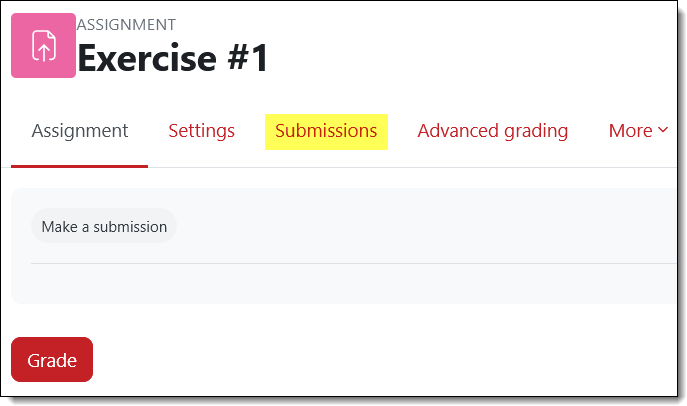
Access submissions. When you open an assignment link, there’s a new tab labeled Submissions that provides access to the work students have uploaded for review.
Search Submissions
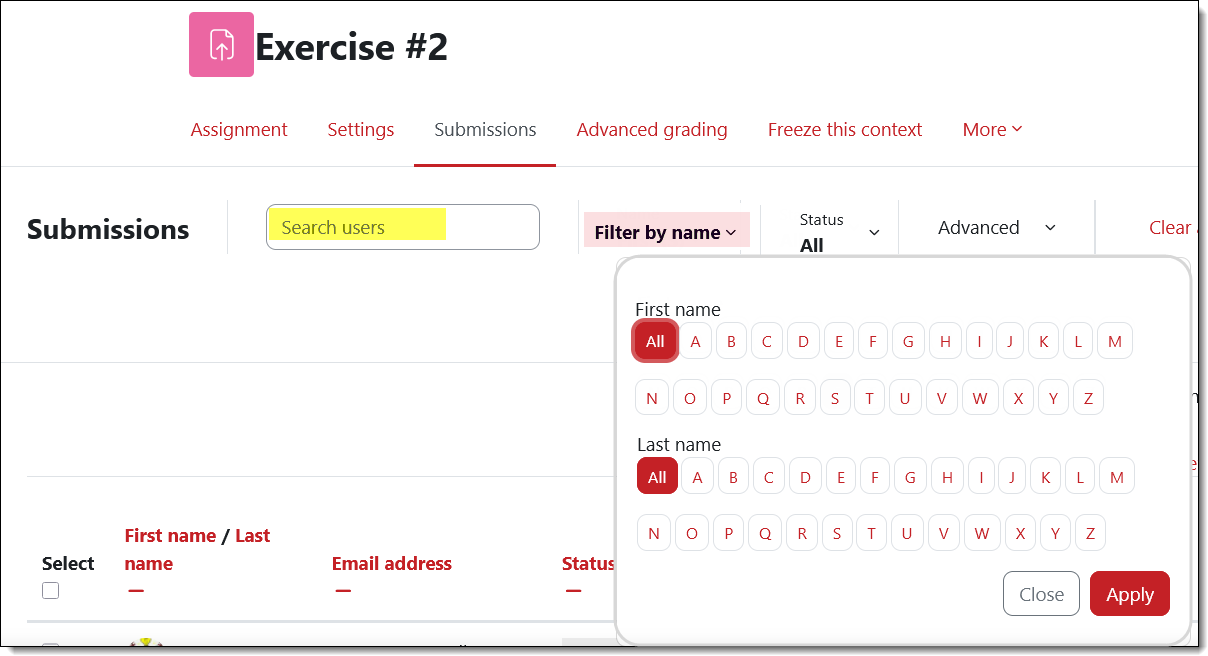
The Submissions page allows you to search for a user or filter by first or last name like the gradebook does.
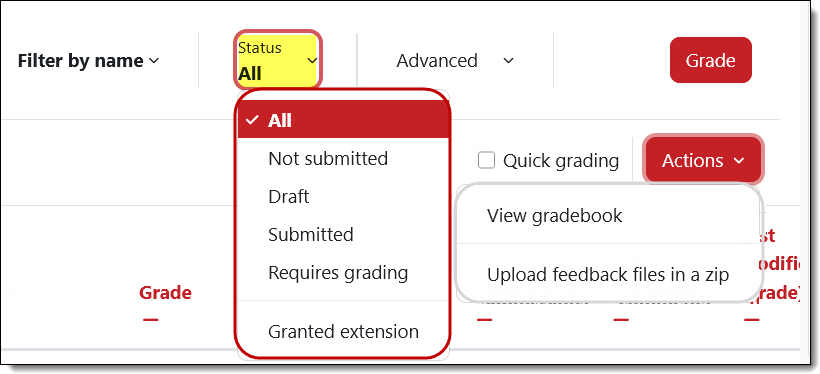
Filter by Status & More
You can filter submissions based on their status, activate quick grading to enter scores in the current page, go to the gradebook or upload feedback files. (In prior versions, these links were located at the bottom of the page, so scrolling has been reduced in this case.)
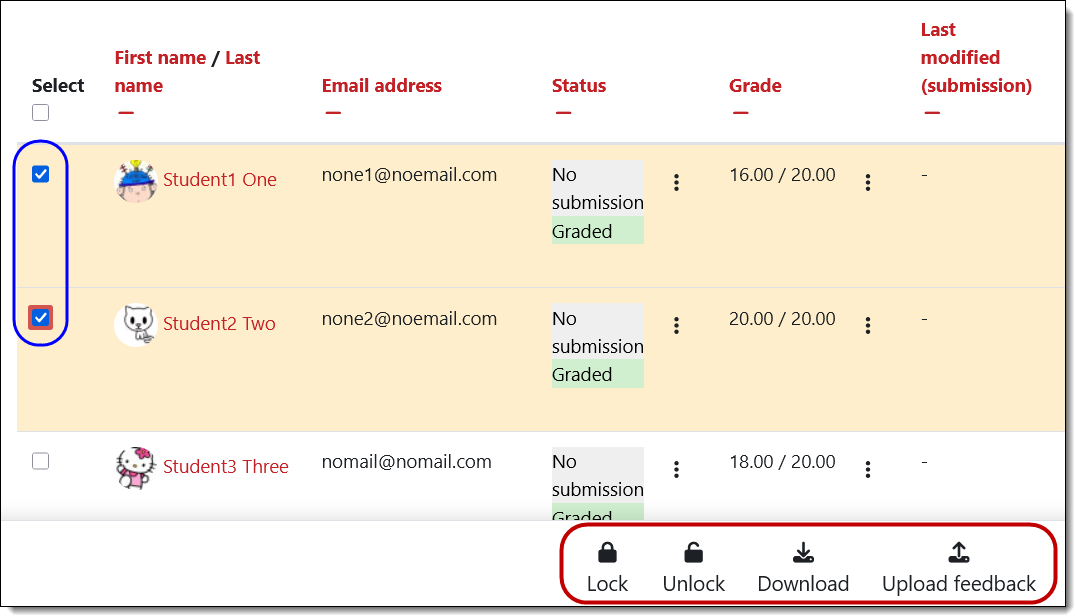
Download Submissions
Selecting specific (or all) users allows you to batch apply grading actions such as downloading submissions. Note that uploading a feedback file allows you to attach the same file to one or multiple students (try it, it’s cool!).
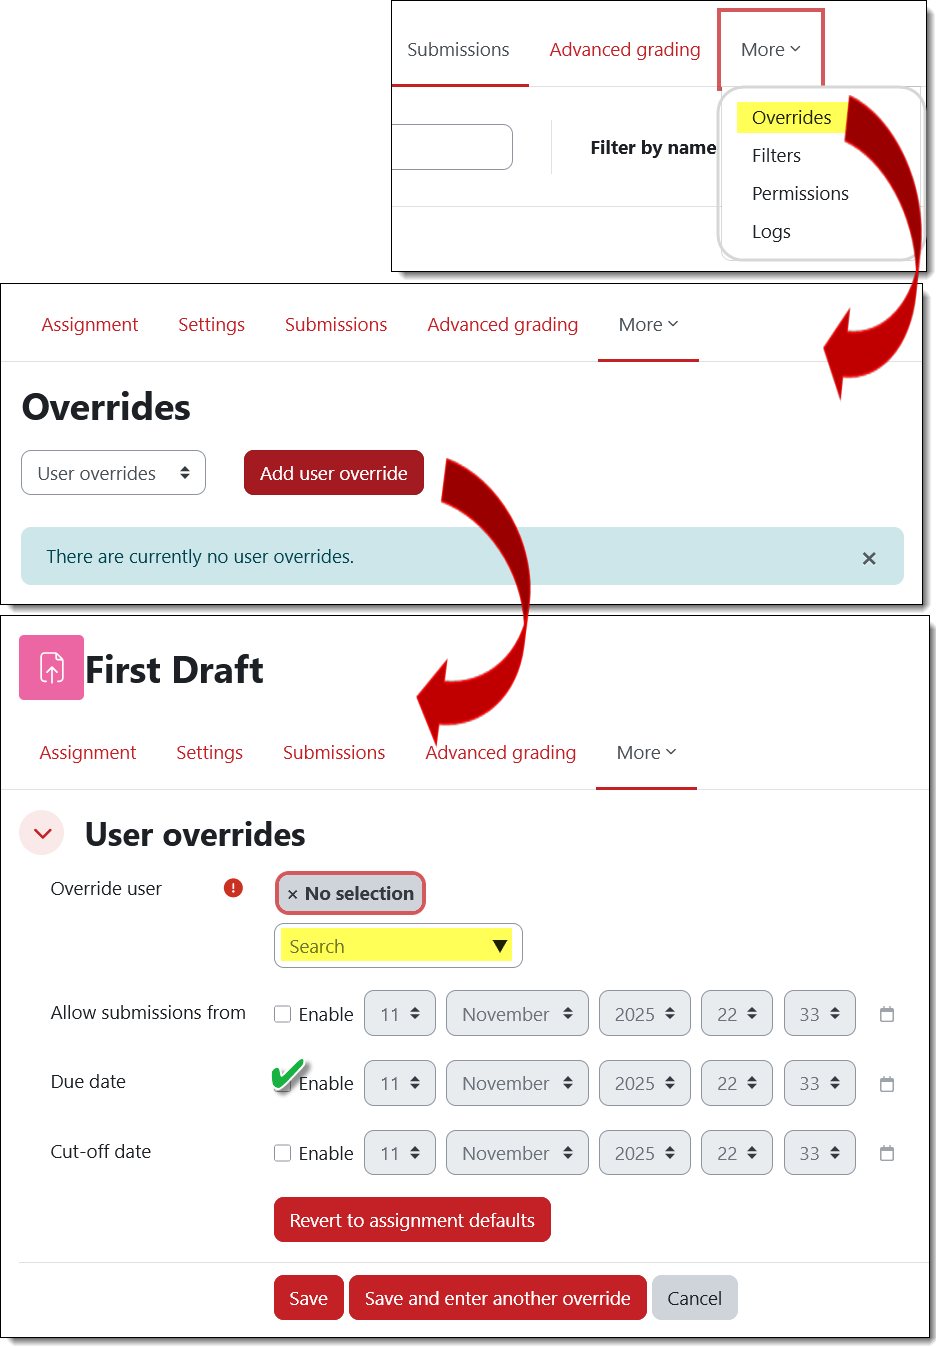
Grant Extensions
Due date overrides can be created via the assignment’s More tab. Once you have identified the student who needs an extension of the due date, enable the due date options and enter the date and time the student has been granted. (Note: You only need to enable the "Allow submissions from" option if you want to restrict students' access to the Add submission button for an assignment.)
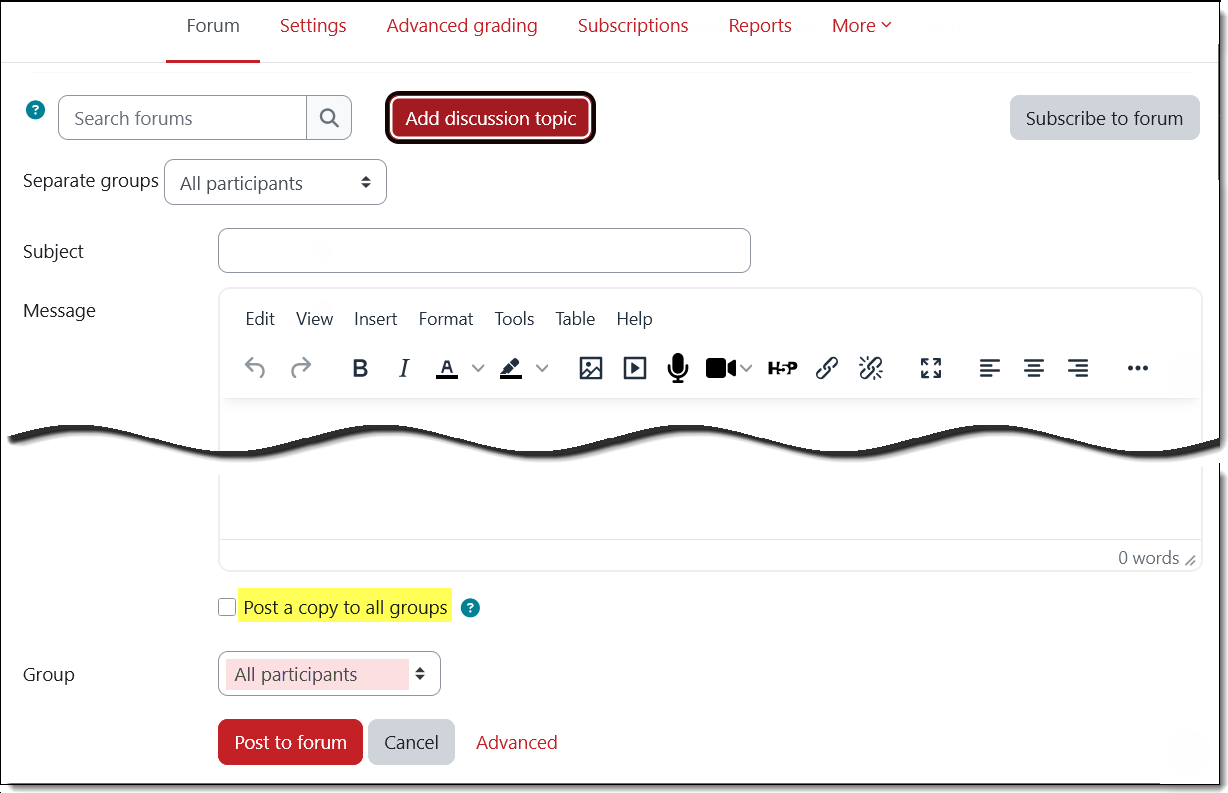
Post to Groups in a Forum
It’s always been tricky to make a forum post in every group — if you don’t open advanced settings, your post won’t work as you think it should. The Post a copy to all groups option has been positioned right where you need it — and if you want to post to just one group, there’s a pull-down menu in the same area. Win, win!
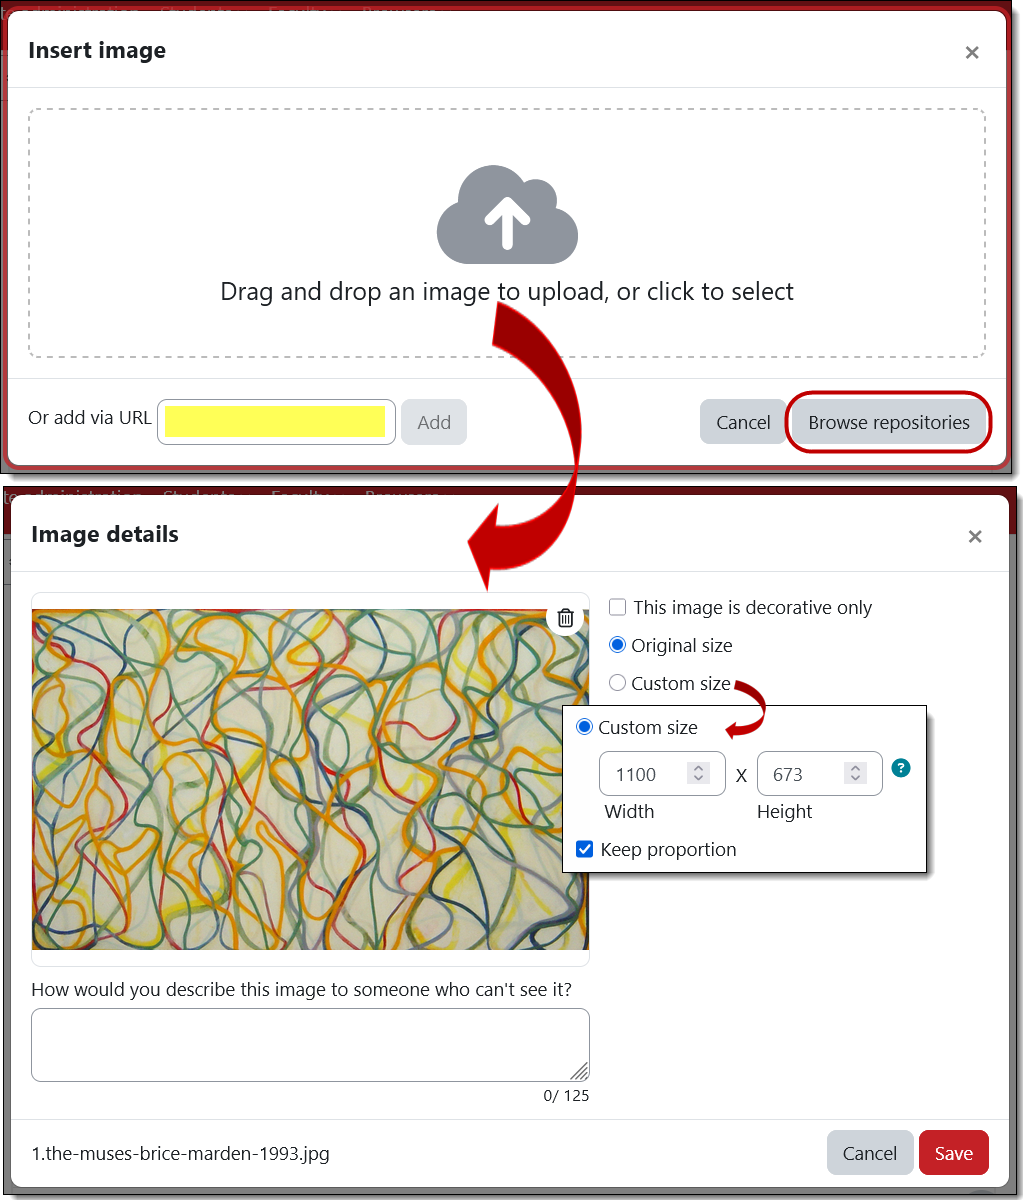
Insert Images
The interface for uploading an image has been simplified. Drag and drop an image, enter the url of an image or browse your files to select an image. Once your image appears in the Image details interface, you’ll be prompted to enter a description of it (“alt text”) or check the box that it is decorative and does not connote broader meaning (see this guide to writing alt text). For your reference, the custom sizing option is measured in pixels — there are 100 pixels to an inch. (Note for nerds: If you are accustomed to using percentages for image sizing, that is no longer supported in 4.5. 😢)
Link Textboxes
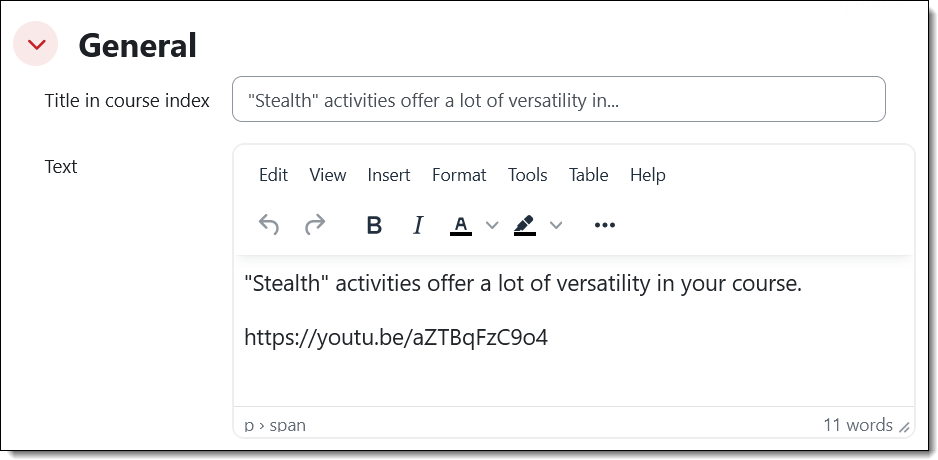
Textboxes now come with a “title” field which enables them to be included as navigational links in the course index in the left panel of your course. (Yay!)
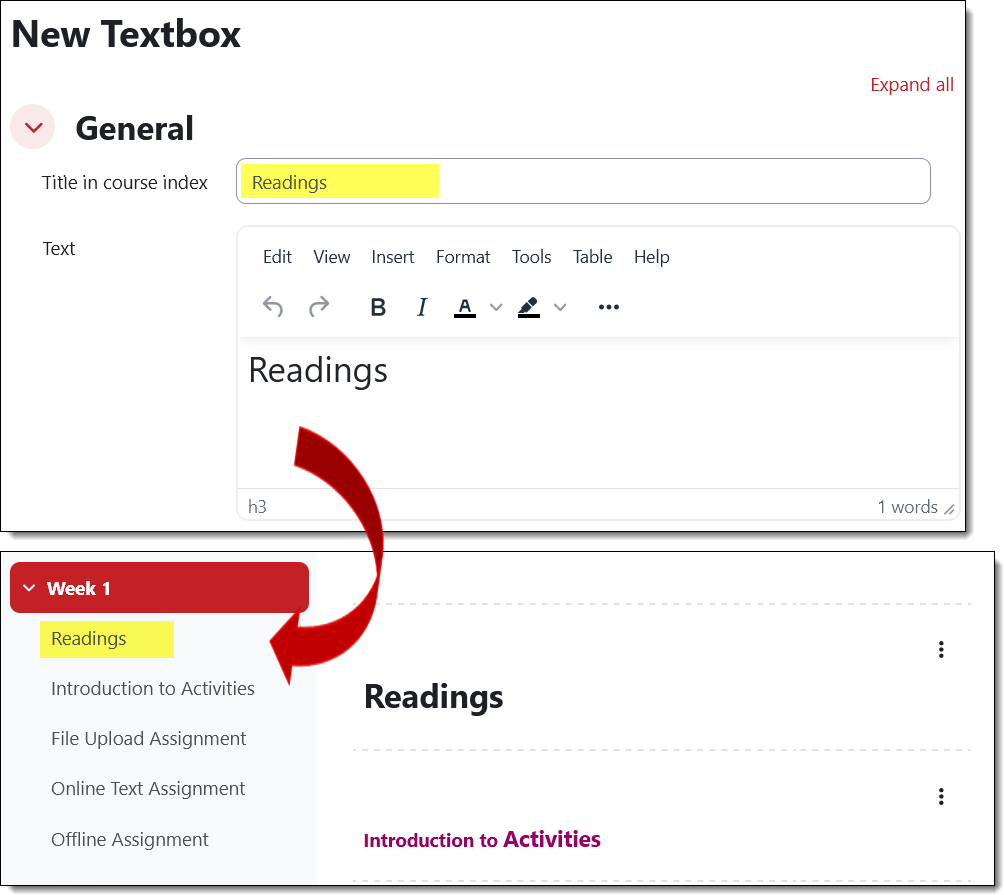
For existing textboxes, Moodle will pull the first 40-50 characters out of the textbox to serve as the title. You can edit the textbox to replace the autogenerated title.
View the Question Bank
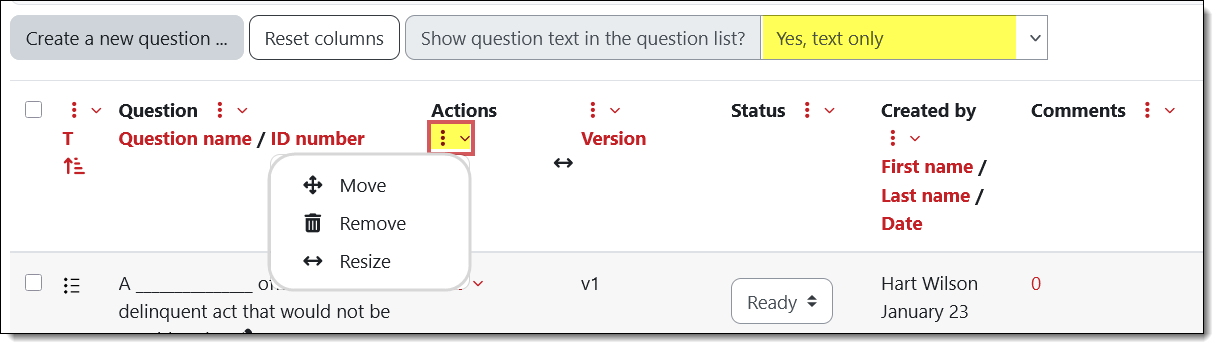
You can customize your view of questions in a question bank. Each column heading features a three-dot icon with options to move, delete or resize the column. Note that you can also choose to show the full text for each question in the list or reduce scrolling by leaving it out. See which mode works best for you in a given question list—some publisher test banks use numeric designations for question names instead of using the question text, so you'll likely want to keep the text only option activated to be able to distinguish between questions.
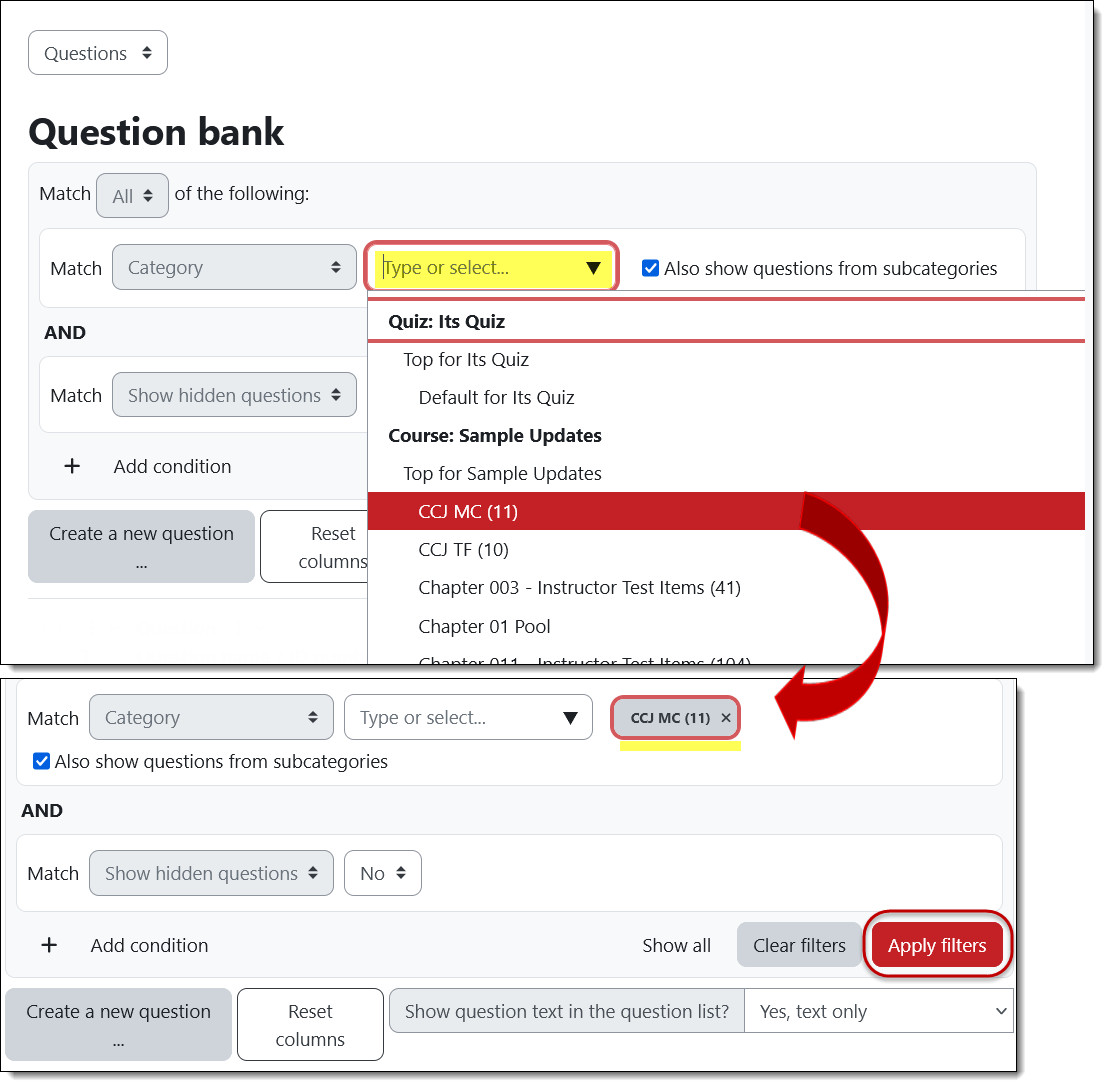
Select Questions in Testbank
The steps involved in selecting questions in a question bank to include in a quiz have changed a bit. Instead of simply choosing a category from which to pull random questions, you now need to select the question category AND click on the Filter button to select questions.
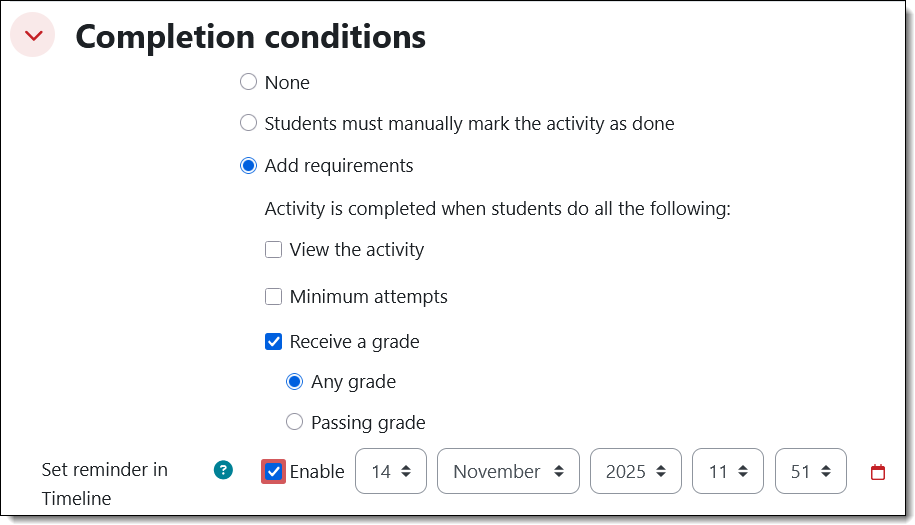
Set Reminder Date
Completion settings include the opportunity to add a completion date to student timelines. (This option was previously labeled "Expect completion by...)
So Long, It Was Good to Know You!
 Sadly, we'll be losing two activity plugins with this upgrade: Scheduler and Journal. We'll keep a lookout for updated versions that our host will confirm for inclusion in our site.
Alternatives for Scheduler: Choice, Questionnaire or good old Google form
Alternative for Journal: Online text assignment